When you deleted /lib on Linux while still connected via ssh

Let’s first not talk about why this can happen, but deleting /lib, /usr/lib, or some other essential runtime files happens quite a lot (as you can see: here, here, here, and here). In this post, I will only discuss what happens when you delete /lib on Linux and how to recover from that.

The easy solution for everything is to replace the missing files, but this can be difficult if /lib is deleted because we won’t have ld-linux, which is needed to run any dynamic executable. When you deleted /lib, all non-static executable (such as ls, cat, etc, will output):

No such file or directory

You will also be unable to open any new connection using ssh, or open a new tmux window/pane if you are using tmux. So you can only rely on your current shell built in, and some static executables that you have on the system.

If you have a static busybox installed, then it can be your rescue. You can use wget from busybox to download libraries from a clean system. For your information: Debian has busybox installed by default, but the default is not the static version.

Minimal Debian install

If you are worried that this kind of problem might happen to you in the future: Install the static version of the busybox binary, and confirm that it is the correct version.

Installing static busybox
Continue reading “When you deleted /lib on Linux while still connected via ssh”

Raspberry Pi for Out of Band Linux PC management

Just a day before I left to Indonesia for my brother’s wedding, I got worried about my headless Linux PC server: it may freeze when I left it. It happened before because of kernel panic and hardware error, it can happen again. I want to be able to reset the PC in case of errors and to power it down in case the error was not recoverable (for example last year my disk drive went bad).

Just a note before reading this: in case you just want to turn on or off a PC using raspberry PI: just use wake on LAN (WOL) to turn on your PC and SSH access to turn it off. Wake on LAN works most of the time, but it can not handle a PC that is not responding.

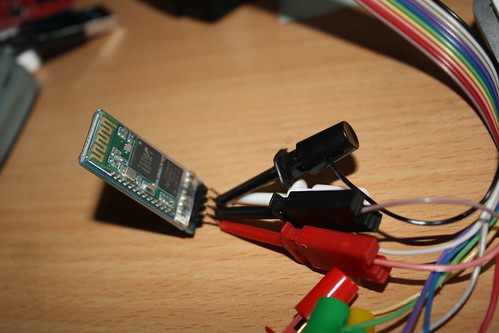
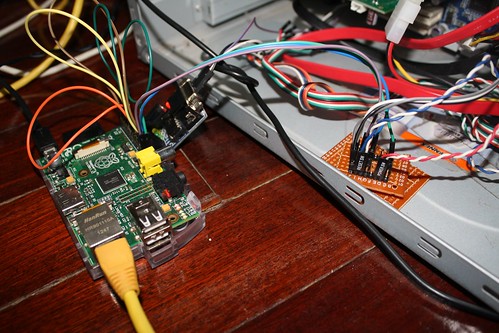
I soldered 2 optocouplers that I have (4N25) to a small perfboard with a pin header. Then I use solderless breadboard cables to connect the board to Raspberry Pi, and to the PC power and reset button (so I can manually turn on/off using the power/reset button on the PC).

4n25

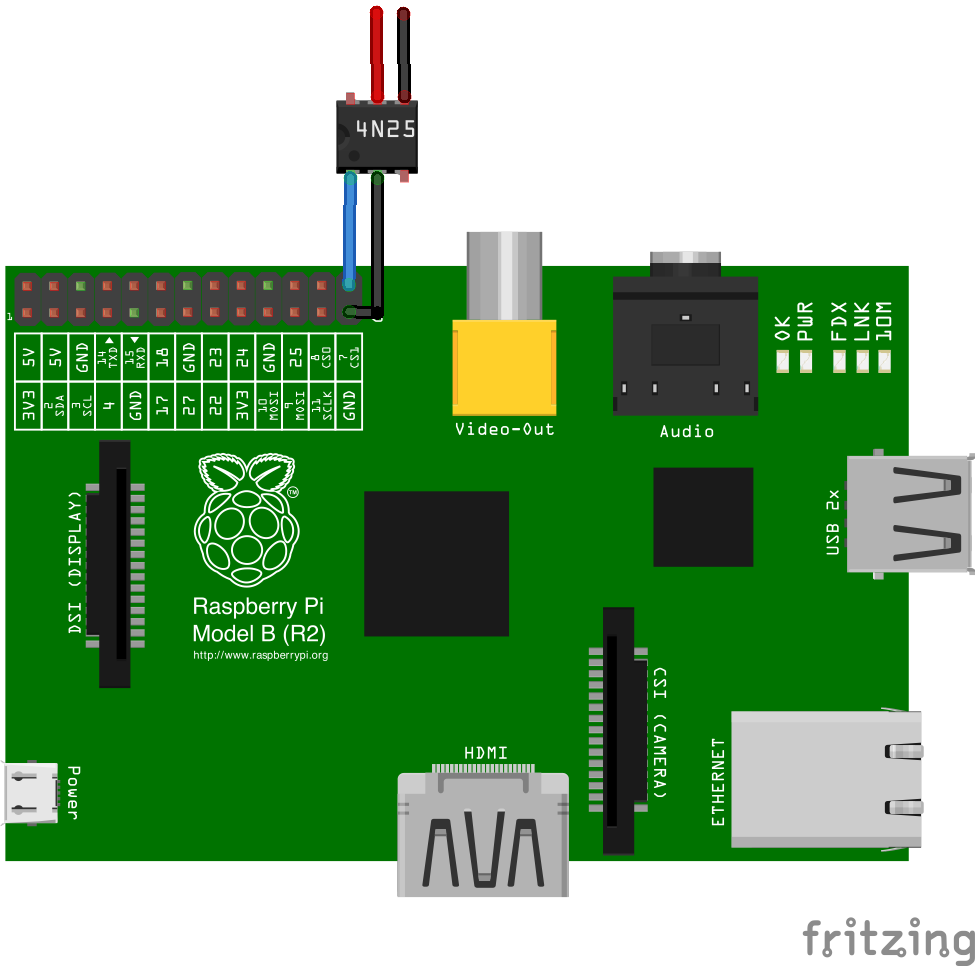
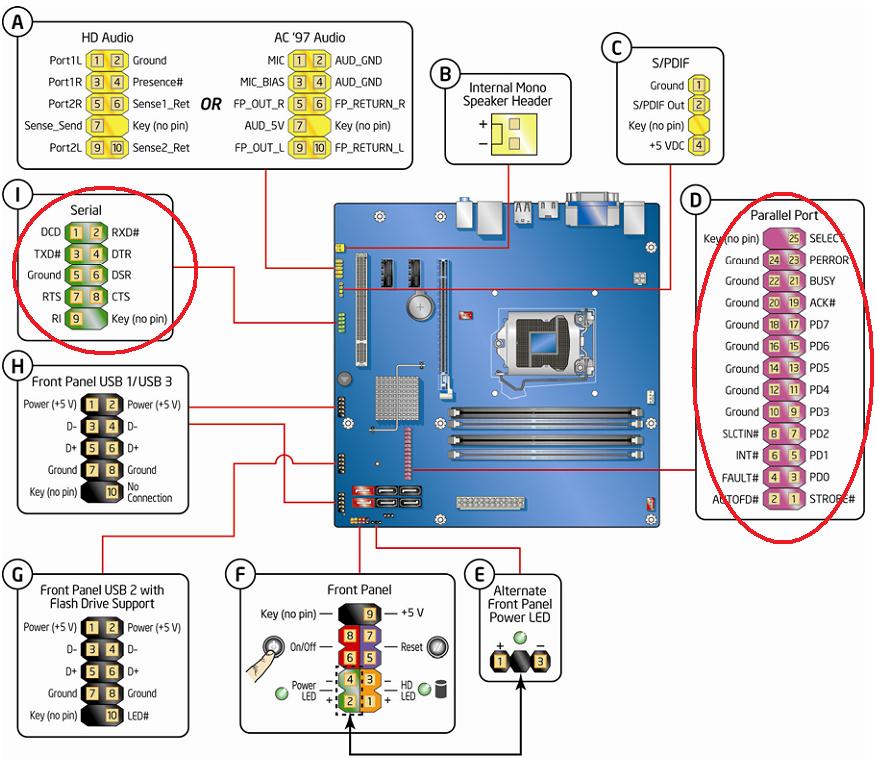
Watch carefully about the + and – on the motherboard (PW is for power, and RES is for reset, note the polarity is important for the optocoupler, on the picture above: Red goes to + and Black goes to -):

I could just have used one optocoupler to connect to the power button (the reset is not really necessary, because we can turn off and on the PC again to reset), but I just want to use the extra 4N25 that I have (it’s really cheap, 5.5 baht or around 17 cents USD).

To reset the PC, I just set the GPIO pin to high for about one second, then set it low again. To power up the PC, I set the GPIO pin to high for about 5 seconds, and set it low again (the same can be used to forcefully power down the PC).

Resetting and powering the PC is easy, the next task is to know what happened if the PC crashed. To do this, I need a serial connection. If my PC has a serial port and I have a USB to serial cable, then everything will be much easier, but since I don’t have a USB to serial cable, and my PC doesn’t have a serial port on the back, it gets a bit complicated.

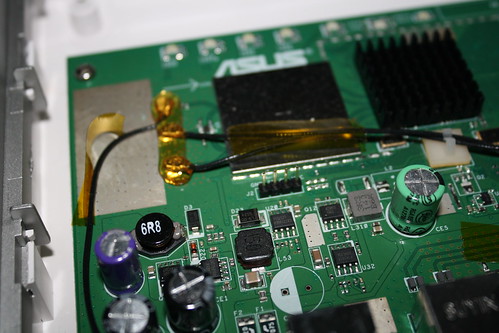
I still have a small board based on MAX3232CPE to convert from 3.3V serial to 5.0 V, so I plugged that board to Raspberry Pi and connected it directly to the PC motherboard. This page helped me in finding the pin names (I only need to connect RX, TX and GND).

mb

On the Raspberry side, I need to set up so that it will not use the serial port for kernel output and log in. You can follow the guide here.

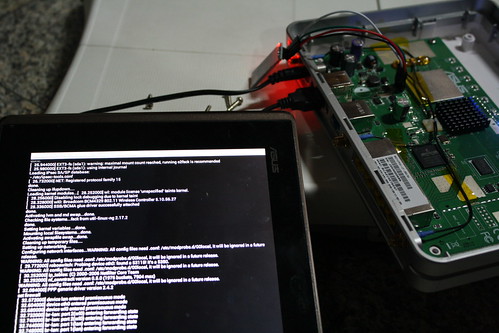
On the PC side, I need to activate serial output in three places: to accept login (getty), to get the kernel output (kernel parameters in grub), and in grub itself (to show the boot selection dialog). This guide for Debian works for me, but I was not able to see the GRUB output on screen when I connected my screen (I can only see the output on my serial console, but this was not a problem for me).

I experimented a little bit with SGABios Hoping that I would be able to see BIOS output from my serial port. It didn’t work as expected. I can not see the initial BIOS screen, and I can not send a key to enter BIOS setting, but If I connect a keyboard and press a button to enter the BIOS, I can see the BIOS menu via serial port and I can interact with it.

Here are the steps that I tried to get the BIOS serial output: I downloaded the BIOS for my motherboard (an AWARD BIOS). Then on a windows machine, I modified the BIOS using CBROM cbrom bios.bin /isa sgabios.bin. Then I flashed the BIOS from Linux using Flashrom.

I didn’t solve the BIOS problem due to time constraint. There are several solutions that I can think of to solve this: one is to use CoreBoot (but unfortunately my motherboard is not supported by coreboot), another one is to try to do more hacking on the BIOS (maybe removing the VGA ROM to force the output to serial port) and the other one is to simulate a keypress to enter BIOS. The first two methods may not be portable across BIOS, but the last one should be portable. The key simulation can be done by simulating a PS2 device (using bitbanging on Raspberry Pi), or USB HID device. A super simple USB HID device can be made by using V-USB library (you can see this as an example).

Just a few hours before I left, I have an idea to connect a temperature sensor just to see if the temperature around the PC case is too high. We are entering the summer here in Chiang Mai and the outside temperature is getting higher every day (from November to beginning of February, the temperature was around 8-20 Celcius, and now it is around 17-37 Celcius). It was quite easy to add the temperature sensor, I just use the guide and driver from adafruit. Next time I may add an infrared LED on the Raspberry Pi to turn on the Air Conditioner when it gets really hot.

Having everything setup: nothing happened while I was away. The PC was running nicely (and I can access the PC via SSH and the serial console).

Adding Bluetooth Serial Port to Asus RT-N16

I am running DebWrt on my Asus RT-N16 and it works well. The only problem that I have is: in case I misconfigure something and the device is inaccessible via the network, I need to open the case then connect a serial port to fix it. Because the configuration is in USB, I don’t have to open the case very often, in most cases, I can unplug the USB disk, mount it in my Linux machine, try to fix the configuration, plug the USB again, restart the router, and hope that my fix works. Either way, both are such a hassle.

I could have added a serial port just like my DIR-300 mod, but I think it’s not the best solution. Because I still need to bring down my router, find my serial cable, plug it in and connect to it. I wish that the device has a Bluetooth capability, so I can connect to it (via Bluetooth serial port profile), fix any problem that it has, and without moving or plugging anything, and hopefully I don’t even need to restart the router and wait for it to boot.

So I bought a 7.32 USD bluetooth module from Aliexpress and installed it on my RT-N16. Some of you may think that it is a bad idea because Bluetooth interferes (somewhat) with WIFI, but I don’t plan to keep constant connection via Bluetooth, and when I do make the connection, the data that I am transferring is very small (maybe just several kilobytes per minutes). So far in my testing, when connected via Bluetooth, I didn’t notice any speed difference in WIFI transfer speed (even when transferring large files via WIFI) and typing furiously from my Bluetooth terminal. Asus RTN16 only supports 2.4 GHz, but If your router supports 5GHz, I think you should use that band to eliminate any possible interference.

Asus RT-N16 has a serial header ready to be connected (it even has labels on it, GND, RX, TX, VCC):

IMG_4476

But before plugging in the module, I need to set the speed of the Bluetooth serial module to 115200, because the default speed is 9600. To set up the Bluetooth serial module, we need to connect it to a computer via serial port (I am using Bus Pirate for this).

My version of Bluetooth module is H-C07, and for this version, the device doesn’t use \r or \n to terminate command, it just uses time out to end a command (a complete command must be received within few hundreds millisecond). Typing very-very quickly in your terminal won’t work, so just copy and paste the command from your text editor. The command needed to set the Bluetooth module to 115200 is “AT+BAUD8”. These Bluetooth modules usually don’t come with documentation, so you need to look on the internet for your specific version.

Bluetooth

One of the nice thing about Bluetooth is: it is accessible from non-PC devices. After connecting the cables, I can connect to my router using Android Bluetooth SPP

Using Bluetooth SPP as console on Android

One thing to note: the Bluetooth module needs time to initialize, so it can not be used for accessing the bootloader. To restart the router, I need to plug and unplug the power cable. So the Bluetooth module will lose its connection when I restart the device. By the time the Bluetooth module is ready, the bootloader has already passed and you will be in the middle of Linux booting.

If you really want to use the Bluetooth module to access the bootloader, you will either need a separate power source for the Bluetooth module, or make a special reset button for the router (that doesn’t involve unplugging and plugging the device, and doesn’t cut power to the Bluetooth module).

STAR9104: Linux Kernel 2.6.29 and Starting FreeBSD port

I’ve finally updated my patch to 2.6.29, the patch can be downloaded from:
http://tinyhack.com/agestar/patch-2.6.29-star.gz

and the config file:

http://tinyhack.com/agestar/config-2.6.29-star

or if you want the image that i already compiled and test (image is compiled with 32 MB memory). This is NOT a FIRMWARE

http://tinyhack.com/agestar/zImage-2.6.29

when i have the time, i will work on creating a new firmware image.

Some changes:

  • The machine ID is now registered in http://www.arm.linux.org.uk/developer/machines/
  • The network problem instability has now been fixed
  • Added new configuration option to select memory size based on your board memory (16, 32, or 64 mb). Note: selecting values larger than the supported size will cause crash.

The other news is that Bruce M Simpson has donated me an Emprex NSD 100 for porting FreeBSD to it. I have started my work, but the progress will be slower from the Linux at the beginning, because:

  1. I am more familiar with Linux kernel compared to FreeBSD kernel
  2. Currently FreeBSD kernel itself doesn’t support many ARM devices yet, so to find an exmple of something I need to look at NetBSD, (and it helps, for example the Faraday 526 processor support is already in NetBSD).
  3. I am rather busy this and coming month (planning to go to Indonesia for about 10 days)

Update – Debian on Agestar Firmware

Warning/Note: This is not an update to the existing firmware. This is for installing Debian. If you don’t know anything about Linux, this is not for you. This firmware DOES NOT contain web interface.

I haven’t looked again on Debian installer for Agestar, but I have built a new firmware for Debian on Agestar using the latest kernel patch (faster network). If you have installed Debian using the instruction in here, you can download zImage-20092008 to Agestar, and then do:

dd if=zImage-20092008 of=/dev/mtdblock1

If you haven’t installed Debian, then when following the instruction, but instead of using star.bin use star-20092008.bin. To make it clear, use zImage-20092008 to update existing installation, and star-20092008.bin for new installation (starting from the original Agestar firmware). If you made a mistake, then you need a serial port to unbrick your Agestar. NOTE: the web update method only works on agestar, other models can work by using serial port and latest patch for kernel source (2.6.29 or later).

If you are interested to make your own firmware, this is what you should do:

  1. Download armboot.bin and put it to a directory
  2. Download mergefile.c to the same directory as armboot.bin
  3. Compile mergefile.c (just do cc mergefile.c -o mergefile)
  4. Compile your kernel according to the instruction at http://tinyhack.com/2008/09/08/how-to-compile-kernel-for-agestar/ to create zImage, copy/move it to the same directory as armboot.bin
  5. Type ./mergefile to merge armboot.bin and zImage to star.bin.

You can use star.bin to flash (replace) original firmware. If you already installed Debian, and you want to update your kernel, you only need to build zImage and do dd if=newzImage of=/dev/mtdblock1.

Installing Debian on Agestar without serial port

I have prepared a firmware and tutorial to Install Debian here, this time without the need for serial port. I have tested this, and it seems that everything works. But of course I will not be responsible if anything happens. If you think there are some missing, unclear or inaccurate steps, or if you doubt about something, then don’t install it. If you have anything to ask just email to yohanes [at] gmail.com, or just post your questions as comments.

NOTE: the web update method only works on agestar ncb3ast, other models can work by using serial port and latest patch for kernel source (2.6.29 or later).

New Firmware Progress

My wife agrees that I can buy another Agestar to hack and use the other one for our network storage. With this new Agestar I can continue my hacks. Currently I am working on building a firmware that can be used to install Debian without serial port. On the first stage, I will build a generic firmware without automatic installer, so the user still needs to do some manual steps to install Debian. So it is something like the manual Debian install on NSLU2 (http://www.cyrius.com/debian/nslu2/unpack.html).  Actually because this is generic command line, you would be able to install Gentoo or something else. The next step would be to make an automatic installer like in NSLU2(http://www.cyrius.com/debian/nslu2/install.html).

The main reason why I started with manual installer is because I am not yet familiar with the Debian installer. Currently the manual installer is almost complete, I just need to test it thoroughly to make sure that this will really works without serial port. I hope I can release this in the next few days (or this weekend at the latest).

Network Driver Problem Solved

I ported STAR 9100 network driver without a documentation, I just blindly use the old driver and modify it to fit with all of the changes in the networking stuff since kernel 2.4.27. The driver claims to support scatter/gather I/O, but there is no implementation of scatter gather I/O in the hard_start_xmit function. I don’t know whether this device supports it or not, so I just change this line:

dev->features |= NETIF_F_SG|NETIF_F_IP_CSUM

to this:

dev->features |= NETIF_F_IP_CSUM

http://tinyhack.com/agestar/patch-2.6.25.4-for-agestar-20080622.bz2

And now the sendfile function works (although it would be faster if the driver supports scatter/gather IO).

Debian Installation

This is the latest patch (add NAPI to the network driver):
http://tinyhack.com/agestar/patch-2.6.25.4-for-agestar-20080621.bz2

I have uploaded the instruction on how to install Debian on Agestar NCB3AST at:

http://tinyhack.com/agestar/

I am also testing exposing my Agestar NCB3AST to the world, I have installed a web server on my device. The same information above can be accessed at:

http://irina.homelinux.com/

Please note that the later URL may not always available. First, my bandwidth is limited, and second, sometimes I still develop and/or test something on it that needs restarting the device.

Debian Etch on Agestar NCB3AST

Powered By DebianFirst the bad news: the network driver in the new kernel is not performing very well, if i remember correctly, this is about twice slower than the original kernel. The maximum speed is around 2.75 mb/s for FTP , 1.4-1.50 mb/s for SAMBA, and 618 kb/s for SSHFS. I have tried implementing NAPI (I will upload the patch soon), but it doesn’t help very much. I have tried to optimize the kernel settings, but no luck so far.

Now, the good news: I have been able to install Debian Etch for ARM in my Agestar using the instruction in here: http://wiki.dns323.info/howto:install_debian. Of course there are differences in booting, and configuring stuff, but the steps to produce the root file system are the same. I have also managed to write new kernel to the flash (by using dd if=bootpImage of=/dev/mtdblock1), so now my agestar will go directly to Debian when i turned it on.

I will clean up the code, and write the instruction on how to install Debian this weekend.