I recently helped a company recover their data from the Akira ransomware without paying the ransom. I’m sharing how I did it, along with the full source code.
The code is here: https://github.com/yohanes/akira-bruteforce
To clarify, multiple ransomware variants have been named Akira over the years, and several versions are currently circulating. The variant I encountered has been active from late 2023 to the present (the company was breached this year).
There was an earlier version (before mid-2023) that contained a bug, allowing Avast to create a decryptor. However, once this was published, the attackers updated their encryption. I expect they will change their encryption again after I publish this.
You can find various Akira malware sample hashes at the following URL:
https://github.com/rivitna/Malware/blob/main/Akira/Akira_samples.txt
The sample that matches my client’s case is:
bcae978c17bcddc0bf6419ae978e3471197801c36f73cff2fc88cecbe3d88d1a
It is listed under the version: Linux V3. The sample can be found on virus.exchange (just paste the hash to search).
Note that the ransom message and the private/public keys will differ.
We do this not because it is easy, but because we thought it would be easy
I usually decline requests to assist with ransomware cases. However, when my friend showed me this particular case, a quick check made me think it was solvable.
From my initial analysis, I observed the following:
- The ransomware uses the current time (in nanoseconds) as a seed.
- On my Linux machine, file modification times have nanosecond resolution.
- They provided a screenshot of a partial log (
shell.log), showing when the ransomware was executed, with millisecond resolution.
Based on this, my initial thought was: “This should be easy—just brute-force it by looking at the file timestamps. How hard can it be?”

I’ll explain in more detail, but it turned out to be more complicated than expected:
- The malware doesn’t rely on a single moment in time but uses four moments, each with nanosecond resolution. The fist two and last two are related, so we can’t just bruteforce the time one by one. Key generation is complex, involving 1,500 rounds of SHA-256 for each timestamp. Each file ends up with a unique key.
- The VMware VMFS filesystem only records file modification times with second-level precision.
- Not all ESXi hosts have millisecond resolution in their log files, some only log with second-level precision. I am still unsure what configuration file causes this different behavior
- The malware uses multiple threads during execution.
- The file modification time reflects when the file is closed, not when it is opened for writing.
Reverse Engineering
The code is written in C++, which is notoriously difficult to read, but fortunately, it wasn’t obfuscated. The binary is statically linked (a bit harder to analyze), but all strings are in cleartext. The error messages indicate that the Nettle library is used, which made understanding the code much easier.
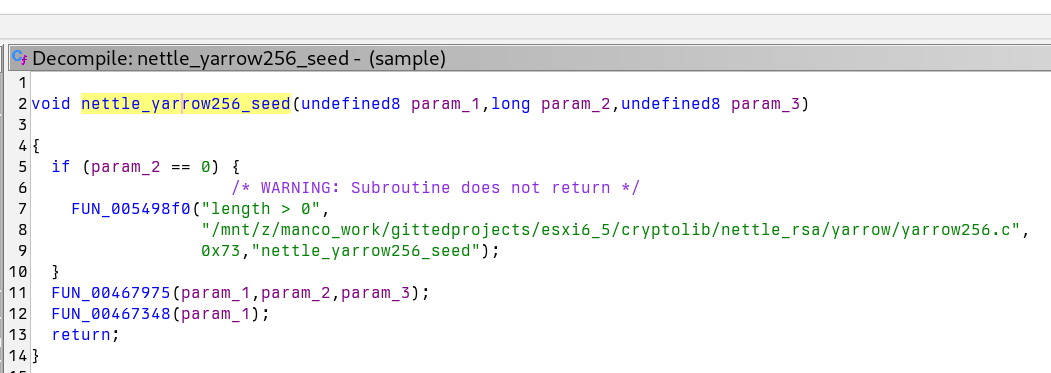
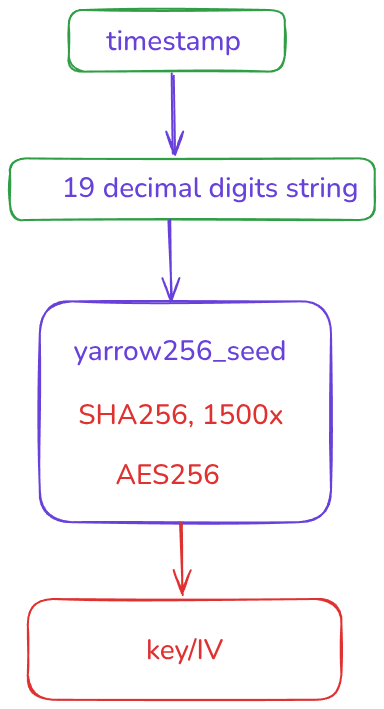
The code to generate random is like this (the actual code is in 0x455f40 in the binary)
void generate_random(char *buffer, int size)
{
    uint64_t t = get_current_time_nanosecond();
    char seed[32];
 //in the real code, it uses C++ code to convert int to string
    snprintf(seed, sizeof(seed), "%lld", t);
    struct yarrow256_ctx ctx;
    yarrow256_init(&ctx, 0, NULL);
    yarrow256_seed(&ctx, strlen(seed), seed);
    yarrow256_random(&ctx, size, buffer);
}
The random generator is implemented in yarrow256.c. Here is the relevant code, with unnecessary parts removed. As noted in the comments:
The number of iterations when reseeding, P_t in the yarrow paper. Should be chosen so that reseeding takes on the order of 0.1-1 seconds.
void
yarrow256_seed(struct yarrow256_ctx *ctx,
	       size_t length,
	       const uint8_t *seed_file)
{
  sha256_update(&ctx->pools[YARROW_FAST], length, seed_file);
  yarrow256_fast_reseed(ctx);
}

void
yarrow256_fast_reseed(struct yarrow256_ctx *ctx)
{
  uint8_t digest[SHA256_DIGEST_SIZE];
  unsigned i;
  sha256_digest(&ctx->pools[YARROW_FAST], sizeof(digest), digest);
  /* Iterate */
  yarrow_iterate(digest);
  aes256_set_encrypt_key(&ctx->key, digest);
  /* Derive new counter value */
  memset(ctx->counter, 0, sizeof(ctx->counter));
  aes256_encrypt(&ctx->key, sizeof(ctx->counter), ctx->counter, ctx->counter);
}

/* The number of iterations when reseeding, P_t in the yarrow paper.
 * Should be chosen so that reseeding takes on the order of 0.1-1
 * seconds. */
#define YARROW_RESEED_ITERATIONS 1500


static void
yarrow_iterate(uint8_t *digest)
{
  uint8_t v0[SHA256_DIGEST_SIZE];
  unsigned i;

  memcpy(v0, digest, SHA256_DIGEST_SIZE);

  /* When hashed inside the loop, i should run from 1 to
   * YARROW_RESEED_ITERATIONS */
  for (i = 0; ++i < YARROW_RESEED_ITERATIONS; )
    {
      uint8_t count[4];
      struct sha256_ctx hash;

      sha256_init(&hash);

      /* Hash v_i | v_0 | i */
      WRITE_UINT32(count, i);
      sha256_update(&hash, SHA256_DIGEST_SIZE, digest);
      sha256_update(&hash, sizeof(v0), v0);
      sha256_update(&hash, sizeof(count), count);

      sha256_digest(&hash, SHA256_DIGEST_SIZE, digest);
    }
}
Seed and encryption
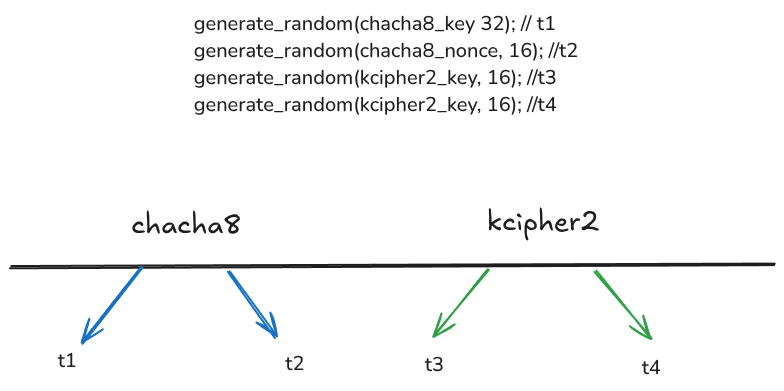
The ransomware calls the random generator four times:
generate_random(chacha8_key 32);
generate_random(chacha8_nonce, 16);
generate_random(kcipher2_key, 16);
generate_random(kcipher2_key, 16);
Each generate_random call uses the current nanosecond timestamp as a seed. Therefore, there are four unique timestamps that need to be identified. The ransomware generates different keys for each file.
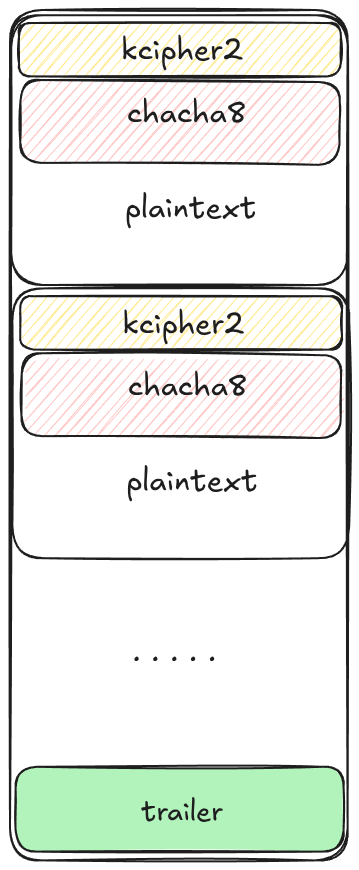
These keys are then saved at the end of the file as a trailer, encrypted with RSA-4096 and padded using PKCS#11 padding.
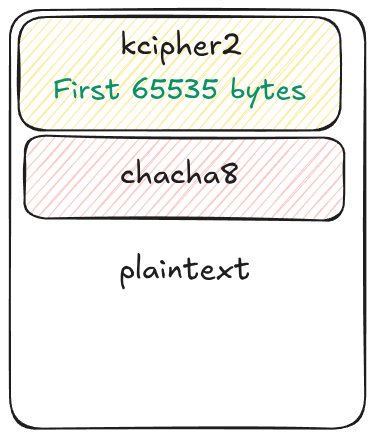
The files are divided into N blocks, and a percentage of each block is encrypted. This percentage is defined by the ransomware’s -n parameter. For each block:
- The first 0xFFFF bytes are encrypted using KCipher2.
- The remaining bytes are encrypted using Chacha8..
The following picture shows how a file is split. Note that, for very small files, knowing the Chacha8 key and IV isn’t necessary..
After studying various VMware filetypes (I will go deeper into this later), I am convinced that the most important files (flat VMDK and sesparse files) has a fixed header, and I can use that to attack the encryption.
Other details
At this point, I didn’t analyze deeper. But I am sure that I can reverse engineer the rest of the algorithms later, specifically:
- How to split the file into blocks
- How is the encryption performed across blocks, does it continue the stream?
These details will be important later. However, for now, if we can’t successfully brute-force the timestamps, none of the other steps will matter.
Bruteforce feasibility
The approach is as follows:
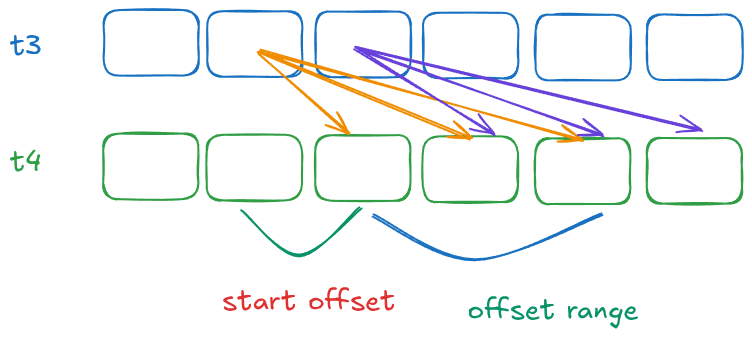
- Generate two timestamps (
t3andt4). - Convert these timestamps into seeds and generate random bytes.
- Use these bytes as the KCipher2 key and IV.
- Encrypt known plaintext and compare the result with the known ciphertext from the encrypted file.
Lets make a plan:
- Check feasibility: Determine if brute-forcing is fast enough to be practical.
- Identify the plaintext: Known plaintext is required for brute-forcing.
- Estimate the seed initialization time: We need to know when the encryption seed was initialized, at least with second-level precision. This knowledge can reduce the brute-force scope to about 1 billion values.
The simplest (but inefficient) way is to try all possible timestamp pairs where T4 > T3. The number of possible pairs is calculated as: N×(N−1)/2
With N = 1 billion, that results in 500 quadrillion possible pairs.
We need to optimize this. First we need to convert all the nanoseconds in a one-to random values:
- On my mini PC CPU, I estimated a processing speed of 100,000 timestamp to random bytes calculations per second (utilizing all cores).
- This means it would take about 10,000 seconds (under 3 hours) to convert all timestamps to seed values.
- Once converted, these values can be saved for reuse.
- Later, I optimized the process using a GPU, reducing the conversion time from 3 hours to under 6 minutes.
If we have a completely deterministic machine, without any interruption, we can run the malware, measure it, know the exact time between T3 and T4. But unfortunately we don’t have this:
- The malware uses multiple threads,
- It runs on a machine that is not idle, the distance between T3 and T4 varies based on the scheduler and how busy the system at that time.
- The code also calls a lot of C++ libraries, which allocates and deallocates objects and makes the execution time more unpredictable.
To be clear:
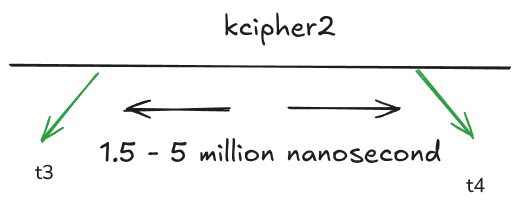
- we need to enumerate t3 (1 billion values for each second)
- we dont start at t3 + 1, but at t3 + start offset, since we know that seeding the value takes time (at least a million nanosecond on my machine), this is the “start offset“
- we assume that it will only take a few million nanosecond to until the next code is executed (remember: there can be interruptions because of the CPU scheduler, and there are several millions instructions executed). This is the “offset range” value
What we can do is to try to run the exact same code as the malware, collect timing data, and try to find a range that statistically makes sense. Using the same technique that I use on my previous post, instead of recreating the algorithm and running it, I just modified the malware and tested on several local machines that I have. The runtime varies quite a lot between machines.
My friend Deny went to the datacenter and did the test on the real hardware that was infected. The result is: the time range varies, and sometimes quite a lot. The normal range of the offset is around 2-4 million nanoseconds (so the offset range is 2 million), but the value varies from 1.5 – 5 million (total offset range is 4.5 million).
We still need to enumerate 4.5 quadrillion pairs, but this appears to be doable. If we have a system capable of running 50 million encryptions per second, the process would take a few hundred days. However, with 16 such systems, we could complete it in a few months on a CPU. By renting additional machines, we could speed up the process even further. Later, I optimized this using a GPU, achieving a significant speed improvement.
I wasn’t sure about how fast we can do Kicpher2, but a quick comparison with chacha, and some quick benchmarking shows that using CPU ony, I should be able to do at least millions of Kichper operations per second on my machine.
As explained before, if t3 and t4 are correct, we will be able to decrypt the first 8 bytes of the file, and it will decrypt to a known plaintext.
Next lets check the feasibility of obtaining plaintext from different VMware files
VMWare File Types
For each file, we need a plaintext sample: the first 8 bytes of the file for KCipher2 (offset 0) and another 8 bytes starting from offset 65,535 (only for large files). Since each block of KCipher2 is 8 bytes, we should use an 8-byte plaintext. It is possible to use fewer bytes (by using bit masking), but this could increase the risk of false positives.
Flat-VMDK
This is a raw disk file. If you’re lucky, this might be the only file you need to recover. However, if snapshots were made (as in this client’s case), the new data would be written to sesparse files.
To obtain the first 8 bytes of the flat VMDK, you’ll need to install the same OS that was used on the original VM. There are several variations of bootloaders used by different OS versions.
To determine which OS was used, check the corresponding VMX file. It should contain partially readable plaintext, allowing you to inspect the configuration for “guestOS”. You might find something like: guestOS=”ubuntu”. However, ideally, you already have documentation regarding which OS was used for each VM, so you don’t have to rely on this method.
For the bytes at position 65,535 (plaintext for Chacha8), it is almost always guaranteed to be zero, since the partition typically starts at a later sector.
Sesparse
If you create snapshots for your VM, there will be a SESPARSE file for each snapshots. We can see the file format from the QEMU source code.
https://github.com/qemu/qemu/blob/master/block/vmdk.c
The file header is 0x00000000cafebabe, and at position 65,535, it should be 0x0 (at least, that’s what I observed in my analysis).

Other files
Other files are not critical for restoring a working VM, but for initial testing, understanding the time distribution can be helpful. If there are many small files with the same timestamp, it’s useful to know if they cluster within a specific timestamp range.
Here are some common file signatures to identify plaintexts:
- NVRAM files start with: 4d 52 56 4e 01 00 00 00
- VMDK files (disk descriptor) start with the string:
# Disk Descriptor - .VMX files start with:
.encoding - VMware log files have lines starting with the format:
YYYY-MM-DD
Since these files are partially readable, we can often guess the initial timestamp based on the beginning of the file (e.g., theYYYY-MM-part of the log).
By identifying plaintexts in these files, the next step is to narrow down the timestamp for accurate brute-forcing.
Encryption timestamp
Now that we know brute-forcing is feasible and we have both plaintext and ciphertext, the next step is to determine when the encryption occurred for each file (since each file will have different keys).
ESXI log
The command used to run the malware is recorded in the shell.log file (including the setting for n, which defines how much of the file should be encrypted).
Some ESXi hosts provide millisecond resolution in their logs, while others only offer second-level precision. This log gives us the initial timestamp for when the malware started.
For example, if the log shows that the malware started at 10:00:01.500, we can safely ignore the first 500 million nanoseconds when brute-forcing, which helps narrow down the search range.
Filesystem timestamp and modification time
Unfortunately, ESXi file systems do not support nanosecond precision.
Another challenge is that the file modification time is recorded only when the file is closed. This means the recorded timestamp might not exactly reflect the moment when the encryption process started but rather when it ended.
For small files, encryption typically takes only a few milliseconds, so the timestamp will most likely reflect the exact second when the file was encrypted. The next step is to determine the encryption time for larger files, where the process takes longer and the timestamps may be less precise.

Multithreaded Encryption
The malware uses multithreading, where each file is processed in a new thread, with a pool of workers limited by the number of CPU cores. This has both advantages and disadvantages.
If the malware targets a single directory and the number of files is less than the number of CPU cores, the process is straightforward—each file will have a timestamp that is very close to the others. On an ESXi machine, it’s common to have CPUs with a large number of cores (in this case, the server has 64 cores).
When checking for timestamps using:
find /vmfs/volumes -exec stat {} \;
we should be able to identify small files that were encrypted first. During brute-forcing, we can then check multiple files simultaneously for that specific moment in time.
Files processed first will have similar timestamps, but things become more complex for files processed later. For larger files, encryption can take seconds to minutes, and the modification time will reflect when the file was closed, which is significantly later than when the encryption key was actually generated.
The malware uses boost::filesystem for traversing directories and files. The iterator in boost::filesystem follows the order returned by readdir, which is the same order observed when using commands like ls -f or find ..
Let’s consider an example where we have 4 CPU cores and 8 files. If the files are tiny (less than 1 KB, such as VMDK descriptor files), their processing is almost instantaneous (within milliseconds). Here’s how the processing might look:
- Threads A, B, and C each find and process small files (
file_a,file_b,file_c), while Thread D finds a large file (file_d). All four files are processed immediately. - Once Threads A, B, and C complete, they begin processing the next set of files (
file_e,file_f,file_g). However, these files are larger and require more processing time. - While the other three threads are still working, Thread D finishes processing the large
file_dand starts working on the final file (file_h). As a result, the starting timestamp offile_hwill align with the completion time offile_d.
Now, imagine having hundreds of files—it becomes difficult to determine the exact processing order. However, one consistent observation is that the encryption start time for a file is likely to be the same or very close to the modification time of another file.
This is because, once a thread finishes processing and closes a file (thereby recording its modification time), it will immediately start processing the next available file. This creates a sequence where the encryption start time of one file is closely linked to the modification time of the previous file.

So given few hundred files and plenty of CPU cores, we may only have a list of a few seconds where the malware will start to generate the random keys.
So now we have the final part of the puzzle: we know when the encryption was performed.
Network Filesystem
While reviewing the client’s logs, I noticed some entries mentioning the use of NFS. However, after clarification, it was confirmed that NFS was used only for backups and was not affected. All relevant files were stored on local disks on the server.
If a network filesystem had been used, it would have complicated the process. If the network time between systems wasn’t perfectly synchronized, the timestamps might have been inaccurate or unreliable, further complicating the brute-force process.
Creating the bruteforcer
The plan seemed solid, so the next step was to implement the code. I needed to confirm whether the encryption process worked exactly like the malware.
To test this, I patched the malware code to make the gettime function return a constant value of 0, ensuring predictable and consistent results during testing.
KCipher2
I focused on KCipher2 because not all files use the Chacha8 key, particularly small files. Although KCipher2 is a standard encryption algorithm, it’s not widely known, and I couldn’t find an optimized implementation for it.
During experimentation, I noticed that my results didn’t match the standard KCipher2 implementations available online. It turned out that the malware included a slight modification in the initialization vector and the encryption process, specifically involving endian swapping.
CUDA
I’m not an expert in CUDA programming. About 10 years ago, I briefly experimented with it but couldn’t find a practical use case for the company I worked for at the time.
To accelerate development, I asked ChatGPT (o1) to port the code to CUDA. The code compiled successfully but produced incorrect results. It turned out that ChatGPT had slightly modified the numbers in the constant tables. After manually correcting these values, the code began to work.
Although the implementation ran, I suspected it was suboptimal, but I wasn’t able to get further optimization suggestions from ChatGPT (o1). At that point, I had two options: spend more time optimizing the code or proceed with the predicted offset range and refine the code along the way. I chose to start testing immediately and optimize as needed. Unfortunately, this approach turned out to be a waste of money, as it didn’t yield any successful results.
At the start of the project, I only had two RTX 3060 GPUs. One was dedicated to my Windows machine, so I could only use one GPU on my Mini PC (connected externally via Oculink). To improve performance, I decided to purchase an RTX 3090. The price in Thailand was still reasonable compared to the 4090 or higher models.
I tested the implementation by reading the key and IV from memory, encrypting zero blocks, and writing the results back to memory. The performance was disappointing, achieving only around 60 million encryptions per second. At this rate, the entire process would take about 10 years, clearly too slow for practical recovery.
Manual Optimization
I performed some manual optimizations by removing unnecessary code to improve performance:
- Only the first block is needed for brute force, so there was no need to handle additional blocks.
- The code was simplified to only encrypt blocks of zeroes, reducing unnecessary processing.
- Since only the first 8 bytes of the result were required, the rest of the output was ignored to minimize computation.
Shared Memory
After researching CUDA optimizations for AES, I discovered that using shared memory significantly improves performance, contrary to what ChatGPT suggested. Surprisingly, the extra steps involved in copying constant memory data to shared memory were negligible in terms of overhead but resulted in the code running several times faster.
Avoiding Memory Writes
Initially, I performed encryption on the GPU and matching on the host (CPU). However, this approach was slow, even when executed in parallel:
- generate encryption on GPU
- copy result to CPU
- Perform matching in a new thread and submit the next batch of work to the GPU.
I found it much faster to avoid writing to memory altogether. Instead, the matching process is handled directly on the GPU, and no data is written to memory unless a match is found. This approach significantly reduced processing time and improved efficiency.
Multiple files matching
For each t3 and t4 combination, a match can occur for any file that shares the same second-level timestamp (but with different nanoseconds).
To improve efficiency, we can attempt to match multiple files simultaneously. However, if there are too many files to match, the process can slow down significantly. Currently, the number of files processed in parallel is hardcoded to 32 to maintain a balance between performance and efficiency.
The Loop
I considered and implemented two ways to do the loop. For every t3 value, we could start a GPU kernel to check all offset ranges. However, this method is inefficient, as it would require launching the kernel a billion times, resulting in significant overhead..

Alternatively, we can launch a GPU kernel for each offset. Each kernel would then perform the necessary checks. This approach is much faster because it reduces the number of submissions to just the “offset range”, which is around 2 to 4.5 million jobs.

Batch Checking
Initially, my approach was to submit a task to the GPU, wait for the result using cudaDeviceSynchronize(), and then submit the next batch of work. However, this method proved to be slow.
- Submit work to the GPU, and if a match is found, simply mark it using a found flag.
- Only call
cudaDeviceSynchronize()to check results every 100 steps. If a match is found, the flag is reset to zero before proceeding.
While this method significantly improved performance, there’s a slight possibility that if two offsets are very close (less than 100 steps apart), the code might miss one of them. Although this issue never occurred during my tests, I added an optional mode of loop. In this mode, the program reads a list of offsets and ensures that nearby offsets are also checked manually to avoid missing any potential matches.
Final Speed
I believe that GPU experts could still find ways to further optimize my code. Currently, I’m achieving around 1.5 billion encryptions per second for KCipher2 on my RTX 3090.
- For testing 1 billion values with a single offset, it takes about 0.7 seconds, including the time to check for matches (with a maximum of 32 matches per batch).
- Testing 2 million offsets would require approximately 16 days on a single GPU, or just 1 day using 16 GPUs.
I also conducted tests using Runpod, and the RTX 4090 turned out to be the ideal option. Although it’s about 60% more expensive than the 3090, it’s also 2.3 times faster.
- With a 4090, the same process would take around 7 days on a single GPU.
- Using 16 GPUs, the process could be completed in just over 10 hours.
Running the brute force
From a cost perspective, the RTX 4090 is an excellent choice for this task due to several factors:
- Large memory is not required.
- Floating-point operations are not needed.
- The RTX 4090 offers a high number of CUDA cores, enhancing processing speed.
- The rental price for an RTX 4090 is relatively low compared to other high-end GPUs.
If the 4090 is unavailable, the 3090 is also a good alternative considering its price-to-performance ratio.
Initially, my client considered using Google Cloud Platform (GCP) machines and seeking a discount for a month-long rental. However, this option proved to be extremely expensive (costing tens of thousands of USD).
After some research, I found more cost-effective alternatives: Runpod and Vast.ai.
Runpod
To brute force 1 second (1 billion nanosecond), with offset range of 2 million, it will take 7 days. The cost for a RTX 4090 (at the time of this writing) is 0.69 USD/hour. It will cost around 116 USD to brute force a single second. Renting 16 GPUs will have the work finished in around 10 hours, same cost, but faster.
Brute forcing with the range of 4.5 million (which is the range that we need) costs 261 USD. Depending on the number of encrypted files, you might need to brute force 10 or more seconds. If you have a lot of files to recover, weekly or monthly rent will be cheaper.
Note: These costs assume everything is executed perfectly. Any mistakes or the need to repeat processes can significantly increase costs.
In total, including all my experiments and tests, I spent around $1,200.
Vast.ai
Unlike runpod, when using vast.ai, you are renting a machine from some random person brokered by vast.ai. When doing the bruteforce, no sensitive data is sent, so privacy should not be a concern.
Using vast AI, the bruteforce cost can be reduced to half, but this depends on your luck in obtaining the machine. The first few machines that I tested didn’t work (network timeout after around 10 minutes of waiting). I also had problem with pulling docker images from docker.io (I had to select another template from another docker repository).
The rest of the work
Now that I found the value of t3 and t4, I can try to find the value for t1 and t2. The value of t1 must be less than t3, and the time offset is less than 10 million nanoseconds. This can be found quickly in minutes using a single GPU.
Block split algorithm
Here is the algorithm used to split the file into parts:
- enc_block_size: for every parts/blocks, this is how many bytes to encrypt. The first 0xFFFFF will be encrypted using KCipher2, and the rest using Chacha8
- part_size: the size of the block
- encrypted_parts: how many blocks to encrypt
void compute_blocks(uint64_t filesize,
    uint8_t percent,
    uint64_t *enc_block_size,
    uint64_t *part_size,
    uint64_t *encrypted_parts)
{
    int parts = 3;
    if ( percent > 49u )
        parts = 5;
    uint64_t enc_size = filesize * (uint64_t)percent / 100;
    *enc_block_size = enc_size / parts;
    *encrypted_parts = parts - 1;
    *part_size = (filesize - *enc_block_size * (*encrypted_parts)) / parts;
}
Encryption Detail
The malware uses the 8 rounds variant of Chacha called chacha8, not Chacha20 as many sites reported.
- For kcipher2, we will encrypt the first 65535 bytes (yes, not 65536). It means that one byte will remain from the first block, and this needs to be used for the next block
- For cacha20, we just throw away the rest of the encryption stream block when starting a new block
Recovery Steps
To recover your files without paying, it is not as straightforward as running a generic decryptor. You will need to:
- obtain timestamps of your files
- obtain ciphertext and plaintext for your files
- rent GPUs
Note about the code
To be honest, I originally wrote this code for one-time use, specifically for this particular client. The shared code is filled with experimental logic, quick hacks, and lacks proper testing.
I don’t have the motivation to clean it up further, apart from removing some client-specific test cases and comments. It’s functional for the intended purpose.

The software I provided includes only the main brute-force and decryption components, intended to be used once you have the necessary timestamps.
I don’t have a dedicated system to manage multiple GPUs. Instead, I rely on basic shell scripting and a custom script that sends a Telegram message when a match is found. The code is “good enough for me” and simply “works for me.”
In essence, you’ll need a capable system administrator who understands the process and knows how to manage and troubleshoot the system effectively.
Building the code
See README.md in the repository, it also has a sample config file to test that it works. Sample encrypted files and configuration files are also provided.
Obtain timestamps
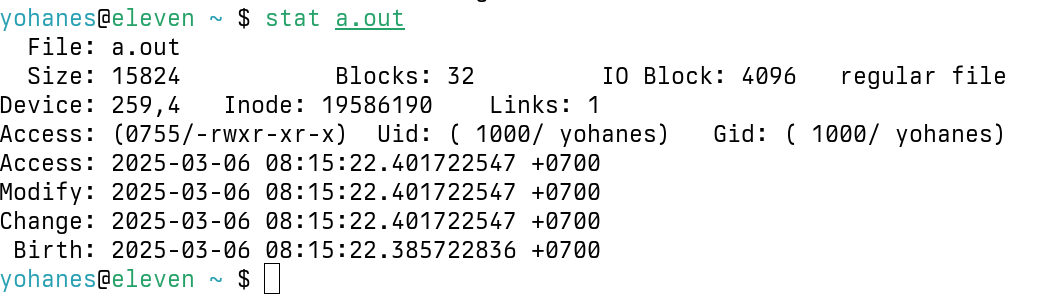
I hope you haven’t touched the files, because all hope of recovery will be gone if the timestamps are unknown. Use stat filename to get the modification timestamp. Use find /vmfs/volumes -exec stat {} \; > /tmp/stats.txt to get the timestamp of everything.
The file shell.log can help to figure out the minimum timestamp to use.
Obtain ciphertexts
Obtain the ciphertext, as explained above:
- For flat-vmdk, you need to extract this from the exact OS that you use (including the exact instalation method, e.g: using BIOS/UEFI)
- For sesparse file, use the header
0x00000000cafebabe - For other files, see what I wrote above
Measure server speed
You can always just use an offset range of 1.5-5 million, but this may not be the correct range if your hardware is too fast or too slow. You can measure this by checking out the timing-patch-1 folder and timing-patch-2 folder on my github repository.
The first one only measures time ranges by calling the function directly. The second one is used to encrypt a directory, but it is patched so that it will write down the exact time when the timestamp is used as the seed to /tmp/log.bin.
Divide the work
Create config files based on the ciphertext/plaintext and timestamp. You can create/split this manually, or use a script to generate it. My code doesn’t do any error checking, make sure the timestamp is in nanosecond format, make sure all plaintext and ciphertext values are correct.
Rent GPUs
If you want a very quick and easy setup, use runpod or other service. If you want to be cheap, use vast.ai, or run it on your own hardware (~ 1K USD for one RTX 3090, which you can resell later).
Run Kcipher2 bruteforce
The first brute force is to find t3 and t4 for Kcipher.
./anti-akira run config.json <gpuindex>
For example:
./akira-bruteforce run2 config.json
Append GPU index if you have multiple GPUs
./akira-bruteforce run2 config.json 1
I suggest running it inside tmux, so you will be fine in the event of network disconnect.
If we are lucky, output.txt will be generated for each t3/t4 found.
As explained above: this may take days (depending on GPU used), so please make sure:
- all the config files are good
- You are using the correct GPU index
- make sure everything is running
- check with nvidia-smi (with runpod, we can also view the GPU status using the web)
- make a notification system to alert you if output.txt is created/updated
Run chacha8 bruteforce
This is not necessary for small files, but it is neede for big files. For each offset found, generate a config with the t3 found in the previous step. On my target machine, the distance between t1 and t3 is less than 10 million, and the t1 to t2 is around 1.5 – 5 million. The brute force should only take around 10 minutes.
Decrypt the files
Note that the decryptor has the percentage hardcoded to 15 percent, so please change this before running the decryptor in case the attacker uses different value.
Once we have obtained the t1, t2, t3, and t4, run the decryptor:
./decrypt filename.vmdk <t1> <t2> <t3> <t4>
The decryption process is not optimized, so it will take a while to decrypt.
Conclusion
Probably 99.9% of the time when you get a ransomware, it won’t be recoverable without the key. But if you are lucky, sometimes it is possible to find a solution. It took me much longer than I anticipated to solve this, I thought that it would take a week, but it took me almost three weeks until we recover an entire set of VM files.
I also would like to add that I found a reddit thread about akira ransomware , I wasn’t sure that the ransomware strain that I have is the same as theirs, and that is the reason why I just continue my own research and to open source it. I hope that my experience and code will be useful for someone else.
Everytime I wrote something about ransomware (in my Indonesian blog), many people will ask for ransomware help. Many people can’t even find the ransomware executable (just the encrypted file, which is not useful). Just checking if the ransomware is recoverable or not may take several hours with a lot of efforts (e.g: if the malware is obfuscated/protected). So please don’t ask me to do that for free.
15 thoughts on “Decrypting Encrypted files from Akira Ransomware (Linux/ESXI variant 2024) using a bunch of GPUs”